Lorex Ping 2 App: Connecting and setup of LNC cameras
You can use the Lorex Ping 2 app to connect to and set up your LNC Series camera through a WiFi connection.
Prerequisites:
- Ensure that you have connected your smartphone or tablet to your WiFi network.
- Install the Lorex Ping 2 app available for Android on the Google Play Store or iOS (Apple) on the App Store.
- The instructions detailed below are demonstrated using the Lorex Ping 2 app for Android.
To connect to and set up your camera with the Lorex Ping 2 app:
-
Press the Plus icon (
 ) in the center of the screen.
 -
Tap Smart WiFi Setup.

-
Tap the Arrow icon (
 ) on the top-right of the screen to open the Enter WiFi password window.
 -
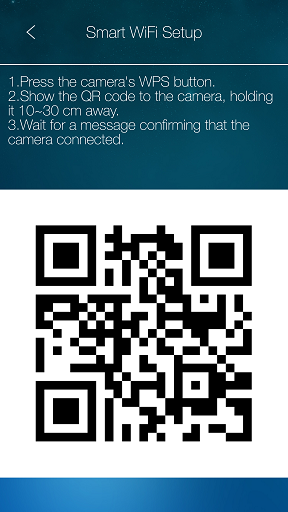
Enter the password for the WiFi network being used and tap OK. A QR code should appear on the screen with the WiFi network details.
-
Press the WPS button on the camera, the camera's LEDs should begin to flash.
-
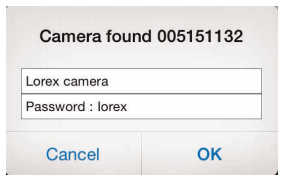
Place the smartphone or tablet being used 1ft (30 cm) away from the camera to scan the QR code. When the connection is successful the camera will beep and a Camera Found message will appear on your smartphone or tablet.

-
Enter a name of your choice for the camera and press OK.
-
Tap the camera name to connect.
REMINDER: If this is the first time connecting to the camera a prompt will appear to create a password.
Once connected to the camera the Lorex Ping 2 app should display your connected camera from the Camera List screen.