Back to list
LHV / LNR Series: Configuring recording settings
The LHV / LNR Series DVR / NVR systems have many different recording settings that can be configured. These include compression settings, resolution settings, frames per second (FPS) settings, as well as other settings.
To modify recording settings on LHV / LNR Series DVR / NVR systems:
- Right-click on the Live View to access the Quick Menu.
- Click Main Menu and then click the Camera icon (
 ).
). - Click Recording.
- Click the Recording tab.
- Configure the recording settings to your preferences.
- Click Apply to save your settings, and then click OK to exit.
Navigating the Recording window:
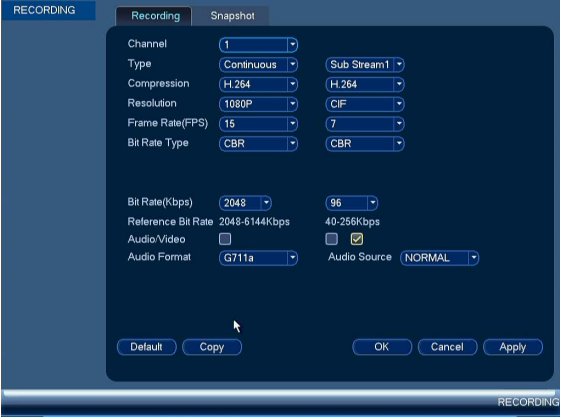
TIP: The left column configures mainstream settings, the right column configures substream settings.
- Channel: Select channel number to configure.
- Type: Select the recording type from Continuous, Motion Detect, and Alarm recording.
- Compression: Select the type of video compression.
- Resolution: Select the resolution the camera will record.
- Frame Rate (FPS): Select the frame rate in Frames Per Second (FPS) that each stream will record in.
- Bit Rate Type: Select Constant Bitrate (CBR) or Variable Bitrate (VBR) to determine the bit rate type. If using VBR, select the Quality from one (lowest) to six (highest).
- Audio/Video: Select to enable audio recording for mainstream, and audio / video recording for substream.
- Audio Format: Select the format that will be used to record audio (G711a recommended).
- Bit Rate (Kbps): Select the bit rate for each recording stream.
REMINDER: Using a higher resolution, a higher frame rate, or a higher bit rate requires more hard drive space and bandwidth.