LHA / LNK Series: Determining how long recordings will be stored
Multiple factors affect how long your video recordings will be saved on your LHA / LNK Series DVR / NVR before the storage space is full, or your recordings are deleted / overwritten by new recordings. Most security recorders are programmed to constantly overwrite the oldest footage to free up storage space for the newer live footage.
Each DVR / NVR has a specific storage capacity. Many DVR / NVR systems have additional hard disk drive (HDD) compatibility to expand the storage capacity. Check your product specifications sheet and user manual to determine if an additional HDD bay is available, and the maximum storage capabilities of your system before attempting to install an additional HDD.
The following instructions require you to access your system using your DVR / NVR and a monitor.
To find out how much space your DVR / NVR system has:
-
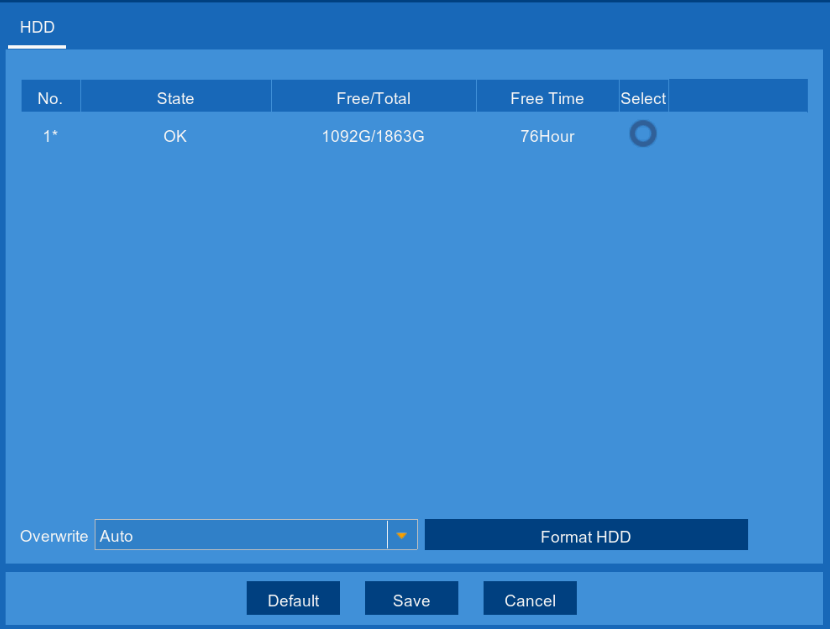
In the taskbar, click the Main Menu icon (
 ), and then click Device > HDD > HDD.
 -
In the HDD tab, the HDD capacity will be displayed in the Free/Total column.
Recording Settings
Recording settings have a direct effect on the storage space usage. You can configure the recording settings on your DVR / NVR to maximize storage space by modifying the following:
-
Recording Resolution
Lower resolution video recordings require less storage space, and enables you to store more recording time. You can adjust the mainstream and substream recording resolution. -
Recording Schedule
The default setting for many DVR / NVR systems is to record all connected cameras in a Continuous recording schedule. This means that all of your cameras will record at all times, even when there is no activity to record. To maximize storage space, change your recording schedule to -
Motion. By changing your recording schedule to motion detection, the system will record only when there is movement detected. You can also configure your recording schedule so that certain times of the day are recorded in continuous mode and other times in motion detection. Set up recording instructions here.
-
Audio
Some cameras have audio capability. Recording audio in addition to video will increase the size of recordings. If audio is not required, disable the audio recording for smaller file sizes. You can disable the audio when configuring your mainstream and substream settings. -
Frames Per Second
Lower frames per second (FPS) rates decrease playback smoothness, but result in smaller file sizes. You can set the FPS when configuring your mainstream and substream settings. -
Enable Hard Drive Overwrite
When the HDD is full, it records over the oldest recorded video to allow space for the new footage to be stored. If you do not enable HDD Overwrite., you will need to manually delete files from the SD card or HDD, or insert a new card into the receiver when the HDD is full. -
Recording Calculators
Input the recording resolution, total number of cameras, number of days to record, and the FPS into the recording calculator to estimate how much storage space you require. If additional space is required, consider installing an additional HDD if supported by your DVR / NVR.
Refer to your user manual for product specific details on how to configure and use each of these recording settings. Click here for downloads and documentation for your product.