Lorex netHD / netHD Stratus Client Software: Downloading recorded video on a PC
You can use the Lorex netHD / netHD Stratus Client software to download recorded video files. You can do so by:
- Downloading entire packaged video files from the NVR.
- Downloading video based on a specified start and end time.
- Downloading tagged segments of video.
To download recorded video files, you must first access the Remote Playback menu.
The following instructions require you to access your system using the Lorex netHD / netHD Stratus Client software and a PC.
To access Remote Playback:
-
Launch Lorex netHD / netHD Stratus Client software on your PC.
-
From Control Panel, click the Remote Playback icon (
 ).
). -
Click the Arrow icon (
 ) next to the NVR folder or camera group folder you would like to playback from.
 -
Check the checkboxes next to the cameras you would like to playback.
TIP: Check the Synchronous Playback checkbox to playback video from multiple channels at the same time.
-
Select the day you would like to playback from in the calendar. Days with recorded video are indicated by a red corner on the date.
-
Click Search to show recorded video on your NVR.
-
Double-click in the time bar to start playback at the selected time.
Once you have accessed remote playback, you can download recorded video files.
To download recorded video files:
-
In Remote Playback, place the cursor over the Live View of the channel to display the Camera Toolbar.
-
Click the Download icon (
 ) to open the download menu.
 -
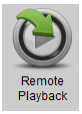
Click the Download By Files tab.
-
Check the checkboxes next to files you would like to download and click Download.
You can also download files based on a specific start time and end time.
To download files based on start and end time:
-
In Remote Playback, place the cursor over the Live View of the channel to display the Camera Toolbar.
-
Click the Download icon (
) to open the download menu. -
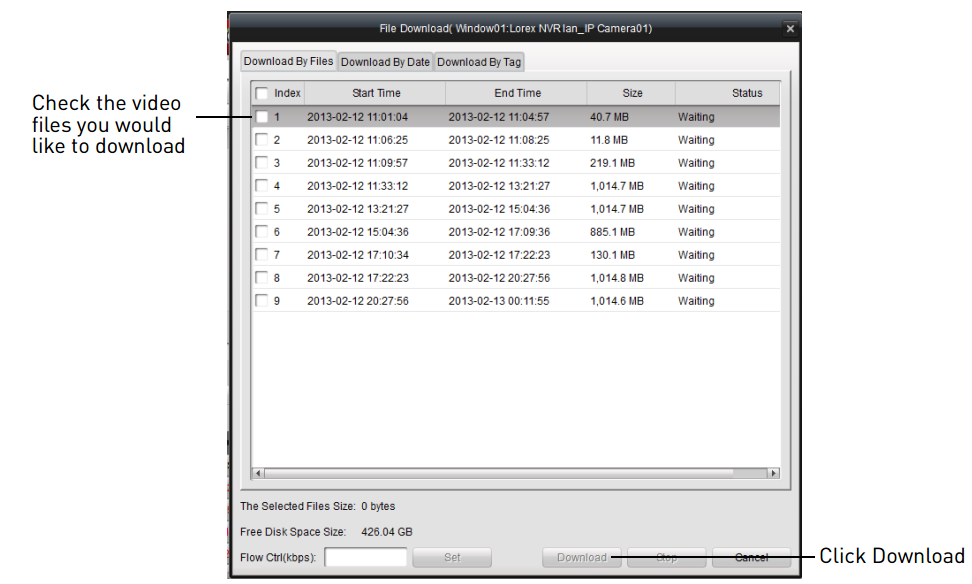
Click the Download By Date tab.
-
Check the Duration checkboxes to select up to 4 time periods to download:
- In the Start Time drop-down, select a start time.
- In the End Time drop-down, select an end time.
-
Click Download to download the video files.
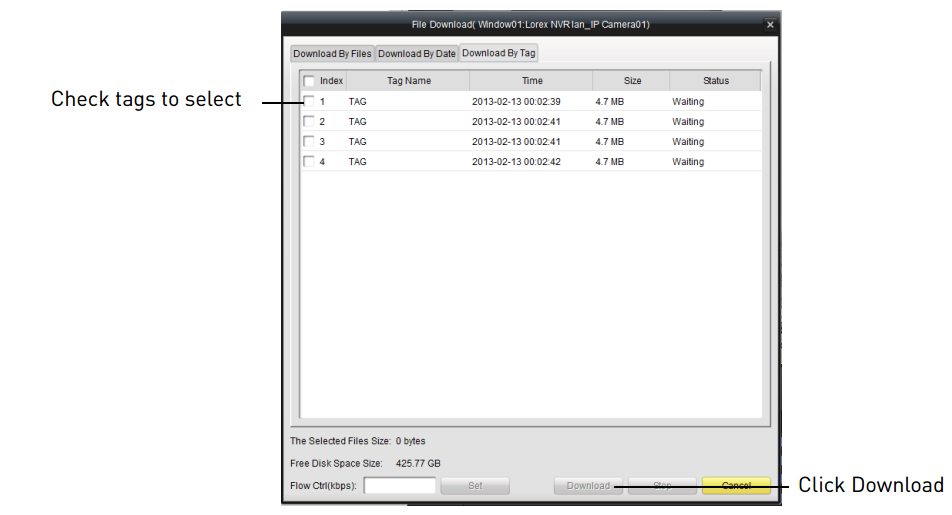
You can also download files based on tags. Click here to learn more about setting tags.
To download files using tags:
-
In Remote Playback, place the cursor over the Live View of the channel to display the Camera Toolbar.
-
Click the Download icon (
) to open the download menu. -
Click the Download By Tag tab.
-
Check the checkbox next to tags to download a 1 minute video clip from the tagged time.
-
Click Download to download the video files.