Back to list
Lorex netHD / netHD Stratus Client Software: Adding your NVR using IP address
Your NVR can be manually added to the Lorex netHD / netHD Stratus Client software by entering the IP address.
Prerequisites:
- Download and install the Lorex netHD / netHD Stratus Client software. Click here for more information on locating software downloads.
- Ensure you have the IP address of your LNR200 / LNR300 Series NVR system. Click here for details on how to access system information on the LNR200 / LNR300 Series.
- The instructions below are shown using a Windows 10 operating system.
The following instructions require you to access your system using the Lorex netHD / netHD Stratus Client software and a PC / Mac.
To manually add the NVR using an IP address:
-
Launch Lorex netHD / netHD Stratus Client software on your computer.
-
Click the Control Panel tab, and then click Device Management.
-
Click Add on the top-left corner to open the Add Device window.
-
In the Add Device window, enter the following:
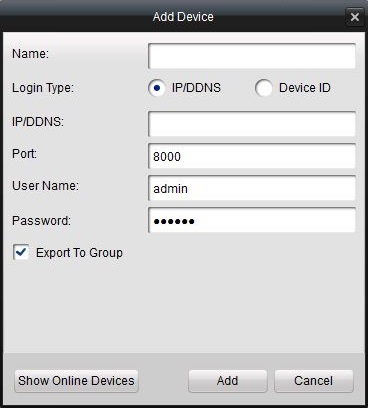
- Name: Enter a name for you NVR.
- Login Type: Select IP/DDNS.
- IP/DDNS: Enter the IP Address of the NVR.
- Client Port: Enter the Client Port value (default: 8000).
- User Name: Enter the NVR User Name. Refer to your user manual for your default username.
- Password: Enter the NVR Password. Refer to your user manual for your default password. If this is the first time connecting to your system, you will be prompted to change the password. Enter a custom 6 character password, and then click Yes.
- Export To Group: Click checkbox to create a group of the NVR and connected cameras.
-
Click Add to connect your NVR. The connection may take a few minutes.