FLIR Client 12 Software: Setting a recording schedule
You can set your DVR / NVR system to a custom recording schedule according to your needs using the FLIR Client 12 software for PC / Mac. For example, you can set the system to record continuously during business hours and record on motion detection only outside of business hours. A custom recording schedule helps reduce the amount of hard disk drive (HDD) space required, increasing the time your system can retain recordings.
Prerequisites:
- Ensure that you have downloaded and installed the FLIR Client 12 software on your PC / Mac. Click here for more information on locating software downloads.
- Ensure that you have logged in and added your DVR / NVR system to the FLIR Client 12 software. Click here for information on how to log in to the FLIR Client 12 software.
To set a recording schedule:
-
Launch the FLIR Client 12 software for PC / Mac.
-
Click Remote Setting in the top-right corner of the window.
-
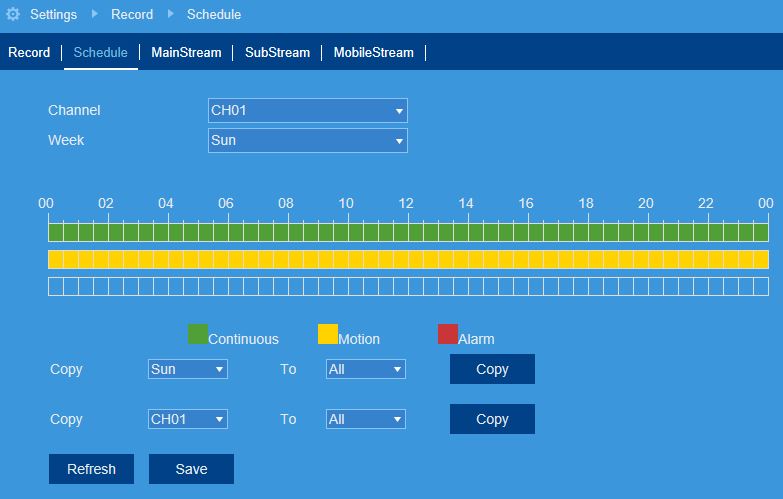
Under Settings, click Record, then click on the Schedule tab.
-
In the Channel drop-down menu, select a channel to set the recording schedule for.
-
In the Week drop-down menu, select the day of the week you would like to set the schedule for.
-
The times of day during which continuous recording is enabled are represented by green bars, and motion by yellow. By default, the system is set the record at all times. Click-and-drag to enable or disable continuous or motion recording during a certain time of day.
TIP: Repeat steps 5 and 6 for as many days of the week that you would like to configure the schedule for.
-
If needed, use the Copy functions to copy the schedule for one day to other days of the week, or to copy one channel’s entire schedule to other channels.
-
Click Save.
Setting up a recording schedule for the LHA / LNK Series DVR / NVR system