LNWDB1 - How to install the Lorex Doorbell
The LNWDB1 Series Doorbell is wired. This guide will show you how to safely remove your old wired doorbell and install your new Lorex doorbell using the existing wiring.
To make sure your doorbell receives enough power, we will ask you to install a chime kit in your indoor chime box.
Summary
This installation guide will cover the followings steps. We highly recommend that you follow the sequence of topics as presented below:
- First, we invite you to explore the product - its overview, dimensions, contents and the tools you may need in the installation.
- For your safety, make sure to turn off your circuit breaker first, then start by installing the chime kit.
- Now, head outside and remove your existing doorbell, then install the mounting bracket.
- Next, wire the doorbell using the old cables and turn the circuit breaker back on to power up your doorbell.
- Finally, connect the doorbell to the Lorex App and secure the doorbell to its mount.
Please follow these instructions carefully to prevent injury.
Part 1 - Overview + Dimensions + Contents + Tools + Download
Before installation, please familiarize yourself with the product (see Overview), its dimensions (see Dimensions), and all the included accessories (see Contents).
You may also need some other tools and materials to facilitate the installation.
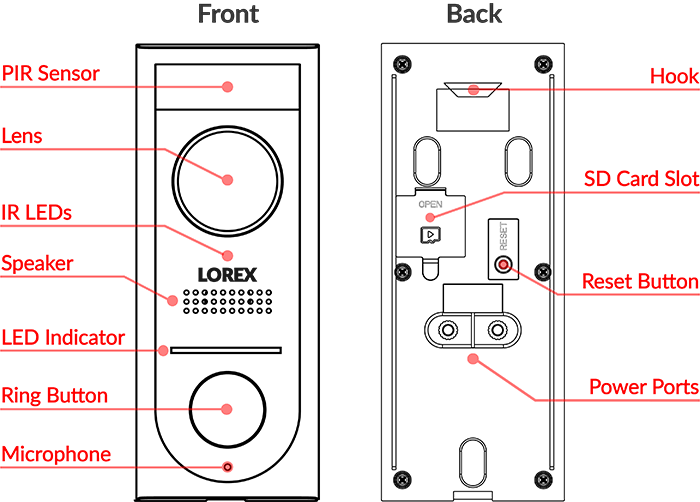
Product Overview
Here is a detailed overview of the doorbell's front and back panels with highlighted features that you should know about.
Product Dimensions
The doorbell measures just over four inches tall, almost two inches wide, and one inch thick.

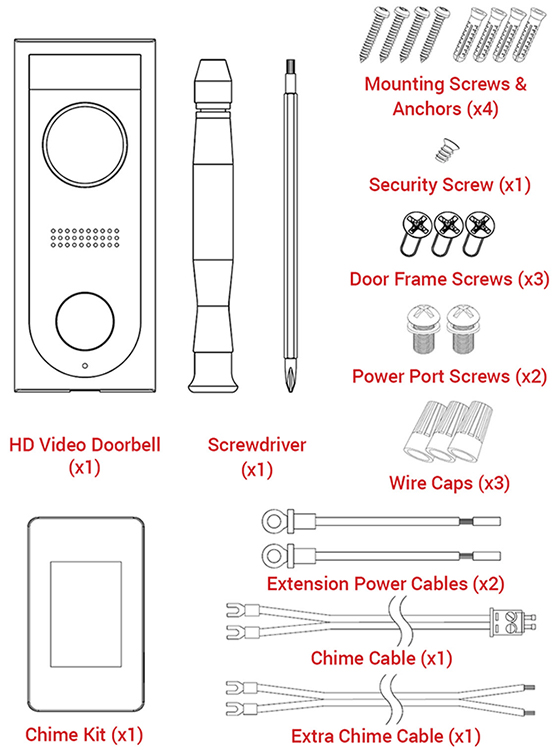
Package Contents
The package comes with one doorbell with a mounting bracket, a chime kit, accessories, and a basic tool.
Tools + Materials
Depending on your particular situation, you may need more tools and materials.
- Voltage Tester
- Wire Cutter
- Wire Stripper
- Needle Nose Plier
- Level
- Electrical Tape
- Masking Tape
- Pencil/marker
- Hammer
- Paper
- Ladder
- Clean cloth
Lorex App + Device ID
If you do not have an account on the Lorex App app, download the app now from the Apple Store or Google Play, and create an account. Make sure you are signed in to your account during this installation process.
Now, grab your new Lorex doorbell and write down the Device ID that is printed on a sticker at the back of the device, just below the QR code. Set the paper aside as you may need it shortly.
Part 2 - Turn off circuit breaker + Install the chime kit
Turn off the circuit breaker.
For your safety, it is critical to cut off power to your existing doorbell before you start removing any wire. Find your circuit breaker box and turn off the appropriate power supply. If you are not sure what switch to turn off, consult a licensed electrician.
Install the chime kit.
Once you have turned off the power supply to the doorbell, you can now install the chime kit.
The chime kit is a small device that must be installed inside the internal doorbell chime. It provides additional power to your doorbell for the best performance and reliability.
Next, locate your internal doorbell chime. You should see it exposed prominently in your living room, hallway, or near the front door.
For this procedure, you will need the following items.
- Access to your internal doorbell chime
- Chime kit*
- Chime cables with terminal*
- Philips screwdriver*
- Ladder (optional)
*Provided
Here’s how to install the chime kit.
(1) Grab the chime cables and insert the terminal to the chime kit's slot. The image below shows the chime kit already paired with the cable.

(2) Using the ladder, remove the doorbell chime cover by simply pulling it out to expose the mechanical components of the chime.
(3) Examine the chime and look for the two terminals labeled TRANS and FRONT, then loosen their respective screws using a Philips screwdriver. Do not remove the screws or any attached wire.
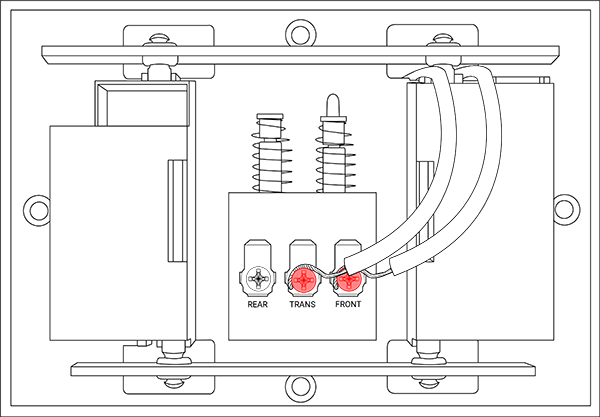
(4) Now, get the chime kit (as pictured in #1) and attach the two ends of the cables to any of the TRANS and FRONT terminals. Tighten the screws back again.
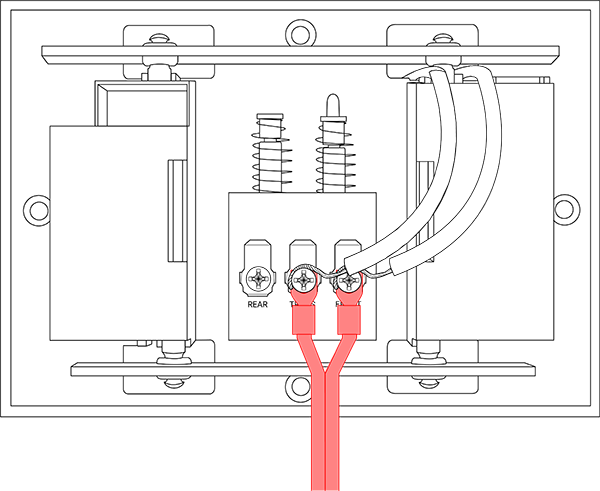
(5) Inside the chime, find a spot where you can hide the chime kit. Use the double-adhesive tape to stick the kit in place.
(6) Put the cover back on to your internal doorbell chime.
WARNING: Leave the power off as you move to the next step.
Part 3 - Remove your existing doorbell + Install the mounting bracket
Remove your existing doorbell.
Now, head outside to your front door and remove your old doorbell. Be sure to bring the new doorbell and its accessories, tools, and materials.
Put and arrange all items nicely on a flat surface for easy access.
For this procedure, you just need a Philips screwdriver.
Here’s how to remove your existing doorbell.
(1) Remove your old doorbell by unscrewing it using a Philips screwdriver.
(2) Using the same Philips screwdriver, disconnect the wires from the two power terminals and put the old doorbell away along with the screws.
(3) Bend the wires, so they do not fall through the hole in the wall.
WARNING: Leave the power off as you move to the next step.
Install the mounting bracket.
Next, install the metal mounting bracket. The bracket is responsible for securing the doorbell and holding it in place. Be sure to install the bracket properly.
For this procedure, you will need the following items.
- Metal mounting bracket*
- For masonry/stucco installation, you need the three (3) plastic anchors and the three (3) mounting screws*
- For wood/siding installation, you need the three (3) wood screws*
- Philips screwdriver*
- A 15/65 drill bit
- A 3/32 drill bit
- Pencil or marker (optional)
- Level (optional)
- Hammer (optional)
*Provided
Check the surface from which you will install the doorbell if it is masonry/stucco or wood/siding. For both installations, ensure the power cables from the wall fit comfortably through the hole in the mounting bracket (see image below).

Here is how to install the mounting bracket on masonry or stucco.
(1) Using a pencil and a level, mark where you will drill holes and use a 15/65" drill bit to punch through the surface.
(2) Next, insert the anchors nice and flat. Lightly tap anchors using a hammer to put them in place.
(3) Then, put and hold the mounting bracket and align each screw hole to its corresponding anchor.
(4) Finally, lock the mounting plate on the wall using the provided mounting screws.

Here is how to install the mounting bracket on wood or siding.
(1) Using a pencil and a level, mark where you will drill holes and use a 15/65" drill bit to punch through the surface.
(2) Then, put and hold the mounting bracket and align each screw hole to its corresponding drill hole.
(3) Now, lock the mounting plate on the wall using the provided wood screws.

WARNING: Leave the power off as you move to the next step.
Part 4 - Wire the doorbell + Turn on the circuit breaker
Wiring the doorbell and powering it on.
After securing the metal mounting bracket permanently onto the wall, proceed by wiring your new doorbell.
For this procedure, you will need the following items.
- Your new doorbell*
- Extension cables*
- Wire caps*
- Philips screwdriver*
- Wire Cutter/Stripper (optional)
- Electrical Tape (optional)
*Provided
Here’s how to wire your new doorbell.
Option 1 - If you have long enough cable to work on.
Before you proceed, make sure you have enough exposed wires to work on. If needed, use a wire cutter and a wire stripper to prep the ends of the wires.
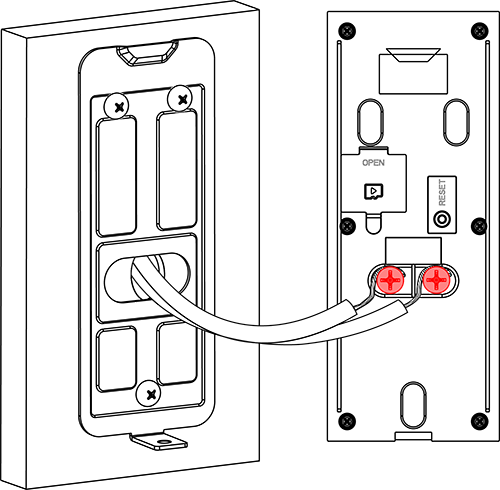
(1) Once you have finished prepping the ends of the wires, simply wrap their ends to the two power screws as shown below.

(2) Next, insert the two power screws to the doorbell's power ports and tighten them up.
Option 2 - If the existing cables are too short.
If the existing cables are too short, use the provided pair of extension cables to give you some extra wiring to work on.
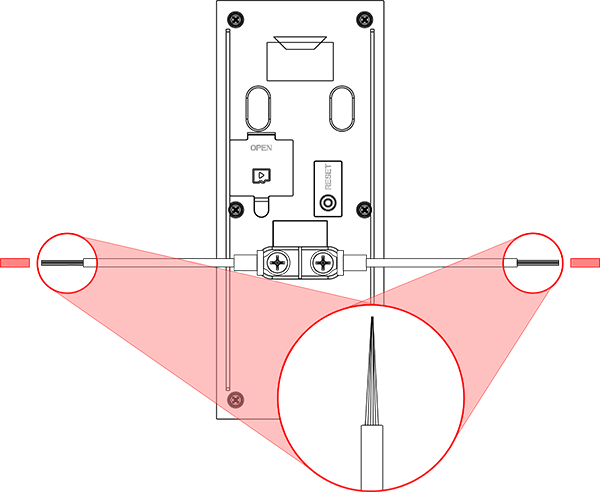
Before you proceed, make sure you have enough exposed wires to work on. If needed, use a wire cutter and a wire stripper to prep the ends of the wires.
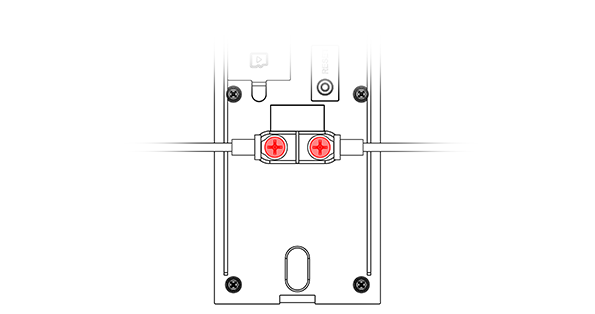
(1) Start by screwing both ends of the extension cables to the doorbell's power ports using the provided power screws.
(2) Next, remove the end caps on the extension cables by sliding them out.
(3) Then, connect both ends of the existing wires and the extension cables using the cable caps.
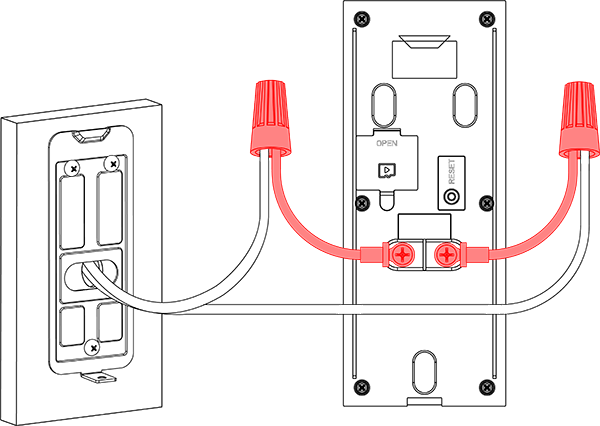
(4) Then, twist the cable cap to lock the two ends together.

IMPORTANT: Seal any exposed wiring with electrical tape.
Once you have wired your doorbell, leave it hanging on its wires and move to the next step.
Turn on the circuit breaker.
Turning the circuit breaker on at this stage of the installation is a necessary step because the doorbell must be powered on before you can connect it to the Lorex App.
Once the doorbell is powered on, leave it hanging on its wires. Do not mount it yet to the metal bracket because you still have to scan the QR code located at the back of the doorbell.
Part 5 - Connect the doorbell to the Lorex App + Mount the doorbell.
Connect the doorbell to the Lorex App.
Now that you have power going to the new doorbell, you can now connect it to the Lorex App app. Wait for the LED indicator to turn solid blue before moving to the next step.
For this procedure, you will need the following items.
- Your smartphone with the Lorex App on it
- Your Wi-Fi password
- Your Device ID written on a piece of paper
- A strong password for the doorbell
Here’s how to connect the doorbell to the Lorex App.
Make sure you are standing next to the doorbell while doing the next steps and have a good Wi-Fi coverage.
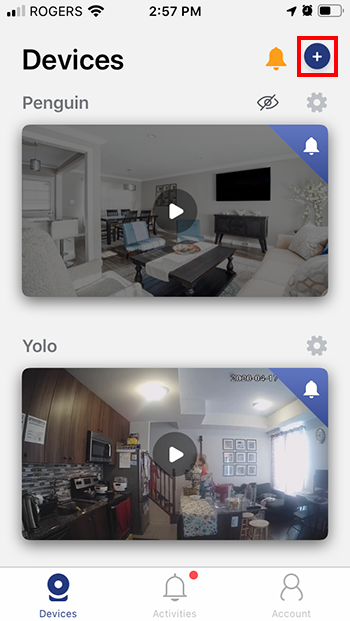
Step 1. Open the Lorex App app and tap the plus (+) sign.
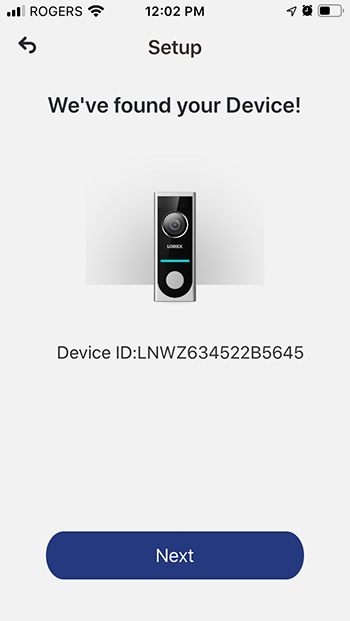
Step 2. Locate the QR code at the back of the doorbell and scan it, then tap Next.
If your camera is unable to scan the QR code, you may have to enter the Device ID manually. Retrieve the piece of paper containing the written Device ID and type it in.
Once the app identifies your device, tap Next.
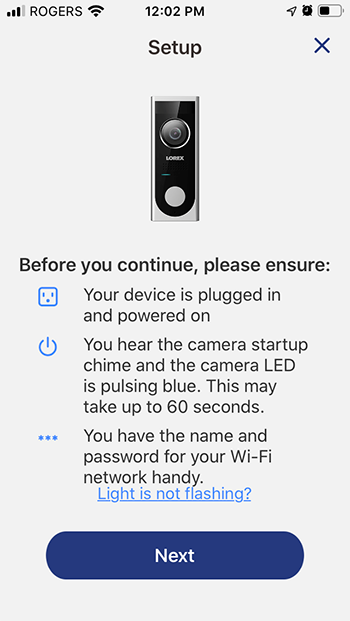
Step 3. Before you continue, please ensure the following:
- Your device is powered on.
- You hear the chime and the camera LED is pulsing blue.
- You have the name and password of your Wi-Fi network.
Tap Next to proceed.
Step 4. You will now be asked to join the device Hotspot.
Tap Join to proceed.

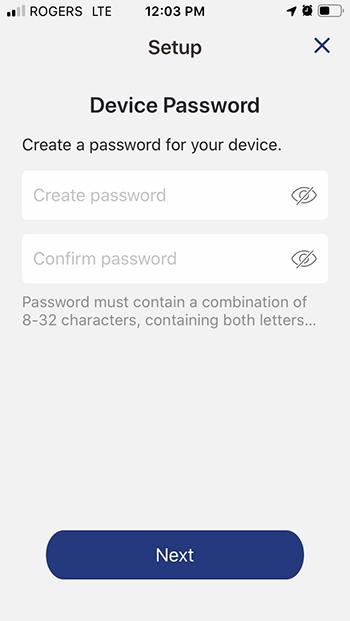
Step 5. Now create a strong password for your doorbell, then confirm.
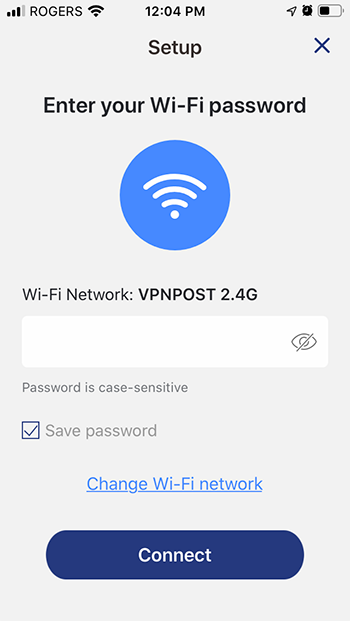
Step 6. Select your Wi-Fi Network.

Step 7. Enter the password of your Wi-Fi Network.
Step 8. Wait until the camera LED turns solid blue, then tap Next.
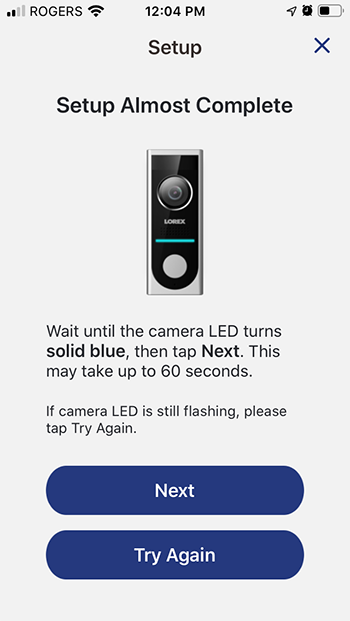
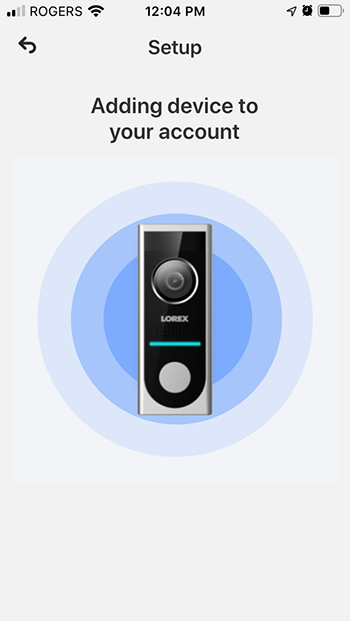
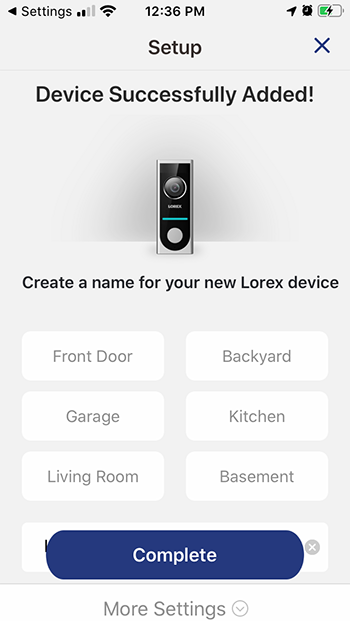
Wait for your device to get added to the Lorex App.
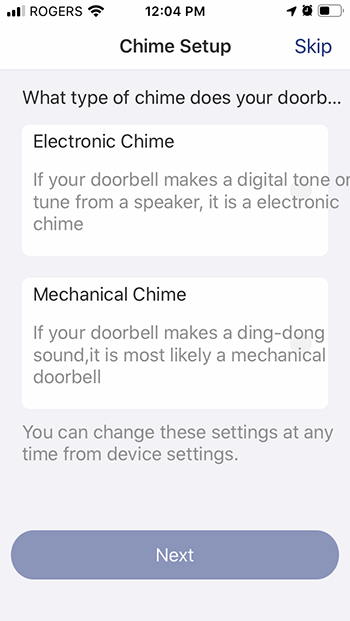
Step 9. Link your chime, then tap Next.
You can skip this portion and do the set up at a later date.
Your doorbell has been added to the Lorex App.
Now, test your new doorbell. Make sure you hear both local (indoor) and digital (mobile) chimes when you ring the doorbell. If it works perfectly, you can now secure the doorbell to its mounting bracket.
Mounting the doorbell on the bracket.
Securing the doorbell to the mounting bracket is the last and final step of the installation.
Here are the things you need.
- Torx (star-shaped screwdriver)*
- Security screw*
- A clean piece of cloth for wiping the doorbell
*Provided
Here’s how to mount the doorbell.
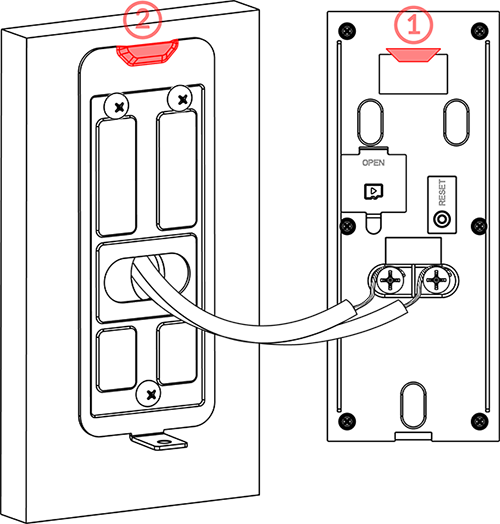
First, feed the excess wiring back to the hole in the wall.
At the back of the doorbell, there’s a built-in (1) hook. Now, insert that hook to the (2) metal bracket to put the doorbell in its place.
Then, lock the doorbell to its mounting bracket from the bottom using the provided security screw. Use the torx screwdriver.
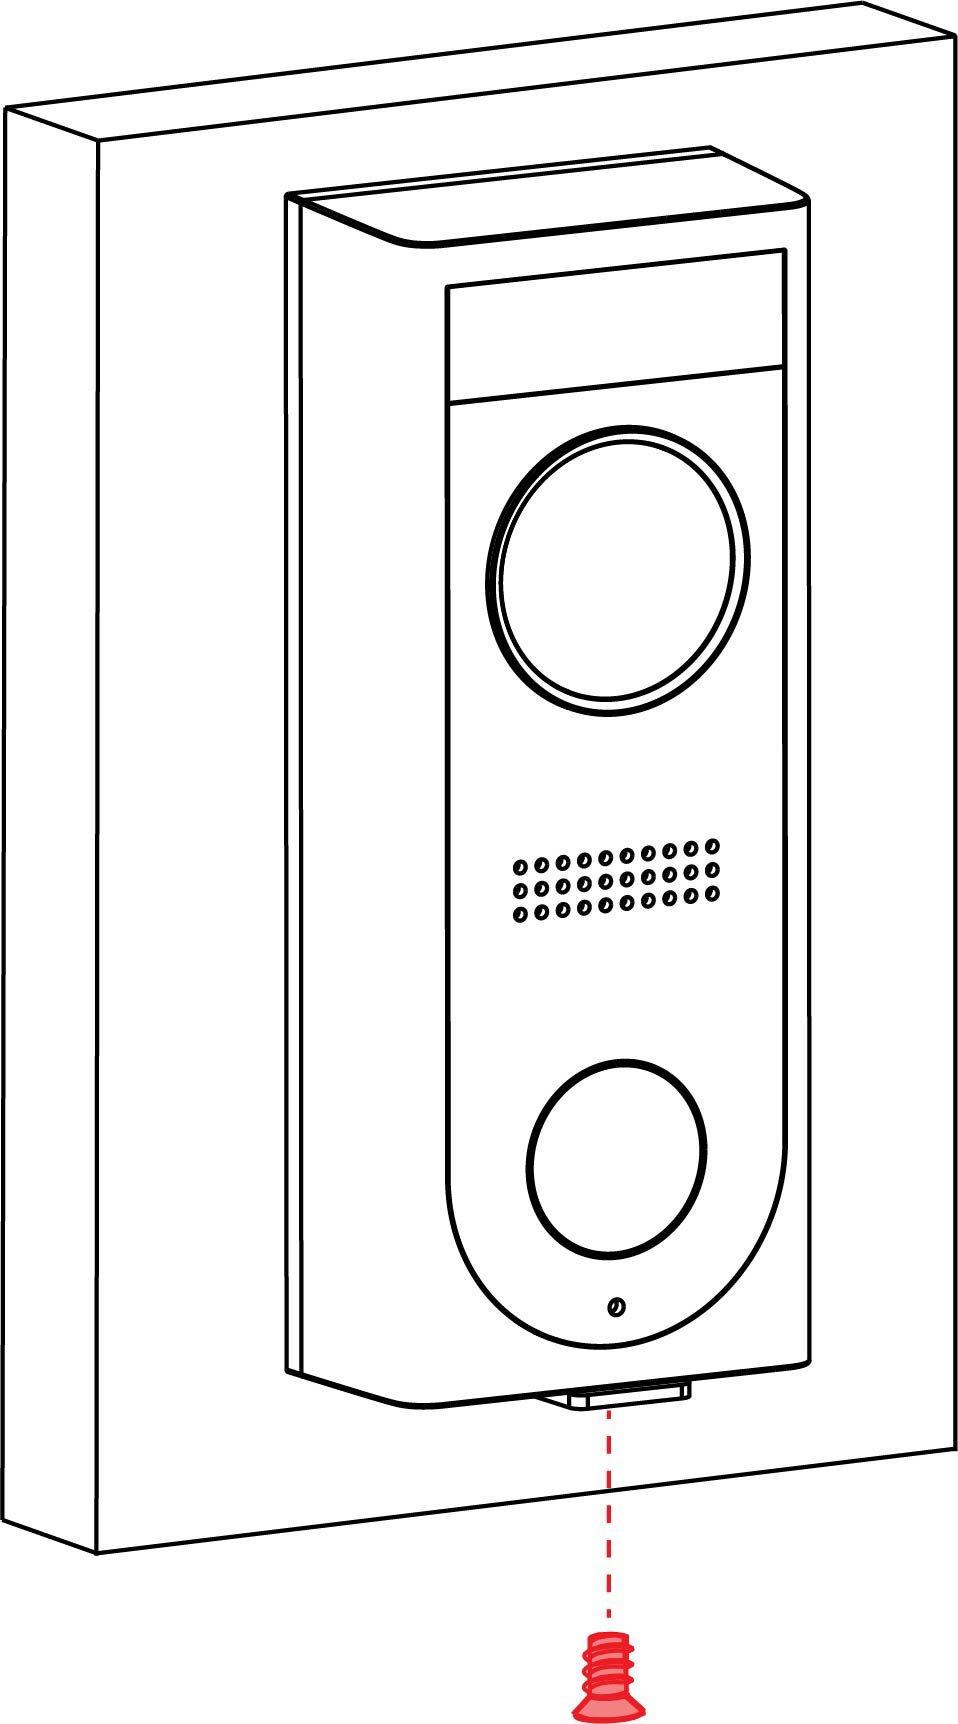
Wipe your new doorbell clean to remove any fingerprint on the lens.