V261LCD Series - 1080p Wired Floodlight Camera: Frequently Asked Questions (FAQs)
The following frequently asked questions (FAQs) answer many questions about the Lorex Wi-Fi Floodlight Camera (V261LCD Series).
How to install the floodlight camera?
You can install the floodlight camera using the existing wiring of your outdoor light. If you are installing the floodlight camera to an area where there is no existing wiring, we highly recommend that you consult with a licensed electrician.
For detailed instructions on installation, please check our installation article here.
How to connect the floodlight camera to the Lorex App?
You can access your floodlight remotely via the Lorex App. To access the floodlight camera remotely, you must connect the camera to the Lorex App.
For detailed instructions on how to connect the floodlight camera to the Lorex App, please check this article.
What are the specifications of the floodlight camera?
- Camera Resolution: 1080p
- Field of View: 137 degrees horizontal, 66 degrees vertical
- Power Supply: Hardwired (110-240V)
- Connectivity: 2.4 GHz Wireless 802.11 b/g/n
- Audio Specs: Two-way audio
- Operating Temperature: -22 ⁰F–122 ⁰F /-30 ⁰C–50 ⁰C
- White Light Brightness: 2x2000 Lumens
- White Light Color: 6500 K
- IR Night Vision: Up to 50ft
- Infrared Wavelength: 850 nm
- Storage Capacity: Up to 256 GB microSD
- Input Voltage: 100~240 VAC
- Max Power: 40W
- Mobile App: Lorex App
- Smart Home: Google Assistant / Amazon Alexa
Is the floodlight camera safe for outdoor installation?
Yes.
The floodlight camera is rated IP65 and safe for outdoor installation. It can withstand wet and dry conditions.
Do I have to purchase a separate storage or cloud storage for my recordings?
You don't need to purchase a separate storage or cloud storage for your recordings. The floodlight camera comes pre-installed with a 32 GB microSD card. You can upgrade the storage for up to 256 GB.
What is the native app of the floodlight camera?
The floodlight camera is compatible with the Lorex App app.
For detailed instructions on how to connect the floodlight camera to the Lorex App, please check this article.
What is the maximum storage capacity of the floodlight camera?
The floodlight camera can accommodate up to 256 GB.
How to download or transfer recordings from the floodlight to other devices?
There are two ways of backing up your recordings (1) through the Lorex App and (2) by manually removing the sd card from the device.
For detailed instructions on how to back up your recordings, please check this article.
What are the three recording modes?
Motion Activation
In the Motion Activation mode, the light will always turn on when a motion is detected.
NOTE: The light sensor prevents the floodlight from turning on if there is an influx of light (such as daylight).
The motion zones option allows you to manually adjust the PIR sensor zone. The camera's floodlight operates based off of PIR detection. Each zone represents a specific area in which the sensor is detecting motion. You can modify specific zones by tapping on a zone. Use the Range Slider to increase or decrease the amount of PIR range allowed for each specific zone.
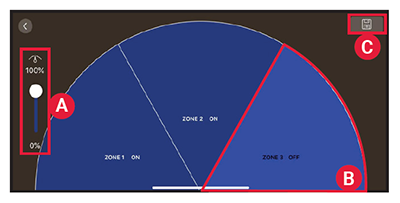
- A. Slide the bar on the left to adjust the distance at which motion will activate your floodlights.
- B. Tap the Zone(s) on or off to activate motion detection from three different areas.
- C. Tap Save.
Light on Duration
The default duration of the floodlight is 1 minutes. This means the floodlight will remain on once a motion is detected for 1 minutes. Use the light duration menu to set a different duration. You can choose from 1 minute, 5 minutes, 10 minutes, or 20 minutes. Click OK to set the light duration on your device.
Manual
Manual mode will allow the floodlight to only turn on manually by activating the floodlight using the Light button on the live view screen
Schedule Mode
Schedule mode will allow you to set a schedule that will allow the light to only be activated during the specific times of day set by the user.
How to configure motion detection?
To configure motion detection, follow these steps:
Step 1. Tap Device Settings.
Step 2. Tap Floodlight Settings.
Step 3. Mode is set to Motion Activation by default. Tap to change the floodlights from being activated by motion detection to Manual. Manually turn the floodlights on and off in the live screen view.
Step 4. Tap PIR Area.
- A. Slide the bar on the left to adjust the distance at which motion will activate your floodlights.
- B. Tap the Zone(s) on or off to activate motion detection from three different areas.
- C. Tap Save.
Step 5. Light Duration is set to 1 minute by default. Tap to change the floodlight’s length of time when activated from motion detection.
What are the compatible SD cards and their recording times?
The following is a complete of list of compatible SD cards and their recording times.
Compatible SD Cards
NOTE: The floodlight camera requires a Class 10 SD card.
SanDisk
- 16 GB
- 32 GB
- 64 GB
- 256 GB
Kingston
- 16 GB
- 32 GB
- 64 GB
- 256 GB
Toshiba
- 16 GB
- 32 GB
- 64 GB
- 256 GB
Samsung
- 16 GB
- 32 GB
- 64 GB
- 256 GB
Sony
- 16 GB
- 32 GB
- 64 GB
- 256 GB
Dahua
- 16 GB
- 32 GB
- 64 GB
- 256 GB
Recording Times
Below is a basic guide showing the estimated SD card recording length when recording directly to an SD card on Continuous Recording Schedule.
NOTE: The values listed below are only an approximation and are for reference purposes only. They are in no way guaranteed recording times.
16G
- Recording Time: 1 day, 9 hours
- Video Quality: 1080p
32G
- Recording Time: 2 days, 18 hours
- Video Quality: 1080p
64G
- Recording Time: 5 days, 13 hours
- Video Quality: 1080p
128G
- Recording Time: 11 days, 13 hours
- Video Quality: 1080p
256G
- Recording Time: 22 days, 4 hours
- Video Quality: 1080p
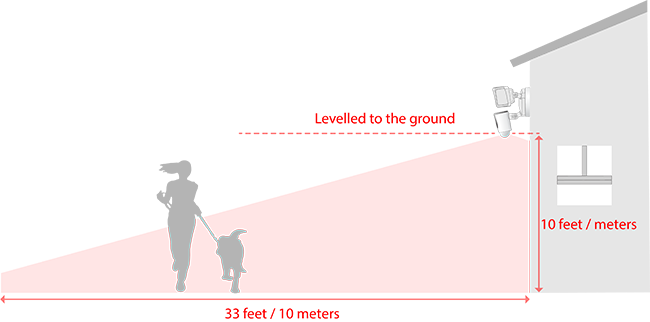
How high should I install my Floodlight camera?
Mount the floodlight camera 10 feet (3 meters) high with the motion detector leveled to the ground for optimal detection of human-sized objects as far as 33 feet (10 meters).
Can I replace the floodlight LEDs after it burns out?
The floodlight LEDs cannot be replaced. If the unit is under warranty, the entire floodlight will need to be replaced. If it is out of warranty, you will need to buy a new floodlight.
What does color temperature mean? What does the Kelvin value indicate?
The color temperature is a dimension to specify the relevant color impression of a light source. The color temperature unit is Kelvin (K). You can divide the color temperatures into different light colors, namely warm white below 3300 K, neutral white 3300-5000 K, daylight white above 5000. Depending on the application, different color temperatures and/or light colors are recommended. For the living area, warm white light lends itself while you mostly use light of the daylight white range for working light.
Can I dim the floodlights?
No. A dimming option is not available at this time.
Can I control the floodlights?
You can control the floodlights using the Lorex App app to manually turn the lights on or turn them off.
If I connect the floodlight camera to a light switch, can I use the switch to turn ON/OFF the lights?
Light switch will need to be turn ON all the time. Everything is controlled by the Lorex App. You can manually turn ON and OFF using the app, Motion Activation and Schedule. The camera must be turn on at all times. Do not turn off the light switch. It will also turn OFF the camera.
Will the floodlight turn on during daytime?
The floodlight is set to remain off during the daytime, when it is not needed. You can adjust this setting in the Lorex App.
How to reset the floodlight camera?
Press the Reset/WPS button for 10 seconds to reset the device to factory settings.
Does floodlight camera work with WPA3 router?
At this time, our hardware does not support connecting to a WPA3 router. If possible on the WPA3 router, you could change the encryption type to WPA2/WPA.
The SD card is not detected or recognized.
The following troubleshooting procedures may help:
- Please format the SD card into FAT32 on your computer, and then insert the SD card into the camera to see if it works
- The card had not been properly inserted into the camera. Take out the SD card and insert it again to see if it works.
- The SD card is defective. Please test the SD card on your computer and see whether the SD card can be read and written. If it doesn't, please use another SD card to see if it works.
I have setup my camera but in the app it always appears offline?
Check if your device is connected to power and that the switch is turned ON.
Check if you have an internet connection.
You may have to reboot or restart your router/modem if needed.
Reconnect your device to the Lorex App app.
My floodlight camera not connecting to Wi-Fi or not connecting during setup
Check that the Wi-Fi network you are trying to connect to is on 2.4Ghz. The camera only works with 2.4Ghz.
The unit does not work with 5GHz networks.
What is the minimum internet speed I need to use the floodlight camera?
We recommend 2 Mbps or higher.
There's a delay in the video and visitors can't hear me speaking through the camera, or there's a delay.
If you're using a cellular connection try moving to an area with a better signal, or switch to your Wi-Fi network. If your Wi-Fi signal is also weak, go to an area where the signal is stronger.
Your camera's Wi-Fi connection may be weak in the spot where your camera is mounted. Try moving your router closer to your camera or get a network range extender.
What happen when you change your modem or router?
To go back up online again, you must reset your floodlight camera and connect it to your new Wi-Fi network.
Can you replace the 32 GB card with a larger card?
The maximum storage capacity for the floodlight camera is 256 GB.
How to setup Continuous Recording Schedule?
To enable continuous recording schedule, please select the Time and Days you would like your floodlight camera to record in continuous.
How to remove custom siren tone?
Please make sure the deleted tone is not selected. Swipe to left to delete
How to add Custom Siren tone/sound when activate siren on motion?
Go to Device Settings > New Custom Tone, press Record, then tap Save.
How to manual turn on the light?
Go to Live View, then tap the light icon.
How to activate siren on motion?
Go the Device Settings > Siren Settings, then toggle the Activate siren on motion to ON.
How to optimize the light duration when activated from motion detection?
Go to Device Settings > Floodlight Setting > Light on Duration > Select light on duration.
Does my device support WPA2 or WPA3?
Your device supports Wi-Fi Protected Access 2 (WPA2) which is the industry standard security protocol for Wi-Fi networks. WPA2 offers security against unauthorized access and data interception and is supported by most Wi-Fi routers including those that support both WPA2 and WPA3. It employs Advanced Encryption Standard (AES), an encryption mechanism, which secures communication between your camera and Wi-Fi network to keep transmitted data confidential. For information on which devices support WPA2 and which devices support WPA3, please refer to “WPA2 and WPA3 Supportive Devices.”