V261LCD Series - 1080p Wired Floodlight Camera: Installation Guide
The V261LCD Wi-Fi Floodlight Camera is wired. This guide will show you how to safely remove your old exterior light and install your new Lorex floodlight using the same existing wiring.
WARNING: If you wish to install this floodlight to an area where there is no existing wiring, we highly recommend that you consult a licensed electrician.
Assembly
The image below demonstrates the process of assembling the floodlight camera. If your old exterior lighting has a junction box, we recommend that you keep it and install the supplied mounting plate onto it.
Next, grab and secure the mounting plate using the supplied bracket screws (x2) onto the junction box, then connect all wires using the provided wire caps, and mount the floodlight camera using the mounting screw.
To make sure you have proper coverage of the area you wish to monitor, adjust the angle of the floodlights and the camera.

Part 1 – Overview + Dimensions + Contents + Tools + Downloads
Before installation, please familiarize yourself with the product (see Overview), its dimensions (see Dimensions), and all the included accessories (see Contents).
You may also need some other tools and materials to facilitate the installation.
Product Overview
The Wi-Fi floodlight camera is quipped with two powerful lights (called floodlights), each producing 2,000 lumens. The camera has a dedicated local storage with a 32 GB micro SD card already pre-installed. You can upgrade the storage for up to 256 GB.
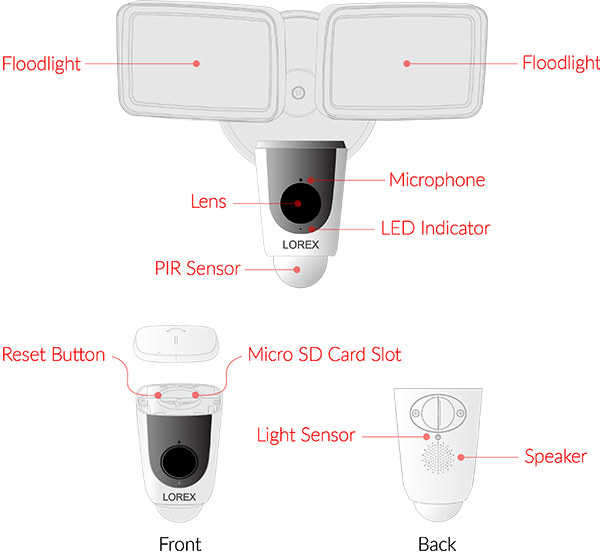
Product Dimensions
The floodlight camera measures 12.8 inches wide, 11.4 inches tall (from top to bottom), and 7.3 inches deep. The camera unit measures 4.96 inches high and 3.2 inches wide.

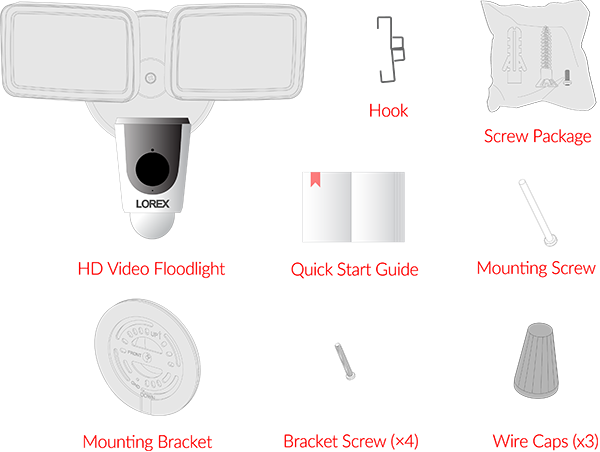
Package Contents
The package comes with one floodlight camera with a mounting bracket, installation kits (screws and anchors), and a quick start guide.
Tools + Materials
Depending on your particular situation, especially if you are installing the floodlight to an area where is no existing wiring, you will need more tools and materials. We highly recommend that you consult with a licensed electrician.
- Voltage Tester
- Wire Cutter
- Wire Stripper
- Electrical Tape
- Pencil/marker
- Hammer
- Paper
- Ladder
- Caulk (silicone rated for exterior use)
- Caulk gun
- Junction box/electrical box
- Drill and bits
- Extra wires
Lorex App + Device ID
If you do not have an account on the Lorex App app, download the app now from the Apple Store or Google Play, and create an account. Make sure you are signed in to your account during this installation process.
Now, grab your new Lorex floodlight camera and write down the Device ID that is printed on a sticker at the side of the device. Set the paper aside as you may need it shortly.
Part 2 - Turn off circuit breaker + remove the existing outdoor light
Turn off the circuit breaker.
For your safety, it is critical to cut off power to your existing outdoor light before you start removing any wire. Find your circuit breaker box and turn off the appropriate power supply. If you are not sure what switch to turn off, consult a licensed electrician.
Positioning
Mount the floodlight camera 10 feet (3 meters) high with the motion detector leveled to the ground for optimal detection of human-sized objects as far as 32 feet (10 meters).
Warnings
- Verify that the supply voltage is correct. Connect fixture to a 100 VAC~240 VAC 50/60 Hz power source.
- DO NOT connect floodlight to a dimmer switch or timer.
- If you are not replacing a light fixture, you will need to run power cabling to the install location, and purchase a UL listed junction box for a licensed electrician to install.
Remove existing light fixture
With the power shut off, remove the existing light fixture and bracket from the wall. Disconnect the wires.
Part 3 - Install the mounting plate
If your existing outdoor light has a junction box, do not remove it as you can install the supplied mounting bracket directly on it. If your existing outdoor light has no junction box, install the mounting bracket directly on the wall.
Install on a junction box
- Run the wires through the middle of the supplied mounting bracket.
- Secure the mounting bracket to your junction box using one of the bracket screws.
NOTE: Be sure to follow the “Front” / ”Up” directions on the mounting bracket.
Install directly on a wall
- Use the mounting bracket as a template to mark 3 holes in a triangular pattern.
- Use a 1/4” drill bit to drill in the marked holes.
- Gently tap the supplied mounting anchors into the drilled holes with a hammer.
- Align the bracket and use a Phillips head screwdriver to secure the supplied mounting screws into the mounted anchors.

Part 4 - Wire the floodlight camera
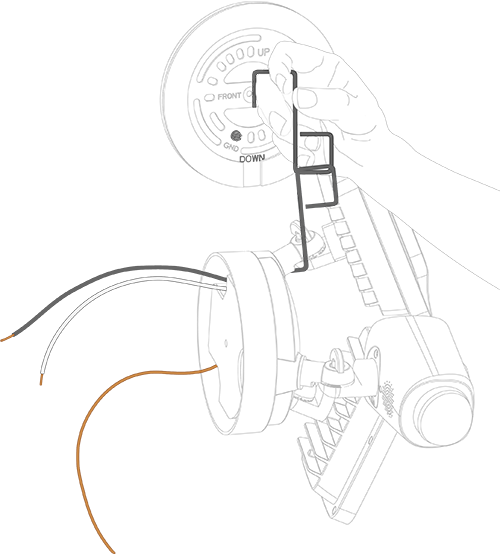
Wiring the floodlight camera is the most critical aspect of the installation process. To free up both of your hands, hang the floodlight unit onto the mounting plate using the supplied hooks, and proceed with connecting all wires.
Hang the floodlight
Using a ladder, stand next to where you installed the mounting plate and hang the floodlight camera using the supplied hooks.
Connect ground wires
Next, connect both ground wires using one of the supplied wire caps. Note, the ground wires are copper-colored wires.
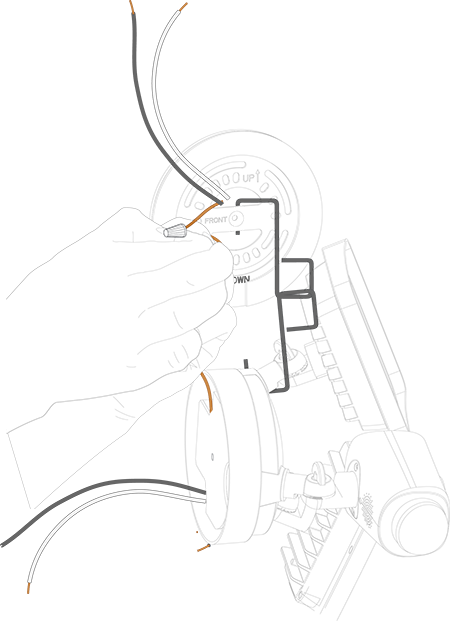
Connect neutral and live wires
Then, connect the neutral (white) wires and the live (black) wires using the supplied the wire caps.
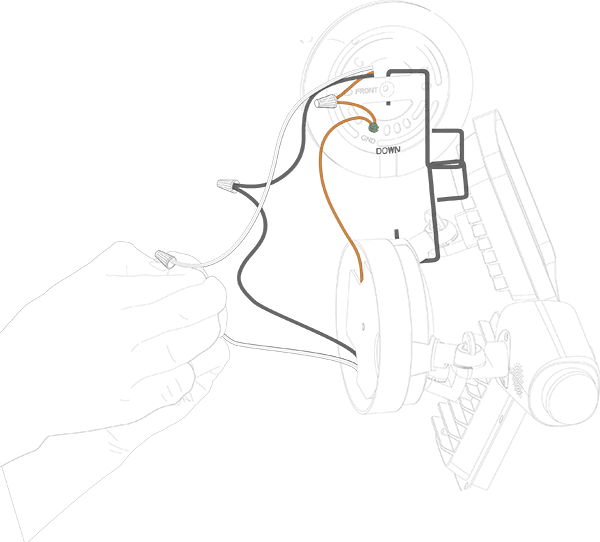
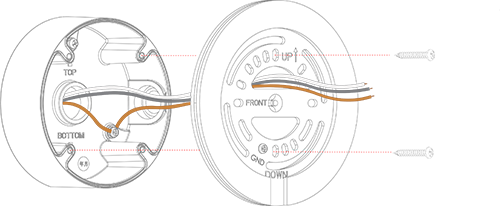
Make sure all wires are connected properly
Finally, check and verify that the correct wires are correctly connected. The ground wire is copper, the neutral wire is white, and the live wire is black. See the image below.

IMPORTANT: Power wire colors in your home may be different. In such a case, consult a licensed electrician.
Part 5 - Mount the floodlight + turn on the circuit breaker
The final step in the installation process is the mounting of the floodlight unit onto the mounting bracket.
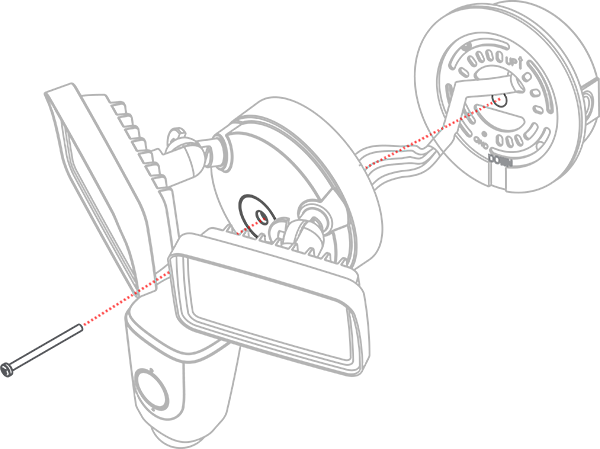
Mount the floodlight camera
-
Carefully push all the wires through the middle opening of the bracket into the junction box, and secure the floodlight camera through the middle hole using the Phillips machine screw.
-
In the case that you are installing the floodlight camera directly to the bracket, fit the wires into the back openings of the camera.
Adjust the angles of the floodlights
- Adjust the light angle using the adjusting knobs.
- To enforce a water-resistant seal, apply silicone compound around the entire perimeter where the junction box is attached to the bracket.
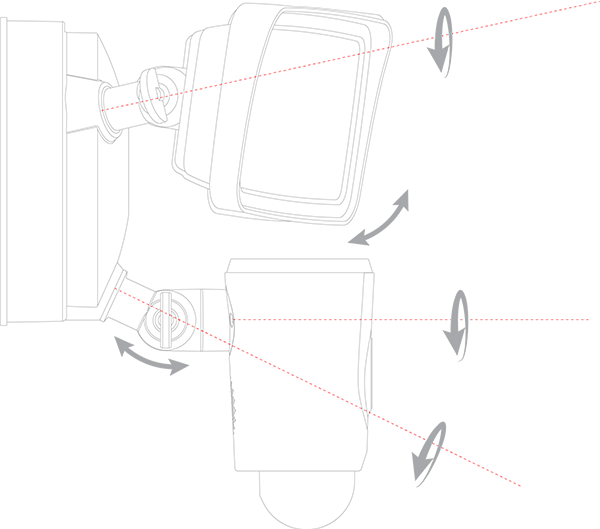
Adjust the camera angle
-
Loosening the Adjustment Knob on the Camera Arm will allow for camera movement. In this orientation, the camera can rotate up and down.
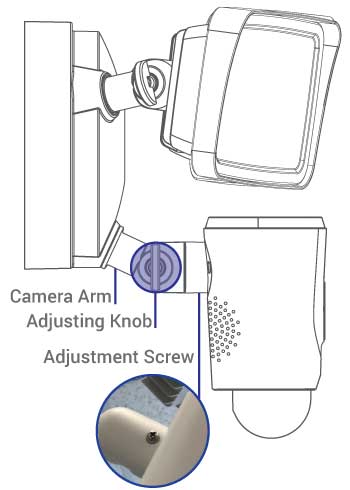
-
Loosening the Adjustment Screw will allow the camera to rotate clockwise or counter-clockwise.

-
To allow for side-to-side rotation of the camera you must change the camera's orientation. Loosen the Adjustment Knob and Screw, rotate the Camera Arm by 90 degrees (clockwise), and then rotating the camera by 90 degrees (counter-clockwise).
-
Make sure to tighten the Adjustment Knob and Screw once your adjustments are completed.
NOTE: If the status LED on the floodlight camera does not turn on, check to make sure wiring is done correctly.
Turn on the circuit breaker
Finally, turn on the circuit breaker and connect the floodlight camera to the Lorex App app.
To connect the floodlight camera to the Lorex App, please check this article.