< Back to list
W891UA Series - 4K Dual-Lens Wi-Fi Security Camera: Installation
This article offers step-by-step instructions for camera installation.
App Setup
- Download the Lorex app from the App Store or Google Play Store.
- Launch the app and create an account, or login.
- Connect your camera’s cable to the Power Adapter and plug into a nearby outlet.
- Tap the add (+) icon to connect your camera.
- Scan your camera's (W891UA) Device QR code. The QR Code is located on the bottom of your camera.
- Follow the in-app instructions to complete setup.
Camera Placement
- Place your camera in a wide, open space, and avoid placing it near any obstructions.
- Place your camera at the central point of the area you wish to monitor.
- Point your camera where there is the least amount of obstructions (i.e. tree branches).
- Install your camera in a location that is difficult for thieves and vandals to reach.
- Secure cabling so that it is not exposed or easily cut.
Other recommendations:
- Place the camera close to your Wi-Fi router as possible.
- Reduce the number of obstructive materials between the camera and the router or access point.
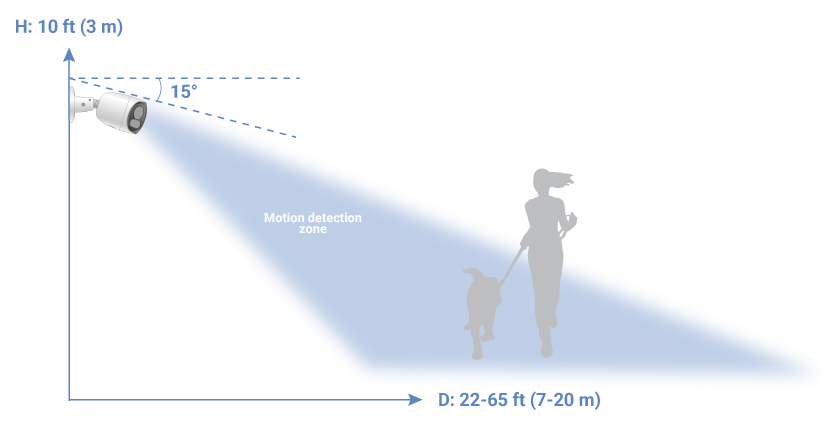
When mounting your camera on a wall, make sure of the following:
- Location: Place your camera in a wide, open space, and avoid placing it near any obstructions.
-
- Height: Install your camera at a height of 10 feet (3 meters) above the ground.
- Angle: Angle your camera to face outwards between 15-30°.
-
- Distance: Position your camera 22-65 feet (7-20 meters) within points of interest.
Camera Mounting

- A: Mounting Screw
- B: Drywall Anchor
- C: Mounting Template
- D: Mounting Surface
- E: Cable Notch
- Place the provided Mounting Template onto the desired location. Ensure an outlet is nearby, and keep in mind the cable length.
- Using a drill, drill through all 3 mounting screw holes on the template.
Note: Drill a hole through the center of the template for your camera’s cable if you plan to run it through the mounting surface. If you are running the cable along a wall/ceiling, make sure to pass the cable through the cable notch.
- Using a Phillips-head screwdriver and the provided Mounting Screws, secure the Mounting Bracket to the surface.
Optional: If you are mounting your camera into drywall, use the provided anchors.
- Connect your camera’s cable to the Power Adapter and plug into a nearby outlet.
- (Optional) Use the provided Cable Clips and Screws to neatly secure your camera’s cable to the wall.
- Adjust the angle of your camera:
- Loosen the Camera Adjustment Screw to rotate your camera downwards and sideways, then tighten to secure it in place.

- Loosen the Mounting Bracket Adjustment Screw to rotate your camera and bracket clockwise or counter-clockwise around the base, then tighten to secure it in place.

- Tip: For a sideways orientation of your camera you must rotate the mounting bracket by 90°, rotate the camera by 90°, and then point your camera to the desired side.
- Remove the vinyl film from the camera lens once your installation is complete.
Don't forget to register your product!