N910 Series - 4K+ Ultra HD 12MP 16 Camera Capable NVR: Motion Detection
The following article provides information about using motion detection on your camera to capture activity, trigger alarms, and receive notifications. You can also set motion detection zones to monitor certain areas in the camera’s field-of-view and decrease or increase the motion sensitivity.
Table of Contents:
Status Icons
The system displays different icons in the bottom left–hand corner of the camera image to inform you of motion detection events:
- Motion detection: Motion has been detected by the camera. An
 icon is shown in the bottom left-hand corner of the camera image to show that motion was detected, but the system is not recording a motion event. This is because motion recording is not enabled on the channel, or the movement detected by the camera was not significant enough to trigger motion recording. See 15.2 Configuring Motion Detection to configure settings for motion detection and recording.
 - Motion recording: Motion-triggered video recording. An
 icon is shown in the bottom left-hand corner of the camera image when a motion event is being recorded.
Configuring Motion Detection
Select channels that you want to enable motion detection on and adjust preferences.
To configure motion detection:
- From the Live View display, right-click to open the Quick Menu, then click Main Menu.
- Click Events, then Event Settings. Click the Motion tab from the side panel, then click the Motion Detection tab from the top panel.

- Select a camera you want to configure.
- Check to enable motion detection.
- Click Setting next to Area to configure which areas of the image will be enabled for motion detection. A grid will appear on the monitor:
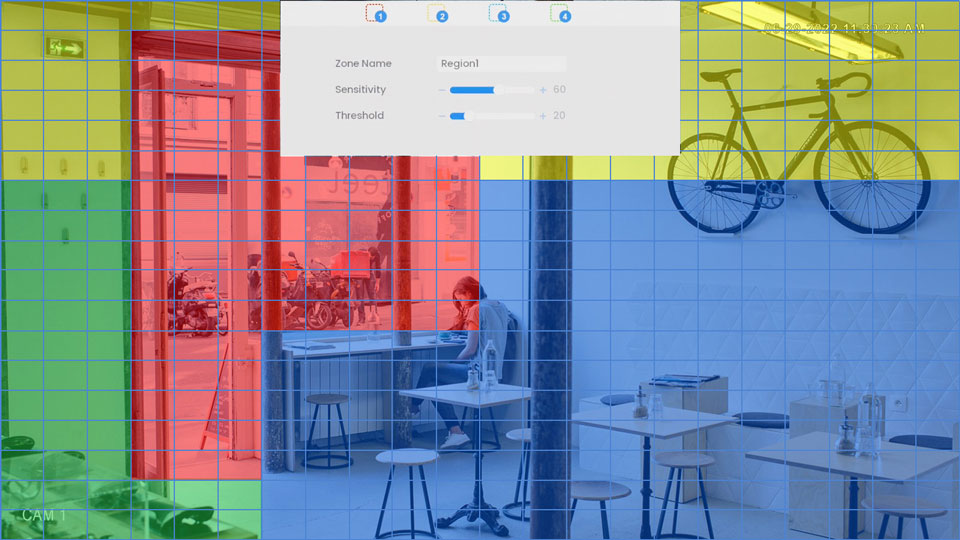
- The camera image appears with a red grid overlay. This means the entire image is enabled for motion detection.
- Click or click-and-drag to add / remove boxes from the active area. Cells that have been removed from the active area appear transparent.
- Hover near the top of the image to reveal zone selection. You can set up to 4 different zones with different sensitivity and threshold values.
- Right-click when finished.
- Click Setting next to Schedule to choose which days and times of the week to enable motion detection:
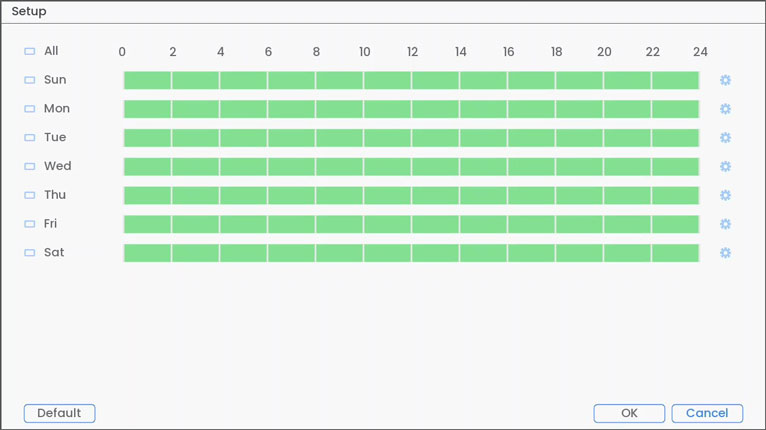
- Click or click-and-drag along each of the green timelines to quickly add or remove time from eachday’s schedule in 30–minute segments.
- Click
 beside 2 or more days to link schedules (
 ). This allows you to quickly change multiple schedules at once.
 - To make fine adjustments to a schedule, click
 . This will allow you to set exact start and end times for a schedule.
 - Click OK when finished.
- Choose how the system will react to motion detection:

- Anti-Dither: After an initial motion event, the system will continue to record video if a second motionevent occurs within the set Anti-Dither period.
- Record Channel: Select the channels that will record when motion is detected on the selected channel. Set the length of recording following a motion detection event in the Post-REC field.
- Show Message: Check to enable an on-screen pop-up when one of your cameras detects motion. On-screen pop-up shows the channels an event occurred on and the type of event.
- Send Email: Check to enable email alerts. You must configure email alerts before you will be able to receive them.
- Sequence: Sequence mode will begin. Select the numbered tiles next to this option to include the corresponding channels in the sequence.
- Snapshot: Select the numbered tiles next to this option to save a snapshot of the corresponding channels.
- PTZ Activation: Set connected PTZ cameras to start a tour, pattern, or go to a preset location.
- Recorder Buzzer: Check to enable the system buzzer.
- Click Apply to save changes.
- (OPTIONAL) Click Copy to apply the settings for the current channel to one or more other channels.
Configuring Motion Detection Through the Lorex App
Motion Zones™ allows you to customize your camera’s motion detection region. The following steps are applicable to the Lorex App.
- Tap
 above the recorder's thumbnail.
 - Select your camera.
- Tap the ellipses (...) in the top right corner of the app.
- Tap Motion Detection Settings.
- Tap
 to enable Motion Detection.
 - Tap Motion Zones™.
- Tap the Motion Zones™ to set up the detection area:
- General Motion Zone
- Person Motion Zone
- Vehicle Motion Zone
- Animal Motion Zone
- Package Motion Zone
- Package Removed Motion Zone
 This will take you to a new screen where you can shrink, stretch, or reposition your Motion Zones™ as needed. For full instructions on how to set customized Motion Zones™, refer to "Configure Motion Zones™".