The following FAQ article answers many of the general questions about the 4K Dual-Lens Wi-Fi Security Camera (W891UA). Where applicable, the FAQ includes links to articles where you may find more information.
How do I safely reset the camera?
- Keep the camera powered on.
- Remove the Reset/MicroSD cover with a Phillips head screwdriver.
- Ensure direct access to the reset button by unmounting the camera or adjusting the angle.
- Press the reset button gently with a release pin or paper clip for 10 seconds until you hear the audio prompt. Avoid excessive pressure or using screwdrivers to prevent damage.
Look for the flashing green Smart Security Light to indicate that the camera has been fully reset.

 A solid or steady green light indicates that the camera has not been fully reset. You may have to redo the process again.
How do I power on the camera?
To power on the camera, connect its USB power cable to the included power adapter, then plug the adapter into a standard power outlet. The camera will turn on automatically, indicated by the Smart Security Lighting and audio prompt.

Caution: Use the power adapter included in the packaging for optimal performance and safety. Avoid unpowered USB ports on devices like computers.
Where can I download the Lorex app?
Download the Lorex app from the App Store or Google Play Store.
Why is the camera not connecting to the Lorex app?
The 4K Dual-Lens Wi-Fi Security Camera can be onboarded on a 2.4GHz or 5GHz Wi-Fi network.
- 5GHz networks will have limitations in Canada due to Industry Canada (IC) regulations; 3 of the 4 bands need to be disabled, as a result you may experience connectivity issues on the 5GHz frequency.
Where do I place the camera?
- Place the camera in a wide, open space, and avoid placing it near any obstructions.
- Place the camera at the central point of the area you wish to monitor.
- Point the camera where there is the least amount of obstructions (i.e. tree branches).
- Install the camera in a location that is difficult for thieves and vandals to reach.
- Secure cabling so that it is not exposed or easily cut.
Other recommendations: * Place the camera close to your Wi-Fi router as possible. * Reduce the number of obstructive materials between the camera and the router or access point.
How should I position the camera?
When mounting the camera on a wall, make sure of the following: * Location: Place your camera in a wide, open space, and avoid placing it near any obstructions. * * Height: Install your camera at a height of 10 feet (3 meters) above the ground. * Angle: Angle your camera to face outwards between 15-30°. * * Distance: Position your camera 22-65 feet (7-20 meters) within points of interest.
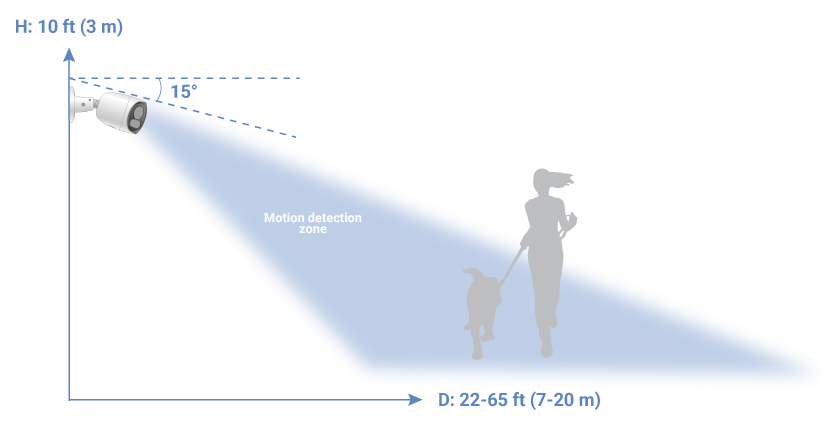
Accuracy of motion detection will be influenced by multiple factors, such as the object's distance from the camera, the height of the object, and the height and angle of the camera. Night vision will also impact the accuracy and distance of detection.
How do I mount the camera?
For full instructions on camera mounting, watch the Installation Video or refer to the Installation Guide.
What are the Smart Security LED indicators?
- Solid Green - Operating Correctly
- Flashing Green - Ready for network connection
- Solid Red - Device resetting
- Flashing Red - Network connection failed*
Flashing Red & Green Interchangeably - Firmware update in progress
Try resetting the device by pressing and holding the reset button until you hear the audio prompt.
What is Smart Detection?
Smart detection uses advanced AI to distinguish movement between people, animals, vehicles, and packages while providing separate alerts for them.
How do I enable motion detection and smart detection (person, vehicle, animal, package & package removed detection)?
- Tap
 above the camera's thumbnail.
 - Tap Motion Detection Settings.
- Tap
 to enable Motion Detection.
 - Tap Smart Detection Settings.
- Tap to enable the type of smart detection you want to use.
Note: If motion detection is disabled, general/person/vehicle/animal/package/package removed detection will automatically disable and you will not receive any motion detection notifications in the Lorex app.
How do I customize Motion Zones™?
Motion Zones™ allows you to customize your camera's motion detection region.
- Tap above your camera's thumbnail.
- Tap Motion Detection Settings.
- Tap Motion Zones™.
- Tap the Motion Zones™ to set up the detection area:
- General Motion Zone
- Person Motion Zone
- Vehicle Motion Zone
- Animal Motion Zone
- Package Motion Zone
- Package Removed Motion Zone
This will take you to a new screen where you can shrink, stretch, or reposition your Motion Zones™ as needed. For full instructions on how to set customized Motion Zones™, refer to "Configure Motion Zones™".
How do I set the Deterrence Light and Smart Securty Lighting to activate when smart motion is detected?
- Tap above your camera's thumbnail.
- Tap Light Settings.
- Tap Activate Light on Smart Motion
- Tap on the type of smart detection you are using.
- Tap to enable Deterrence Light and/or Smart Security Lighting whenever smart motion is detected.
- Adjust the light settings, and then tap Save.
How do I turn off the Smart Security Lighting?
- Tap above your camera's thumbnail.
- Tap Light Settings.
- Tap Smart Security Lighting Modes.
- Tap Working Mode to uncheck it, and then tap Set.
As long as all of the Smart Security Lighting modes are not selected, the Smart Security Lighting is turned off. This will not effect the Smart Security Lighting set to activate on smart detection.
How do I customize the Smart Security Lighting?
To enable, disable, and customize Smart Security Lighting settings, refer to "W891UA - 4K Dual-Lens Wi-Fi Security Camera: Smart Security Lighting" for more information.
How do I enable Color Night Vision?
- Tap above your camera's thumbnail.
- Tap
 to disable Auto Night Vision.
Note: Disabling Auto Night Vision will force the camera into Color Night Vision mode. Some ambient lighting required.
To learn more, visit the Color Night Vision page.
Why am I receiving so many notifications?
You may find that the camera is triggering frequently and sending too many event notifications. Refer to the article "Lorex App - Too Many Notifications" for a few troubleshooting tips to help reduce false alerts.
How do I play Quick Responses?
From your camera's Liveview: Tap the Response button, and then tap a response from the list to hear it play from the camera.
How do I create custom Quick Responses?
- Tap above your camera's thumbnail.
- Tap Quick Responses.
- Tap +.
- Press and hold the record button to create your own custom Quick Response.
- Tap Next, and then enter a name for your Quick Response.
- Tap Save.
- From the list, tap your newly created Quick Response to hear it play from the camera.
How do I enable the Auto-Framing feature?
The Auto-Framing feature detects a moving object, then uses one lens to automatically zoom-in and follow across the 180° view.
- Tap above your camera's thumbnail.
- Tap to enable Auto-Framing.
How do I enable sound detection?
Record videos and send notifications whenever sound is detected at or above the preset decible level.
- Tap above your camera's thumbnail.
- Tap Sound Detection Settings.
- Tap to enable Sound Detection.
- Adjust the sound sensitivity.
How do I view events (recordings)?
- Tap the Events tab.
- Tap on the camera.
- Tap on the events to play the recordings.
To view all recordings stored on your camera, navigate to your camera's Timeline. For more detailed instructions on navigating through events, refer to "Lorex App - Events".
How do I access the events Timeline?
- Tap the camera's thumbnail to start the Liveview.
- Tap Timeline.
- Scroll through the timeline to view all the events.
How do I change the viewing resolution to Auto, SD, 1080P, 2K or 4K?
- Tap on the camera's thumbnail to start the Liveview.
- Tap the SD button in the liveview bar.
- Select the resolution that you would like to start viewing.
How do I optimize the video quality?
- Tap above your camera's thumbnail.
- Tap Video Settings.
- Tap to enable HDR (High Dynamic Range).
Note: Enabling HDR optimizes video picture in high-contrast conditions such as under-lit and over-lit areas. By default, the video quality is set to High (4K).
How do I add Shared Users?
You can share the camera with friends or family to give them access to Liveview, recordings, and more.
Note: The shared user must already have a Lorex app account.
- Tap above your camera's thumbnail.
- Tap Shared Users
- Tap Add Shared User.
- Enter the user's email address, select their permissions, and then tap Confirm.
What is Home & Away™?
The Lorex app can automatically use your location to manage your notifications when you are at home or away. The app will notify you when you are inside/outside of your set home perimeter.
To start using this feature, navigate to your mobile device settings and enable Location services for Lorex App.
For detailed setup instructions, refer to "Configuring Home & Away™".
How do I remove the camera from my account?
- Tap above the camera's thumbnail.
- Tap Remove Device.
How do I permanently delete data off of the camera?
Refer to the article "Formatting Device Storage" for more information.
Does my device support WPA2 or WPA3?
Your device supports Wi-Fi Protected Access 2 (WPA2) which is the industry standard security protocol for Wi-Fi networks. WPA2 offers security against unauthorized access and data interception and is supported by most Wi-Fi routers including those that support both WPA2 and WPA3. It employs Advanced Encryption Standard (AES), an encryption mechanism, which secures communication between your camera and Wi-Fi network to keep transmitted data confidential. For information on which devices support WPA2 and which devices support WPA3, please refer to WPA2 and WPA3 Supportive Devices.
What are the compatible SD cards?
Refer to the article "Compatible SD Cards and Storage Sizes" for more information.
How do I switch motion detection recording to continuous recording?
- Tap above your camera's thumbnail.
- Tap Local Storage.
- Tap to enable Continuous Recording.
Note that continuous recording will quickly fill up your MicroSD card memory.
Can the 4K Dual-Lens Wi-Fi Security Camera connect to a Lorex Fusion Recorder for larger storage?
Yes, to learn more about Lorex Fusion Systems visit the Fusion page.
What devices are compatible with my 4K Dual-Lens Wi-Fi Security Camera?
Visit the Product Compatibility Chart for more information.
Was this article helpful?
That’s Great!
Thank you for your feedback
We're sorry this article wasn't helpful.
Your feedback helps us improve our support experience.
Feedback sent
We appreciate your effort and will try to fix the article