L4248, U424A Series - 2K NVR & Wire-Free Camera System: Motion Detection Settings
This article provides instructions to setup motion detection setting with your 2K NVR & Wire-Free Camera system (L4248 Series). with the help of Lorex Cirrus app.
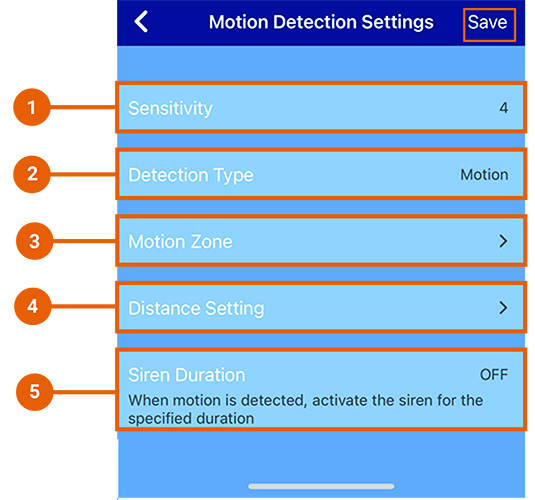
Configuring Motion Detection Settings
You can configure motion detection settings on any connected device using the Lorex Cirrus app.
Configure the following as needed.
To access Motion Detection Settings
-
Launch the Lorex Cirrus app.
-
Tap
 icon to open Settings.
 -
Tap Motion Detection Settings.
-
Sensitivity: Tap to select a sensitivity level for motion events. The lower the sensitivity value, the more movement is required to trigger motion detection.
Note: By default, sensitivity is set to 4. Highest and lowest sensitivity levels are 8 and 1 respectively. -
Detection Type: Tap to select detection types, either motion or person detection.
Note: Tap OFF if you want to turn off Detection Type. -
Motion Zone: Tap to configure the motion zones. Motion will only be detected in areas highlighted in blue.
-
Distance Setting: Tap to configure distance setting for motion detection. Change the distance setting if motion detection is being triggered by unwanted events.
-
Siren Duration: Tap to select the amount of time you want the camera siren to be active up to 60 seconds or select Off to disable the siren.
Note: Remember to tap Save to apply any changes.
Customizing Motion Zones
Motion Zones allows you to customize your device’s motion detection region.
Motion detection will be disabled for areas without the blue overlay. Only motion which occurs in the blue overlay will trigger motion detection. Disabling motion detection in certain areas of the image is an effective way to eliminate unwanted recordings and notifications, such as those caused by trees blowing in the wind or street traffic seen through a window.
To set Motion Zones
-
Launch the Lorex Cirrus app.
-
Tap
icon to open Settings. -
Tap Motion Detection Settings.
-
Tap Motion Zones.
Note: By default, the entire area has a blue overlay, meaning that a motion event happening anywhere on the screen will trigger an event.
- Tap and drag over the area where you want motion detection enabled.
Note: The deselected area will black out and the selected area will be highlighted in blue.
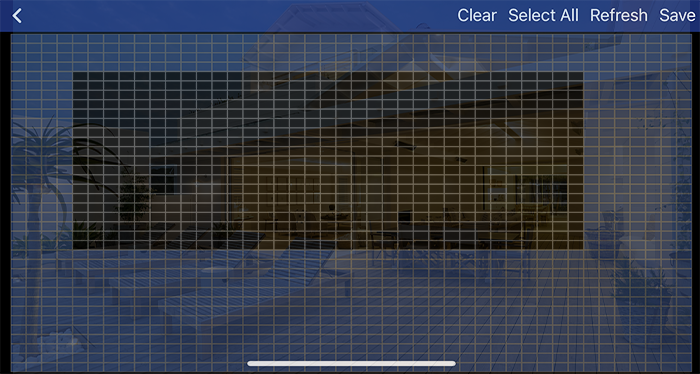
- Clear: Tap to remove the entire image from the active area.
- Select All: Tap to add the entire image as the active area for motion detection.
- Refresh: Reset to the default of using the entire image as the active area for motion detection.
- Save: Tap to save the motion detection region.
- Tap Save.