W452AS Series - 2K Wired Floodlight: Installation
This article provides instructions to install your Lorex 2K Wired Floodlight camera (W452AS Series).
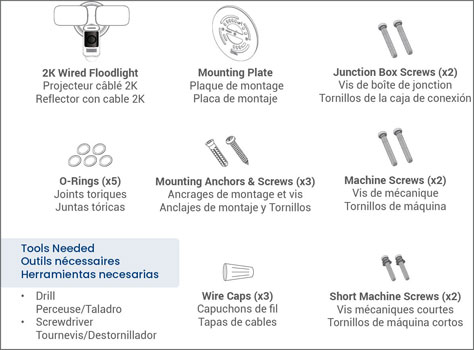
What's Included?
![]() WARNING: TURN OFF THE POWER RUNNING TO YOUR EXISTING CIRCUIT AT THE BREAKER
WARNING: TURN OFF THE POWER RUNNING TO YOUR EXISTING CIRCUIT AT THE BREAKER
- If you are unsure of which breaker controls the circuit, then turn off the main power switch.
- If you do not know where your breaker is or how to turn off power, consult a licensed electrician.
- Make sure the supply voltage is correct. 100-240 VAC 50/60Hz is required.
- DO NOT connect the floodlight to a dimmer or timer.
Step 1 - Mounting Setup
![]() If you are not replacing a light fixture, you will need to run power cabling to the install location, and purchase a UL listed junction box for a licensed electrician to install.
If you are not replacing a light fixture, you will need to run power cabling to the install location, and purchase a UL listed junction box for a licensed electrician to install.
Ensure you are on a 2.4 GHz Wi-Fi connection during setup. You can switch to a 5 GHz* network after setup.
*5 GHz networks may have limitations in Canada

- Remove the existing light fixture and bracket from the wall, and then disconnect the wires. Tip: Bend the power cables so they do not fall through the wall.
- Run the existing wires through the middle of the Mounting Plate.
- Place and align the Mounting Plate with the
 arrow up. Make sure the 2 horizontal holes are level.
 - Secure the Mounting Plate to the Junction Box using the included Junction Box screws.
Step 2 - Wiring & Installation
![]() WARNING: Power wire colors in your home may be different. In such a case, consult a licensed electrician.
WARNING: Power wire colors in your home may be different. In such a case, consult a licensed electrician.
- Use the Wire Caps to connect the wires.
a. Twist the Ground wire (green) to the ground wire.
b. Twist the Live wire (black) to the live wire.
c. Twist the Neutral wire (white) to the neutral wire.
-
Carefully fit the wires back into the Junction Box.
-
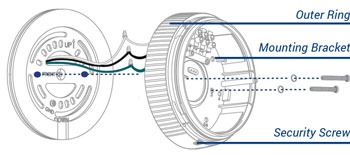
Slide the O-Rings onto the Machine Screws, and then use a Phillips-head screwdriver to secure the Mounting Bracket to the Plate.
-
Ensure the Outer Ring is completely rotated counter-clockwise.
-
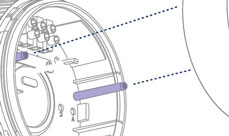
Align the 2 grooves inside the Floodlight to the 2 posts on the inner sides of the Bracket, and then push the Floodlight into place. Ensure there are no gaps around the perimeter between the Floodlight and Bracket. Tip: Align the
 to the
  symbol on the sides.
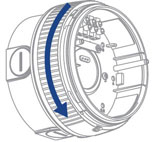
- Twist the Outer Ring clockwise until the and the
 symbols align.
- Tighten the pre-installed locking screw at the bottom of the Mounting Bracket.
- Remove the Rubber Plug at the bottom of the Floodlight.
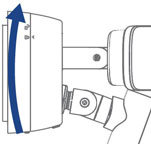
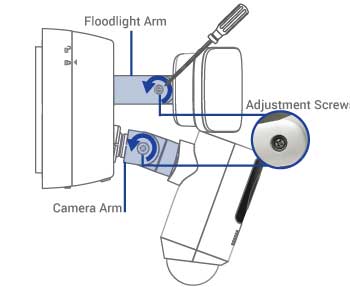
Step 3 - Adjust the Angles of the Floodlights
Loosen the Adjustment Screws on the Floodlight and Camera Arms to adjust the light and lens angles.
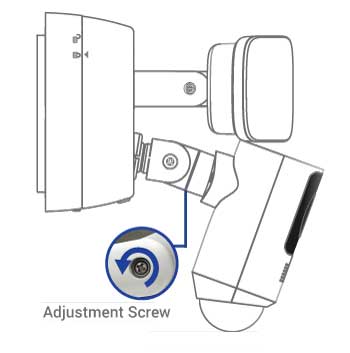
Step 4 - Adjust the Angle of the Camera
- Loosening the Camera Arm Adjustment Screw, will allow for camera movement. In this orientation, the camera can rotate up and down.

- Loosening the Adjustment Screw behind the camera will allow the camera to rotate clockwise or counter-clockwise.
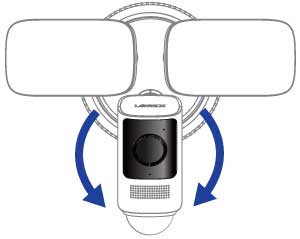
-
To allow for side-to-side rotation of the camera you must change the camera's orientation. Loosen the Adjustment Knob and Screw, rotate the Camera Arm by 90 degrees (clockwise), and then rotating the camera by 90 degrees (counter-clockwise).
-
Make sure to tighten the screws once your adjustments are completed.
-
Turn the power ON at the breaker. If the status indicator does not turn on, check that the wiring is correct.
-
If the status LED on the floodlight camera does not turn on, check to make sure wiring is done correctly.
-
Add the Floodlight to the Lorex App app.
Step 4 - Device App Setup
- Download the Lorex App app.

- Tap
