AUL-1W3 and AUL-1B2 Wall Mount Bracket: Frequently Asked Questions
The following FAQ article answers common questions about the AUL-1W3 and AUL-1B2 Wall Mount Bracket Series. Where applicable, the FAQ includes links to articles where you may find more information.
How do I install my E851AD camera with this product?
The E851AD camera equips a cable that exits from the bottom edge of the device, while other models equip cables that exit from the middle of the bottom side. Because of this, extra care must be taken to attach the wall mount bracket to the E851AD camera. Please follow the steps below for proper installation of your camera and wall mount bracket:
- Remove the dome camera cover from the E851AD camera using the provided Allen key from the camera package.
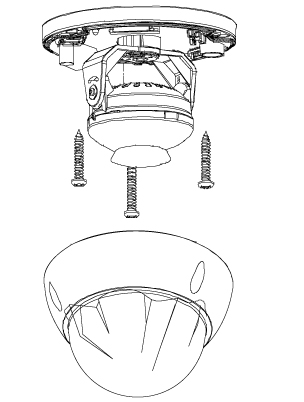
Note: Do not remove the dome cover in humid or dusty environments and always wash your hands before handling your camera.
- Carefully bend the E851AD camera cable to fit into the indent in the wall mount bracket. Feed the rest of the cable through the indent and out of the wall mount bracket.
- Use the provided screws and Allen key from the wall mount bracket package to attach the base of the E851AD camera to the wall mount bracket.
- Use the provided Allen key and screws from the camera package to re-attach the dome camera cover to the E851AD camera base.
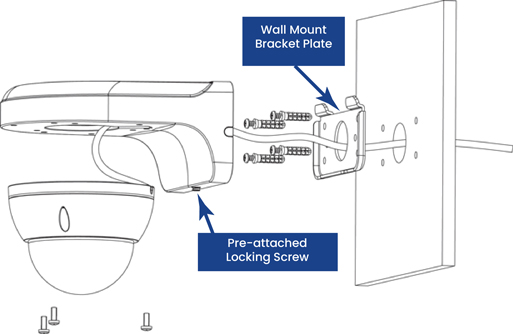
- Install the wall mount bracket plate at your desired location.
- Bring the attached camera and wall mount bracket to the location of the mount bracket plate. Align the wall mount bracket with the wall mount bracket plate, and use the pre-attached locking screw to secure them together.
Enjoy using your new E851AD camera, with your new wall mount bracket.
Where can I install the wall mount bracket?
The wall mount bracket can be installed at any location that can support the its entire weight including the attached camera (up to 3.3 lbs / 1.6 kg). However the following criteria are recommended for best performance:
- Place your camera in a wide, open space, and avoid placing it near any obstructions.
- Place your camera at the central point of the area you wish to monitor.
- Point your camera where there is the least amount of obstructions (i.e. tree branches).
- Install your camera in a location that is difficult for thieves and vandals to reach.
- Secure cabling so that it is not exposed or easily cut.
Other recommendations:
- Place the camera close to your Wi-Fi router as possible.
- Reduce the number of obstructive materials between the camera and the router or access point.
What are the benefits of using the wall mount bracket?
It adds protection, angle precision, and aids in wire organization for your device.
How much weight can this product hold?
The wall mount bracket can carry up to 2.20 llbs / 1.1 kg, which includes the weight of any of the compatible devices.
Do I need to purchase a junction box with the wall mount bracket?
No, the wall mount bracket acts as a junction box, and we recommend that users do not install an additional junction box.
What are the dimensions of the wall mount bracket?
The dimensions of the wall mount bracket are (W × D × H) 6.3 × 4.8 × 2.99” / 160 × 122 × 76 mm.
Which cameras are compatible with this product?
Please see the Compatibility Chart to find compatible cameras.