FLIR Cloud Client Software: Adding your DVR / NVR using Device ID
Your DVR / NVR can be manually added to the FLIR Cloud Client software by entering the device ID. FLIR Cloud Client software is available for download on PC / Mac. Click here for more information on locating software downloads.
Prerequisite:
- The following instructions require you to access your system using the FLIR Cloud Client software and a PC / Mac. The instructions below are shown using a Windows 10 operating system.
To manually add the DVR / NVR using a device ID:
-
Launch FLIR Cloud Client software on your computer.
-
Enter your login information. Refer to your user manual for your default Username and Password if needed.
-
Click Login to open the Home window.
-
Click the Devices icon (
 ) to open the Devices tab.
 -
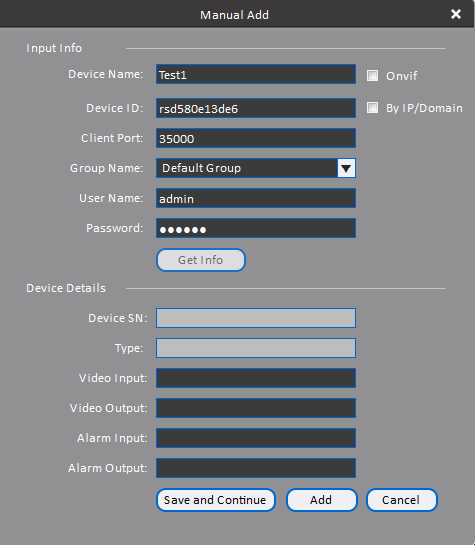
Click Manual Add on the bottom-left corner to open the Manual Add window.
-
In the Manual Add window, enter the following:

- Device Name: Enter the Device Name of your choice to identify the DVR / NVR.
- Device ID: Enter the device ID or scan the QR code located on the top of the DVR / NVR.
- Client Port: Enter the Client Port value (default: 35000).
- User Name: Enter the DVR / NVR User Name. Refer to your user manual for your default Username if needed.
- Password: Enter the DVR / NVR Password. Refer to your user manual for your default Password if needed.
-
Click Add to connect your DVR / NVR. The connection may take a few minutes.
-
Click Home, and then double-click Default Group to load your connected cameras.
If you are not able to connect to your DVR / NVR using the device ID on the same network, you may be experiencing a NAT Loopback issue. Routers recognize and connect to DVR / NVR via IP address. To connect your system from the same network, use the IP address of the DVR / NVR. Click here for details on using the IP address to manually connect your DVR / NVR.