FLIR Cloud Client Software: Adding your DVR / NVR using IP address
Your LHV / LNR Series DVR / NVR system can be manually added to the FLIR Cloud Client software by entering the system IP address.
Prerequisites:
- Download and install the FLIR Cloud Client software
- Ensure you have the IP address of your LHV / LNR Series DVR / NVR system.
- The following instructions require you to access your system using the FLIR Cloud Client software and a PC / Mac. The instructions below are shown using a Windows 10 operating system.
To manually add the LHV / LNR Series DVR / NVR using an IP address:
-
Launch FLIR Cloud Client software on your computer to open the Login window.
-
Enter your login information. Refer to your user manual for your default Username and Password.
-
Click Login to open the Home window.
-
Click the Devices icon (
 ) to open the Devices tab.
 -
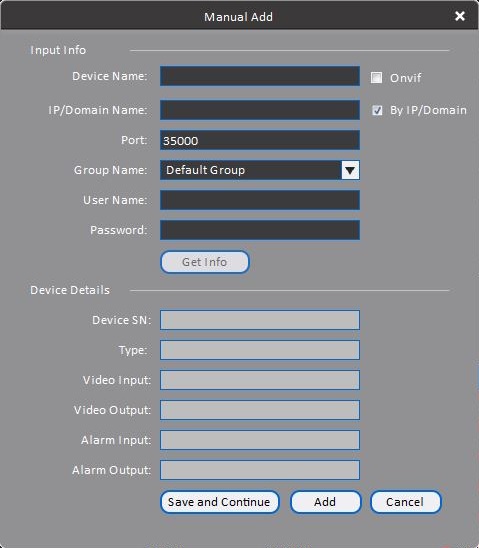
Click Manual Add on the bottom-left corner to open the Manual Add window.
-
In the Manual Add window, enter the following information:

- Device Name: Enter the Device Name of your choice to identify the DVR / NVR.
- IP/Domain Name: Ensure the IP/Domain checkbox is checked to enable connection using the IP address. Enter the IP address of the DVR / NVR.
- Client Port: Enter the Client Port value (default: 35000).
- User Name: Enter the DVR / NVR User Name.
- Password: Enter the DVR / NVR Password.
-
Click Add to connect the DVR / NVR. The connection may take a few minutes.