W482CAD Series - 2K Wi-Fi Camera: Installation Guide
This article provides instructions to install your Lorex 2K Wi-Fi camera with Smart Deterrence (W482CAD).
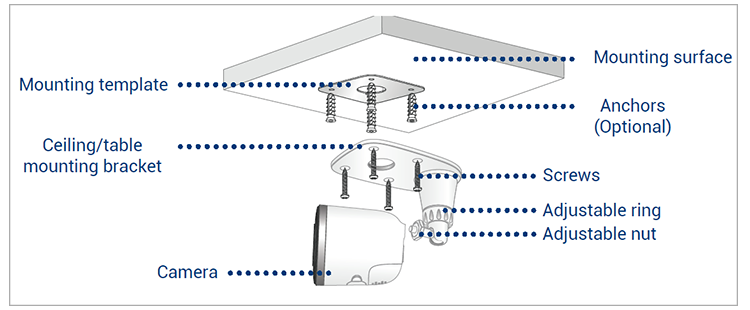
What is included in the box?
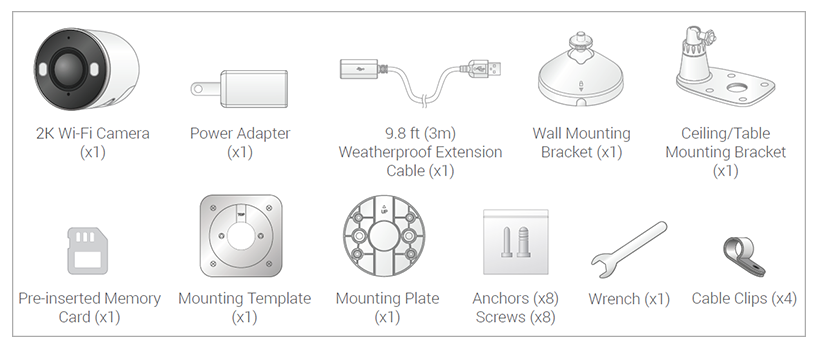
 The above contents are based on one camera.
How to connect with Lorex App
-
Attach the provided power adapter to the camera. The device is ready for setup as soon as the status indicator is flashing green and chimes.
Note: Ensure your camera is plugged in and powered ON throughout the setup.
Optional: Attach the weatherproof extension cable to the camera. -
Download the Lorex App by scanning the following QR Code. You can also visit Google Play or Apple Store to download Lorex App.

-
Open the Lorex App app and create an account or login with your credentials.
-
Tap
 icon to add a new device, then follow the in-app instructions to complete the device setup.
For full instructions on Lorex App setup, see Connecting with Lorex App.
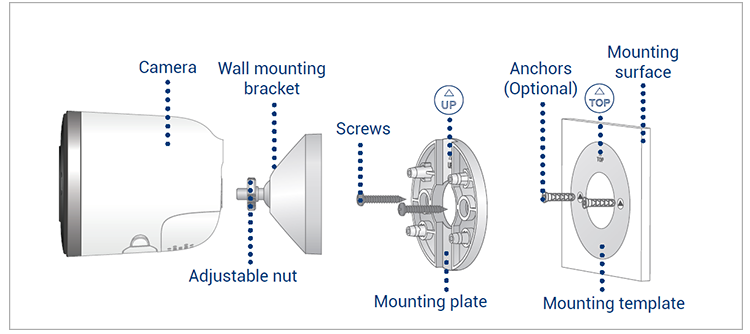
How to mount 2K Wi-Fi Camera to the wall
-
Place the mounting template onto the desired location.
Note: Ensure an outlet is nearby, and keep in mind the cable lengths. -
Using a 15/64" (6mm) drill bit, drill 2 holes over the triangle symbols on the template.
Optional: Drill 15/64" (6mm) holes for the anchors. -
Align the arrows of the mounting plate and template.
Using a screwdriver and provided screws, secure the mounting plate to the surface.
-
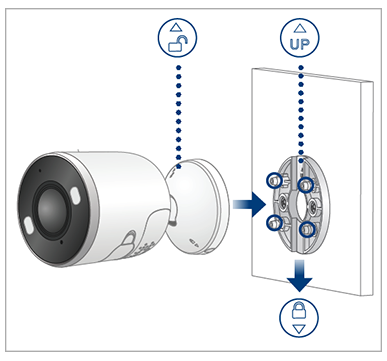
Align the arrows between wall mounting bracket and plate. Push the bracket in to install, then slide down to lock in place. You will hear a 'click' when the bracket is installed.
-
Attach the camera to the mounting bracket using the threaded insert at the rear of the camera. Rotate the camera clockwise until attached, then tighten into place with an adjustable nut.
-
Adjust the camera into desired angle.
Note:
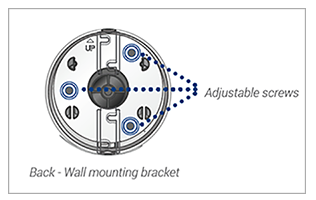
- If the camera is not holding in place or difficult to adjust, unplug the camera and slide the bracket up to detach from the mounting plate.
- Tighten or loosen the 3 screws at the back of the mounting bracket to adjust accordingly.
- Repeat steps 4-6 to re-install.
How to mount 2K Wi-Fi Camera to the ceiling
-
Place the mounting template onto the desired location.
Note: Ensure an outlet is nearby, and keep in mind the cable lengths. -
Using a 15/64" (6mm) drill bit, drill 4 holes over the X symbols on the template.
Optional: Drill 15/64" (6mm) holes for the anchors. -
Remove the 4 pre-inserted plugs from the ceiling/table mounting bracket.

-
Attach the camera to the ceiling/table mounting bracket using the threaded insert at the rear of the camera. Rotate the camera clockwise until attached, then use the wrench to tighten the adjustable nut in place.
-
Place the bracket over the drilled holes. Using a screwdriver and the provided screws, secure the bracket to the surface.
-
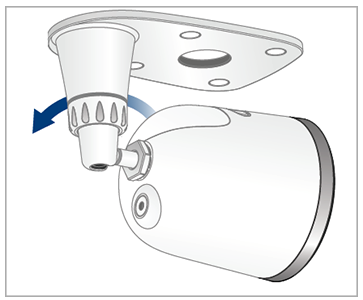
Rotate the adjustable ring counter-clockwise to loosen and adjust the camera to the desired position, then tighten to secure.
Optional:
- Feed the camera cable through the hole at the base of the bracket or the mounting surface.
- Open the camera’s settings in the app and enable Image Rotation to flip the camera image. To configure camera settings, see Device Settings.