MPX PTZ Cameras: Installation and setup on LHV / LNR
A Megapixel over Coax (MPX) Pan-Tilt-Zoom (PTZ) camera makes it possible to view large areas with a single camera connected to a DVR. PTZ cameras are able to rotate along two different axis, while being able to zoom in and out. Network PTZ cameras are also available for connecting to an NVR system. For assistance with Network PTZ camera setup, refer to your user manual. Click here for downloads and documentation for your product.
The following instructions require you to access your system using your DVR and a monitor.
To connect an MPX PTZ camera to a DVR:
-
Connect the camera to one of the Video In ports on the DVR.
-
Right-click on the Live View to access the Quick Menu.
-
Click Main Menu, and then click the Setting icon (
 ).
). -
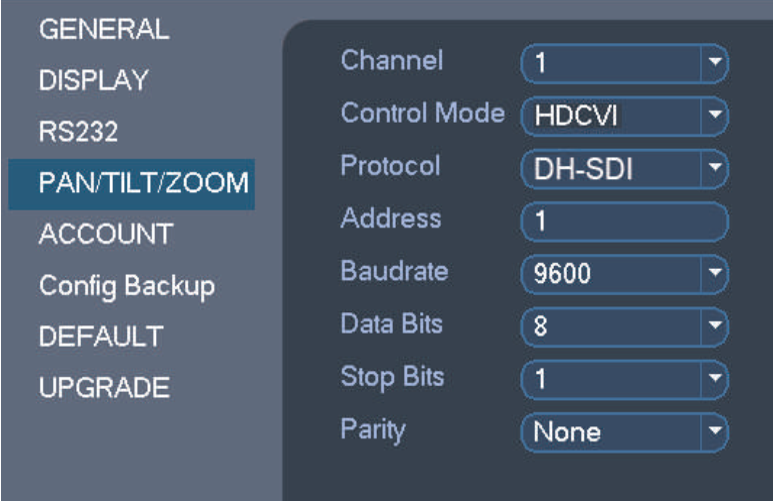
Click Pan / Tilt / Zoom.
-
In the Channel drop-down, select the port that goes to the PTZ camera.
-
In the Control Mode drop-down, select HDCVI.
-
In the Protocol drop-down, select DH-SDI.
-
Click Apply to save the settings, and then click OK to exit.

You can now control your PTZ Camera using your DVR.
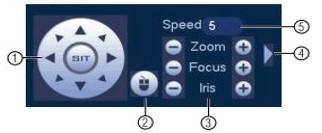
General controls for the MPX PTZ camera:

- Direction Keys: Allows for panning and tilting the camera. Clicking SIT stops the current action.
- Mouse PTZ: Allows for the PTZ camera to be controlled using the mouse.
- Click and drag to move the camera.
- Use the scroll wheel to zoom in and out.
- Right-click to exit and return to normal PTZ controls.
- Zoom / Focus / Iris: Click +/- to adjust the zoom, focus and iris.
- Advanced Controls: Opens the advanced PTZ controls.
- Speed: Allows for adjusting the speed at which the camera moves.
If the camera image is not displaying after initial setup, click here for troubleshooting steps.