L-View Client Software: Navigating the software on PC
When viewing or configuring the LNC Series camera on a PC, the L-View Client software is used to view playback and configure camera settings. Product downloads and documentation
L-View Client software Navigation:
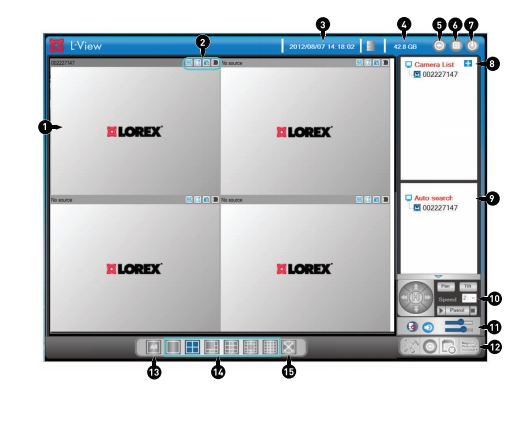
- Display: Shows a live video feed for the camera(s) being used.
- Click to select a camera and scroll up / down to zoom in / out. When zoomed in, click and drag the camera image to pan locations.
- Double-click to open the image in full-screen. Double-click again to exit full-screen.
- Right-click to open the display sub-menu.
- Image / Recording Controls:
- Video settings icon (
 ): Opens the video settings options.
 - Record list icon (
 ): Displays a list of recordings that have been saved to an SD card.
 - Snapshot tool icon (
 ): Opens the Snapshot tool. The Snapshot tool allows for taking pictures of live video or playback that is being watched.
 - Manual record icon (
 ): This allows for starting or stopping manual recording for a selected channel.
-
Time and Date: Displays the current time and date of the computer. The time and date of the camera may differ.
-
Hard Drive Indicator: Displays the amount of available space on the computer hard disk drive that is available for recording.
-
Minimize / Restore: Minimizes the L-View Client software to the toolbar.
-
Maximize / Revert Window: Maximizes the L-View Client software window to the size of the screen being used, or allows for reverting from maximum size to original size.
-
Exit: Closes the L-View Client software.
-
Camera List: Displays a list of all saved cameras. Available cameras will be displayed in blue and unavailable cameras will be displayed in red.
TIP: If cameras are displaying in red, check the network connection.
-
Auto Search: Shows all cameras available on the Local Area Network (LAN).
- To view a camera double-click a camera name or click and drag the camera to the Display Area.
- To save the camera click and drag the camera to the Camera List.
- To change camera settings in a web browser right-click the camera then click Web-Configure.
- Pan / Tilt / Zoom (PTZ) Controls: Controls for PTZ Cameras (not included).
- Volume Controls:
-
2-Way-Audio icon (
 ): Activates 2-way-audio functions.
 -
Mute icon (
 ): Mutes and un-mutes audio from the camera.
 CAUTION: Activating 2-way-audio will mute the camera.
-
The bottom slider adjusts camera volume.
- L-View Controls:
- L-View Settings icon (
 ): Open the L-View Settings
 - L-Play icon (
 ): Opens the L-Play software. The L-Play software allows for the playback of saved files from your computer's hard disk drive.
 - Schedule icon (
 ): Opens the scheduling settings. This configures the recording schedules.
 - Language selector icon (
 ): Allows for configuring the L-View Client software interface language.
- All camera action icon (
 ): Allows you to perform an action on all cameras.
 - Split screen selectors (
 ): Allow you to change the Live View display configuration.
 - Full screen icon (
 ): Allows you to display a selected camera in full screen. To exit full screen view press ESC.