Wi-Fi Security Camera - Installation tips
In this support article, we will show you how to properly install your camera. Verify your camera model and use the appropriate installation method for your camera.
This guide applies to the following products: W281AA, W282CA, W261AS, and W261AQ.
W261AS Series
WARNING: W261AS Series camera is for indoor use only.
IMPORTANT: To ensure the best possible wireless performance, we recommended that you keep the following installation tips in mind when choosing a location for your camera:
-
Place the camera as close to your Wi-Fi router or access point as possible.
-
Reduce the number of obstructive materials between the camera and the router or access point. Concrete, brick, metal, and wood are the most common materials in your house that can cause poor signal strength.
-
Other electronic devices such as microwaves, TVs, cordless phones, and baby monitors can cause signal interference. We recommended installing your camera as far away from these devices as possible.
Installation - Tabletop, Wall, and Ceiling
-
Once set up, the camera can be placed on any flat surface.
-
You also have the option to mount the camera to a wall or ceiling using the included mounting accessories. Use the included double-sided tape to mount the camera with no drilling required, or follow the steps below for permanent mounting.
Mounting the Camera on Wall or Ceiling
1. Mark the camera’s mounting position using the included mounting template.
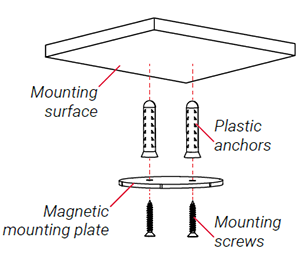
2. Drill holes where marked on the mounting template.
NOTE: Insert the optional plastic mounting anchors if you are installing the camera on a drywall or concrete.
3. Position the holes in the magnetic mounting plate over the mounting points.
4. Attach the magnetic mounting plate to the mounting surface using the included mounting screws.
5. Place the camera base on the magnetic mounting plate to secure it to the mounting surface. Adjust the camera’s position as needed.

IMPORTANT: If you are installing the camera on a ceiling, use the Image Rotation feature on the Lorex App to flip the camera image.
To flip the camera image, launch the Lorex App app > tap the camera you wish to flip the image>tap Settings > Image Rotation > toggle the Image Rotation to On.
W261AQ Series
WARNING: W261AQ Series camera is for indoor use only.
IMPORTANT: To ensure the best possible wireless performance, we recommended that you keep the following installation tips in mind when choosing a location for your camera:
-
Place the camera as close to your Wi-Fi router or access point as possible.
-
Reduce the number of obstructive materials between the camera and the router or access point. Concrete, brick, metal, and wood are the most common materials in your house that can cause poor signal strength.
-
Other electronic devices such as microwaves, TVs, cordless phones, and baby monitors can cause signal interference. We recommended installing your camera as far away from these devices as possible.
Installation - Tabletop and Ceiling Only
-
Once set up, the camera can be placed on any flat surface.
-
You also have the option to mount the camera to an indoor ceiling using the included mounting accessories.
Mounting the Camera
1. Mark the camera’s mounting position using the included mounting template.
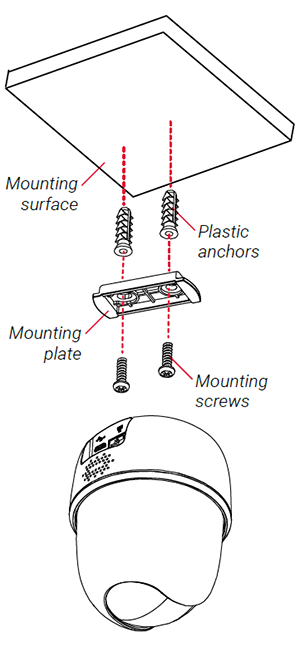
2. Drill holes where marked on the mounting template.
NOTE: Insert the optional plastic mounting anchors if you are installing the camera on a drywall or concrete.
3. Remove the mounting plate from the camera base and position the holes over the mounting points.
4. Attach the mounting plate to the mounting surface using the included mounting screws.
5. Twist the camera base onto the mounting plate to secure it to the mounting surface.
Adjust the camera’s position as needed.
IMPORTANT: If you are installing the camera on a ceiling, use the Image Rotation feature on the Lorex App to flip the camera image.
To flip the camera image, launch the Lorex App app > tap the camera you wish to flip the image > tap Settings > Image Rotation > toggle the Image Rotation to On.
W281AA / W282CA Series
NOTE: The camera is weather resistant and can be installed indoors or outdoors. Installation in a sheltered location is recommended.
IMPORTANT: To ensure the best possible wireless performance, we recommended that you keep the following installation tips in mind when choosing a location for your camera:
-
Place the camera as close to your Wi-Fi router or access point as possible.
-
Reduce the number of obstructive materials between the camera and the router or access point. Concrete, brick, metal, and wood are the most common materials in your house that can cause poor signal strength.
-
Other electronic devices such as microwaves, TVs, cordless phones, and baby monitors can cause signal interference. We recommended installing your camera as far away from these devices as possible.
-
Point the camera where there is the least amount of obstructions (e.g., tree branches).
-
Install the camera where vandals cannot easily reach.
-
Secure cabling so that it is not exposed or easily cut.
Installation - Wall Mounting
The following is the detailed instruction on how to properly install the camera on a wall.
1. Unplug the camera.
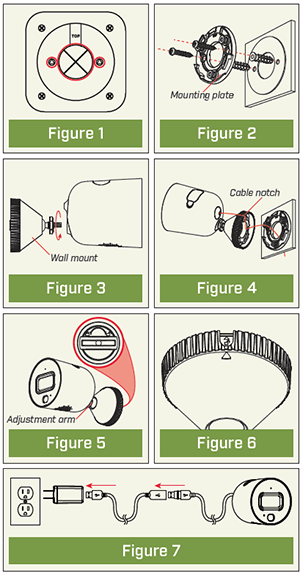
2. Use the included mounting template to mark holes for the mounting screws (×2) and cable (see Figure 1).
3. Drill holes where marked. If required, insert the included drywall anchors (×2).
4. Set the mounting plate over the screw holes with the TOP indicator pointing up. Secure the mounting plate in place using the included screws (see Figure 2).
5. Twist the camera clockwise onto the wall mount (see Figure 3).
6. Feed the camera cable through the cable notch in the wall mount, as well as the mounting surface (see Figure 4).
7. Use a flathead screwdriver (not included) to unlock the wall mount to move the adjustment arm. Adjust the camera angle as needed, then lock the adjustment arm (see Figure 5).
8. Position the wall mount over the wall mounting plate so the cable notch lines up with the unlocked position marked on the wall mount base (see Figure 6).
9. Twist the wall mount cover clockwise to lock the camera in place.
10. Reconnect the camera to the included power adapter using the optional weatherproof USB extension cable if desired (see Figure 7).
Installation - Tabletop and Ceiling
Tabletop Installation
Please refer to the following installation notes for outdoor mounting locations:
-
Ensure objects of interest will be further than 5ft (1.5m) from the camera.
-
Place the camera so that it has a clear view of the scene, and is not blocked by the surface it is installed on.
Ceiling Installation
Refer to“Ensuring Accurate Person & Vehicle Detection” above.

1. Unplug the camera.
2. Use the included mounting template to mark holes for the mounting screws (×4) and cable (see Figure 8).
3. Drill holes where marked. If required, insert the included drywall anchors (×4).
4. Remove the pre-inserted silicone plugs (4×) from the mounting stand (see Figure 9).
5. Twist the camera clockwise onto the mounting stand (see Figure 10).
6. Set the mounting stand over the screw holes. Secure the mounting stand in place using the included screws (see Figure 11).
7. Feed the camera cable through the hole in the mounting stand base, as well as the mounting surface (see Figure 12).
8. Twist the adjustment ring on the mounting stand counterclockwise to adjust the camera angle as needed. Tighten the adjustment ring when finished (see Figure 13).
9. Reconnect the camera to the included power adapter using the optional weatherproof USB extension cable if desired (see Figure 14).