Pan-Tilt Wi-Fi Security Camera : Motion Detection Settings
This article applies to the following products:
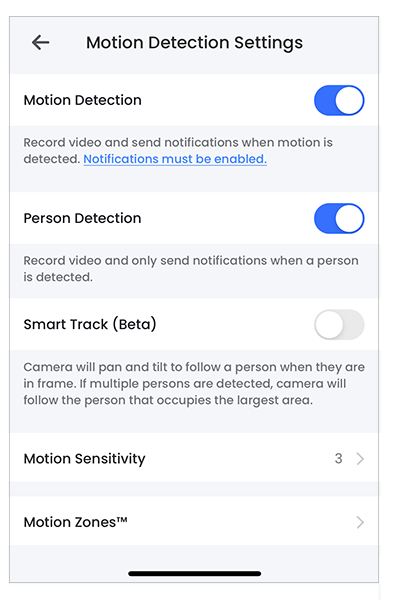
You can enable/disable the following settings from the Motion Detection screen:
- Motion Detection
- Person Detection
- Smart Track (Beta)
- Motion Sensitivity
- Motion Zones™
To enable/disable Motion/Person Detection
Enabling Motion or Person detection will record video and send notifications when motion or person is detected. Note: Notifications must be enabled.
-
Launch the Lorex App.
-
Tap
 icon above the channel thumbnail on the Devices screen.
 -
Tap Motion Detection Settings.
-
Tap
 icon to enable Motion/Person Detection. Tap again to disable.
To enable/disable Smart Track(Beta)
Your Lorex HD Wi-Fi Camera will pan and tilt to follow a person when they are in frame. If multiple persons are detected, camera will follow the person that occupies the largest area.
-
Launch the Lorex App.
-
Tap
icon above the channel thumbnail on the Devices screen. -
Tap Motion Detection Settings.
-
Tap
icon to enable Smart Track (Beta). Tap again to disable.
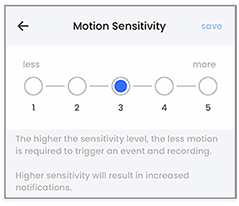
To change Motion Sensitivity
You can adjust the level of Motion Sensitivity of your Lorex device according to your preference. The higher the sensitivity level, the less motion is required to trigger an event.
Note: Higher sensitivity will result in increased notifications.
-
Launch the Lorex App.
-
Tap
icon above the channel thumbnail on the Devices screen. -
Tap Motion Detection Settings.
-
Tap Motion Sensitivity.
-
Tap and select the level of Motion Sensitivity, then tap Save.
Configuring Motion Zones™
Motion Zones™ allows you to customize your device’s motion detection region. Areas of the camera image that trigger unwanted motion events can be ignored, such as a busy sidewalk or trees blowing in the wind.
To set Motion Zones™
-
Launch the Lorex App.
-
Tap
icon above the channel thumbnail on the Devices screen. -
Tap Motion Detection Settings.
-
Tap Motion Zones™.
To set customized Motion Zones™
This setting can only detect motion in the specified area.
By default, the entire area has a blue overlay, meaning that a motion event happening anywhere on the screen will trigger an event.
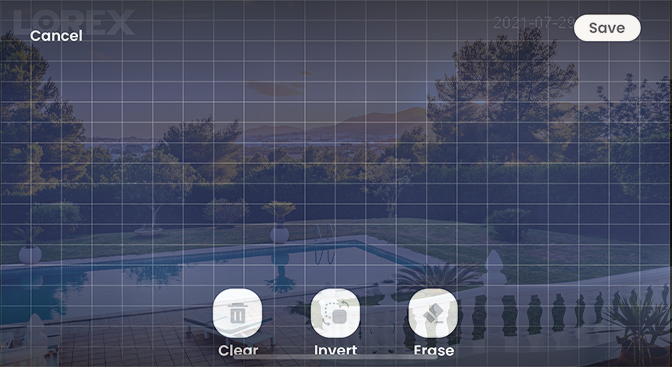
-
Tap
 icon to remove the blue overlay from the entire image.
 -
Tap and drag over the area where you want motion detection enabled.
Note: The deselected area will grey out and the selected area will be highlighted in blue.
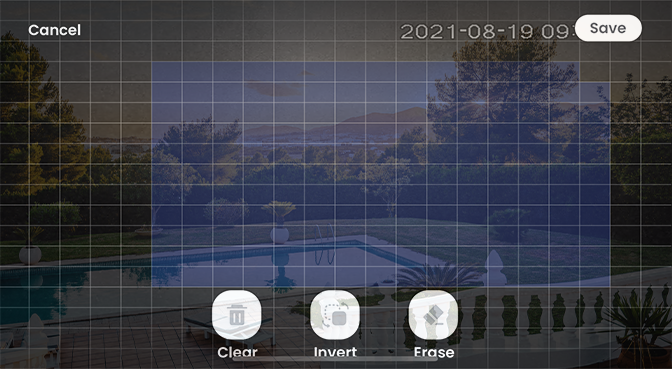
-
(Optional) Tap
 icon to exclude any area from the Motion Zones™.
 -
(Optional) Tap
 icon switch the Motion Zones™ to the unselected area.
 -
Tap Save.