N883, N884 Series: Using People Counting
The following article provides recorder instructions for using the People Counting feature on your wired cameras.
Table of Contents:
- Configuring People Counting
- Configuring In Area No.
- Searching for People Counting
- Searching for In Area No.
The People Counting feature anonymously detects, counts, and records the heads of people entering, exiting, and waiting in a monitored area allowing you to detect how long people spend in one place and how often that place was visited. Using smart search for people counting, you can then create reports and graphs broken down by hours, days, months, years based on the data from various cameras.
There are two types of people counting functions that can be applied:
- People Counting: People are counted as they cross a defined line in the camera’s field-ofview and exit up, down, left, or right depending on your settings. If the number of people crossing exceeds the predefined limit, it will trigger the system.
- In Area No.: In Area No. keeps count of the number of people waiting in a defined area and triggers the system if the number or the wait time exceeds a defined threshold.
People Counting is compatible with certain Lorex IP cameras. For a complete list of compatible cameras, navigate to your recorder series at lorex.com/compatibility.
Configuring People Counting
The system allows you to count the number of people entering, exiting, and passing by in a defined area. Select channels that you want to enable people counting on and adjust preferences.
Pre-requisite: If a Smart Plan is not enabled properly on your camera, the People Counting feature will not work. Please make sure to enable the People Counting feature before continuing. See the article Setting Your Camera's Smart Plan, for full instructions.
- From the Live View display, right-click to open the Quick Menu, then click Main Menu.
- Click EVENTS. Click the Event Settings tab from the side panel, then the People Counting tab from the drop-down.
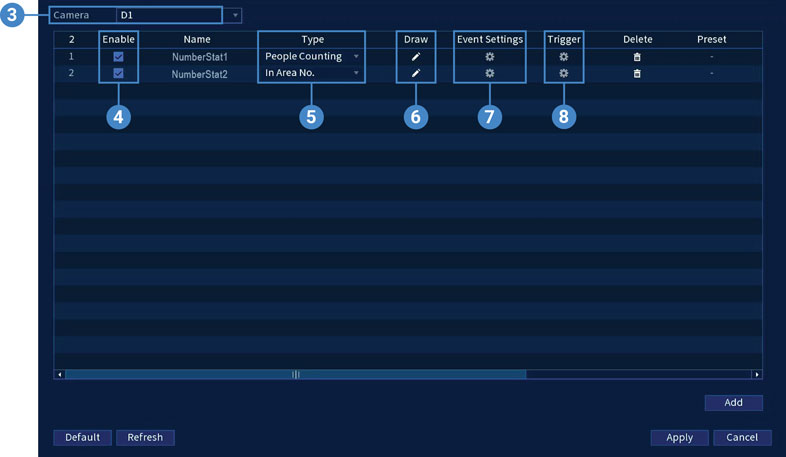
- Select a compatible camera.
- Check to enable the people counting rule(s) that you want to use.
- Select the People Counting type.
- Click the Draw icon and customize the active area for people counting.
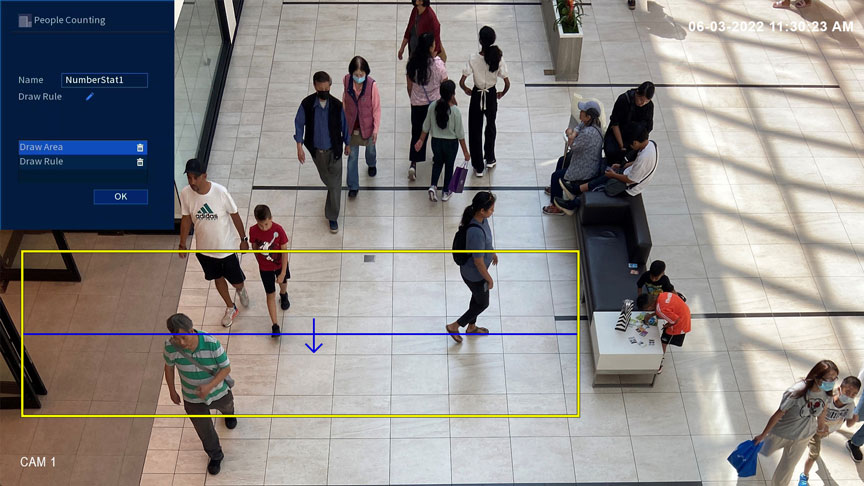
- Under Name, click to set a customized name for the rule.
- To draw the area, click Draw Area, and then click-and-drag the corners of the yellow bounding box to resize. To create a customized bounding box, click the delete icon
, and click around the area. Right-click to close the bounding box. For most accurate results, set an area where objects of interest will move within the bounding box as well as into/out of.
- To draw the people counting crossing line, click Draw Rule, and then click-and-drag the rule. By default, the rule will count people crossing from up within the bounding box. To change the crossing direction, click the delete icon and draw a new crossing rule. To count people crossing down, draw the rule from right to left. To count people crossing up, draw the rule from left to right. To count people crossing left, draw the rule from down to up. To count people crossing right, draw the rule from down to up.
- Click OK when finished.
- Click Event Settings to set the limit number for people entering, exiting, or staying in the defined area. The system will trigger an alarm if the number exceeds the limit.
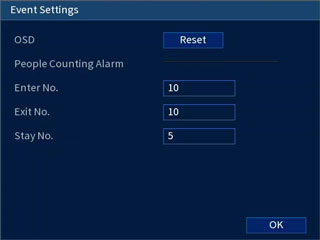
- Enter No.: Input a number limit for people entering the defined area.
- Exit No.: Input a number limit for people exiting the defined area.
- Stay No.: Input a number limit for people staying in the defined area.
- Click OK.
- Click the trigger modifying icon to adjust how the system will react to exceeding the people counting limit.
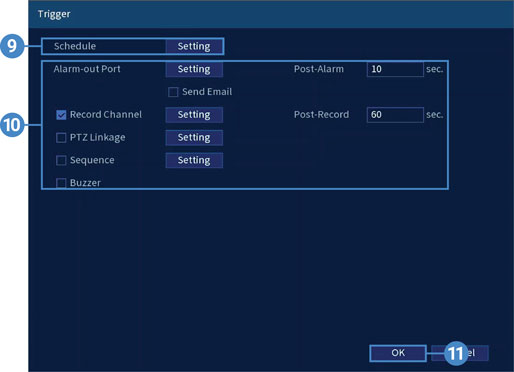
- Click Setting next to Schedule to choose which days and times of the week to enable people counting:

- Click or click-and-drag along each of the blue timelines to quickly add or remove time from each day’s schedule in 30–minute segments.
- Click
 beside 2 or more days to link schedules (
 ). This allows you to quickly change multiple schedules at once.
 - To make fine adjustments to a schedule, click
 . This will allow you to set exact start and end times for a schedule.
- Choose how the system will react to exceeding the people counting limit:
- Send Email: Check to enable email alerts. You must configure email alerts before you will be able to receive them.
- Record Channel: Select the channels that will record when motion is detected on the selected channel. Set the length of recording following a video loss event in the Post-Record field.
- PTZ Linkage: Set connected PTZ cameras to start a tour, pattern, or go to a preset location.
- Sequence: Sequence mode will begin. Select the numbered tiles next to this option to include the corresponding channels in the sequence.
- Picture Storage: Check the box to save a snapshot of the corresponding channels.
- Buzzer: Check to enable the system buzzer.
- Click Apply to save changes.
- Click Add to create additional active areas for people counting on the selected channel.
- To delete a people counting rule, click the Delete icon for that rule.
Configuring In Area No.
The system allows you to keep count of your area capacity and queuing limits. Select channels that you want to enable in area no. on and adjust preferences.
Pre-requisite: If a Smart Plan is not enabled properly on your camera, the People Counting feature will not work. Please make sure to enable the People Counting feature before continuing. See the article Setting Your Camera's Smart Plan, for full instructions.
- From the Live View display, right-click to open the Quick Menu, then click Main Menu.
- Click EVENTS. Click the Event Settings tab from the side panel, then the People Counting tab from the drop-down.
- Select a compatible camera.
- Check to enable the people counting rule(s) that you want to use.
- Select the In Area No. type.
- Click the Draw icon and customize the active area for in area no.
.jpg)
- Under Name, click to set a customized name for the rule.
- To draw the area, click Draw Rule, and then click around the area. Right-click to close the bounding box. For most accurate results, set an area where objects of interest will move within the bounding box as well as into/out of. To redraw the area, click the delete icon next to Draw Area and then click Draw Rule.
- Click OK when finished.
- Click Event Settings to set the limit number and time for people staying in the defined area. If the number exceeds the set limit, the system will trigger an alarm.
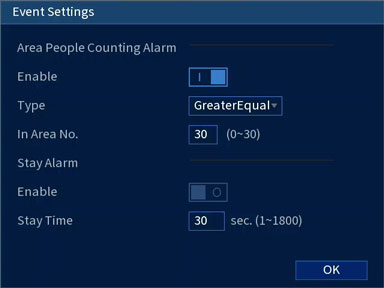
- Under Area People Counting Alarm, click Enable.
- Type: When the real-time number of people in the detection area is Greater Equal (greater than), Less Equal (less than), = Threshold (equal to), or ≠ Threshold (unequal to) the in area no., the alarm is triggered.
- In Area No.: Input a number limit for people in the defined area.
- Under Stay Alarm, click Enable.
- Stay Time: Input a time limit for people in the defined area.
- Click OK.
- Click the trigger modifying icon to adjust how the system will react to exceeding the in area no. limit.
- Click Setting next to Schedule to choose which days and times of the week to enable in area no.:
- Click or click-and-drag along each of the blue timelines to quickly add or remove time from each day’s schedule in 30–minute segments.
- Click beside 2 or more days to link schedules (). This allows you to quickly change multiple schedules at once.
- To make fine adjustments to a schedule, click . This will allow you to set exact start and end times for a schedule.
- Choose how the system will react to exceeding the in area no. limit:
- Send Email: Check to enable email alerts. You must configure email alerts before you will be able to receive them.
- Record Channel: Select the channels that will record when motion is detected on the selected channel. Set the length of recording following a video loss event in the Post-Record field.
- PTZ Linkage: Set connected PTZ cameras to start a tour, pattern, or go to a preset location.
- Sequence: Sequence mode will begin. Select the numbered tiles next to this option to include the corresponding channels in the sequence.
- Picture Storage: Check the box to save a snapshot of the corresponding channels.
- Buzzer: Check to enable the system buzzer.
- Click Apply to save changes.
- Click Add to create additional active areas for in area no. on the selected channel.
- To delete an in area no. rule, click the Delete icon for that rule.
Searching for People Counting
Smart Search for People Counting generates a statistical report based on your search criteria. Data obtained by the People Counting function can be graphed either as a bar graph or line chart and provides insight to daily, monthly, and yearly trend analysis.
- From the Live View display, right-click to open the Quick Menu, then click Smart Search.
- Click the People Counting tab from the side panel.
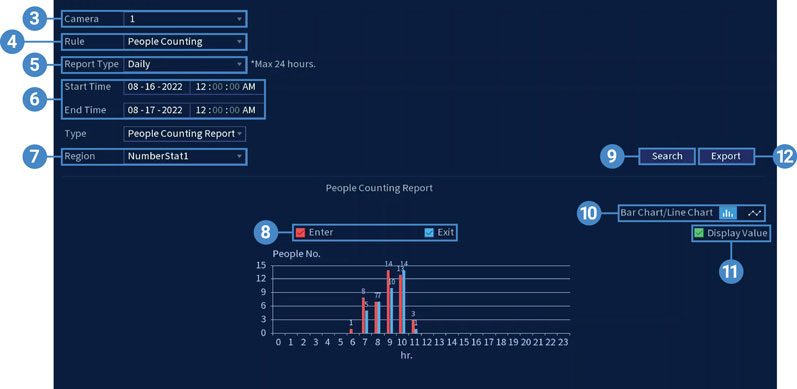
- Select a camera to search for people counting.
- Select the People Counting type for your search.
- Select the period for your search.
- Enter a start and end time for your search.
- Select the corresponding people counting rule for that camera.
- Check the people counting direction for your search, or both.
- Click Search. The people counting report that matches your search criteria is displayed in the chart.
- Select either a Bar Chart (bar graph) or Line Chart (line chart) for your report.
- Check to display the number of people in the chart.
- Click Export to save your data onto a connected USB (not included).
Searching for In Area No.
Smart Search for In Area No. generates a statistical report based on your search criteria. Data obtained by the People Counting function can be graphed either as a bar graph or line chart and provides insight to daily, monthly, and yearly trend analysis.
Note: Data collected for people counting - in area no. is stored to the recorder's hard disk drive (HDD) until its limit, and then the existing data is overwritten.
- From the Live View display, right-click to open the Quick Menu, then click Smart Search.
- Click the People Counting tab from the side panel.

- Select a camera to search for in area no.
- Select the In Area No. type for your search.
- Select the period for your search.
- Enter a start and end time for your search.
- Select the report type for your search.
- People Counting Report: This report includes the statistics for the number of visitors within the defined area.
- Average Stay Time: This report includes the statistics for the average stay duration within the defined area.
- Check the region for your search, or check all.
- Click Search. The in area no. report that matches your search criteria is displayed in the chart.
- Select either a Bar Chart (bar graph) or Line Chart (line chart) for your report.
- Check to display the number of people in the chart.
- Click Export to save your data onto a connected USB (not included).
For detailed instructions on configuring your system, refer to your recorder's Series Manual on the product support page. Visit help.lorextechnology.com and search your recorder's model number.