N883, N884 Series: Using Heat Map
The following article provides instructions for using the heat map feature to see hot (high activity) and cold (low activity) areas of the camera’s image.
Heat map works as a graphical overlay that displays the area and frequency of motion detected in the camera’s image using a warm-to-cool color scheme. The warm colors indicate sections with the most motion detected, red being the highest detected areas, and the cool colors point to the lowest detected areas.

Heat Map is compatible with certain Lorex IP cameras. For a complete list of compatible cameras, navigate to your recorder series at lorex.com/compatibility.
Enable Smart Plan Feature
If a Smart Plan is not enabled properly on your camera, the heat map feature will not work. Please make sure to enable the Heat Map feature before continuing. Refer to the article Setting Your Camera's Smart Plan.
Using Heat Map
Select channels to use heat map on and adjust preferences.
- From the Live View display, right-click to open the Quick Menu, then click Main Menu.
- Click EVENTS. Click the Event Settings tab from the side panel, then the Heat Map tab from the drop-down.
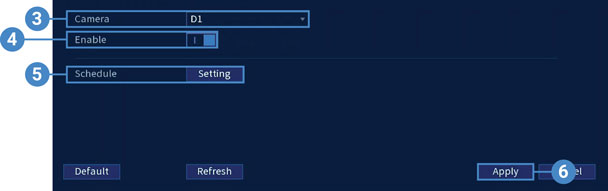
- Select a channel with a compatible camera.
- Check to enable heat map on the selected camera.
- Click Setting next to Schedule to choose which days and times of the week to enable heat map:

- Click or click-and-drag along each of the blue timelines to quickly add or remove time from each day’s schedule in 30–minute segments.
- Click
 beside 2 or more days to link schedules (
 ). This allows you to quickly change multiple schedules at once.
 - To make fine adjustments to a schedule, click
 . This will allow you to set exact start and end times for a schedule.
- Click Apply to save changes.
Searching for Heat Map (Smart Search)
Search for heat mapping on a specific channel or the entire system. You can also choose to back up events (USB flash drive required – not included).
- From the Live View display, right-click to open the Quick Menu, then click Smart Search.
- Click the Heat Map tab from the side panel.
- Select a camera to search for heat map.
- Choose a start time and end time for your search.
- Click Search.
- All heat mapping data matching your search criteria is displayed. You now have the option to export:
- Connect a USB flash drive (not included) to a free USB port on the unit and click Export.
- Select a folder for exporting and click OK.
For detailed instructions on configuring your system, refer to your recorder's Series Manual on the product support page. Visit help.lorextechnology.com and search your recorder's model number.