B241AJ Series - 1080p Wired Video Doorbell: Frequently Asked Questions (FAQs)
The following FAQ answers many of the general questions about the 1080p Wired Video Doorbell. Where applicable, the FAQ includes links to articles where you may find more information.
Why is the Lorex App not connecting to the video doorbell during setup?
This is a single band 2.4 GHz Wi-Fi doorbell, and needs a 2.4 GHz Wi-Fi network.
The doorbell will not power on?
If you are also setting up a Wi-Fi Chimebox (ACCHM1 / ACCHM2), you must select the correct option during setup.
Select Not Now. Do not select Mechanical Chime or your doorbell will not power on.

What's the wireless range of the video doorbell?
The doorbell has a range of approximately 32 meters (105 ft) dependent on the environment.
Note:
- Reduce the number of obstructive materials between the doorbell and the router or access point.
- Other electronic devices such as microwaves, TVs, cordless phones, and baby monitors can cause signal interference.
Why is the video doorbell not turning on?
- Make sure the breaker is turned on. After turning the breaker back on, wait 5 minutes for the doorbell to fully power on and press the doorbell’s button to ensure that the chime is operating correctly.
- Make sure the power source that supplies the video doorbell is 16-24V AC. Check if the voltage is printed on your transformer and/or use a multi-metre to test the power. Refer to the article “What transformer should I use with my Wired Video Doorbells?” for more information.
- Connect the video doorbell using the supplied USB power cable. Make sure the USB cable is connected to a 5V 2A USB power adapter (not included) that is also connected to a power outlet. To verify if the power outlet is working properly, try connecting another device to the outlet and check if the device gets power. If the video doorbell successfully powers on using the USB power adapter, carefully go over the installation setup again. Refer to the article “Installing the 1080p Wired Video Doorbell” for more information.
My doorbell does not ring or rings continuously
If after you press the ring button on the video doorbell, and experience that your existing mechanical chime does not ring, or rings continuously, please contact support at 1-888-425-6739.
I hear an echo when I use 2-way talk (iPhones Only)
Users experiencing an echo or other audio issues, should upgrade their iPhone firmware to iOS 16.1 or later.
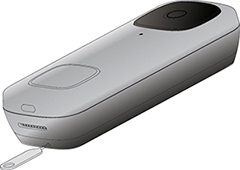
How do you remove the video doorbell from the mounting bracket?
- Insert the supplied pin into the hole at the bottom of the mounting bracket until the inner buckle is reached.
- Then slide the doorbell up and remove it.
How do you reset the video doorbell?
- Pull back the RESET/microSD card slot cover located on the back of the video doorbell.
- Use the supplied pin and insert it into the tiny hole labelled RESET for 10 seconds. Wait for an audible sound to confirm that the video doorbell is restarting.
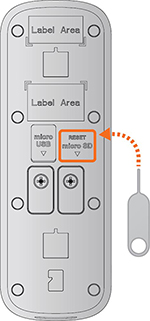
How do you insert or remove the microSD card from the video doorbell?
- Pull back the RESET/microSD card slot cover located on the back of the video doorbell.
- If inserting, slide the microSD card into the slot (with the label side down) until it clicks into place.
- If removing, push down gently on the microSD card. It will pop out and can then be removed.
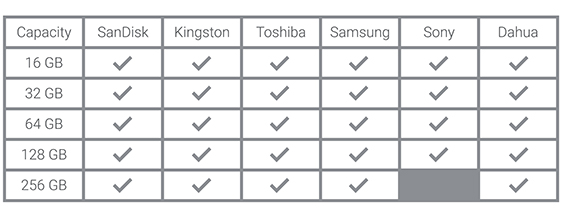
What size microSD card does the video doorbell accept?
The video doorbell can accept a micrsoSD card of up to 256 GB of storage capacity.
Here are sizes and brands of microSD card's that are supported by the video doorbell:
What is the minimum recommended upload speed required for remote video streaming?
A minimum upload speed of 10 Mbps is required for best performance.
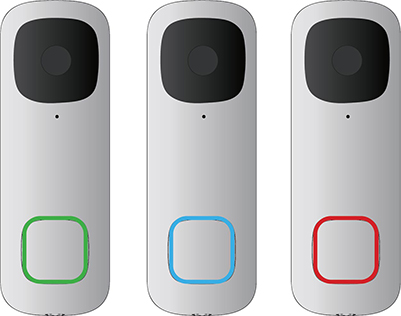
What is the video doorbell's LED status indicator?
The LED is on the outside of your doorbell button and indicates how the doorbell is operating. The following section describes how the LED works if you didn’t change the default LED settings.
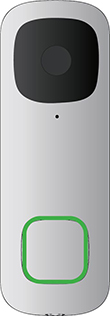
- Solid blue: the video doorbell is powering on or the video doorbell is restarting.
- Flashing blue slowly: The video doorbell is ready to connect.
- Solid green: The video doorbell is operating correctly.
- Spinning green: The calling function on the video doorbell is in use.
- Flashing green: The talking function on the video doorbell is in use.
- Flashing blue quickly: The video doorbell has detected motion.
- Solid red:The video doorbell is resetting to factory default.
- Flashing blue, red, and green: A firmware update is in progress.
- Flashing red: The video doorbell failed to connect to the network.
- Spinning red: The video doorbell is connected to the network, but unable to access the internet.
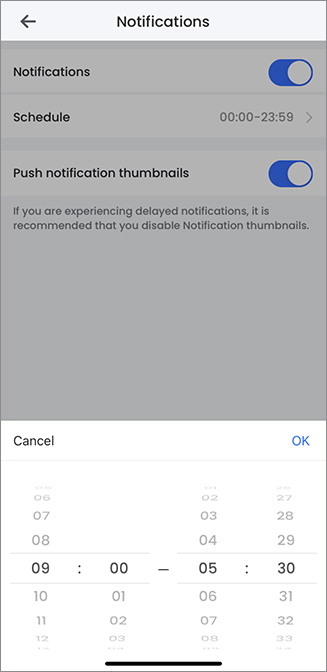
How come I am receiving so many notifications?
- There are a few ways you can lower the number of notifications you are getting. The first settings you can look to adjust is the Motion Detection Settings. In here you can enable/disable motion detection and person detection, as well as customizing Motion Zones™ and Sensitivity. Refer to the article "Customizing motion detection for the Video Doorbell" for more information.
- You can also manage notifications in Device Settings > Notifications and set a schedule to receive alerts at set periods in the day.
How do I customize motion detection and person detection?
- Open the Lorex App.
- Tap on the three dots ••• icon on the top right of the video doorbell (Device Settings) > Motion Detection Settings.
For more information, visit B241AJ - 1080p Wired Video Doorbell: Customizing Motion Detection Settings.
How do I filter through recorded events?
The Video Doorbell has person detection and motion detection enabled by default. You will only receive notifications in the Lorex App when a person is detected and your events will only display person detection events and doorbell call events.
- Open the Lorex App.
- Tap the video doorbell to go to Live View.
- Tap on Timeline to reveal all events on the timeline bar.
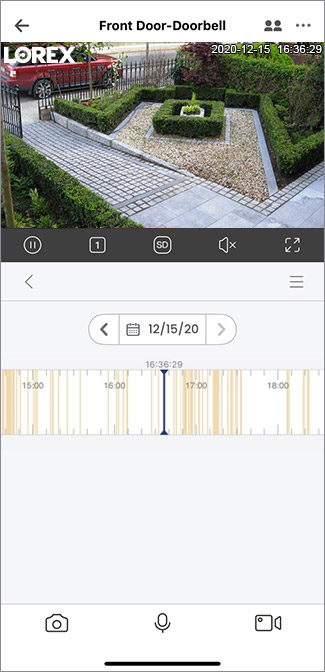
- Tap the three lines on the top right of the timeline.
- Tap
 to filter through the event types.
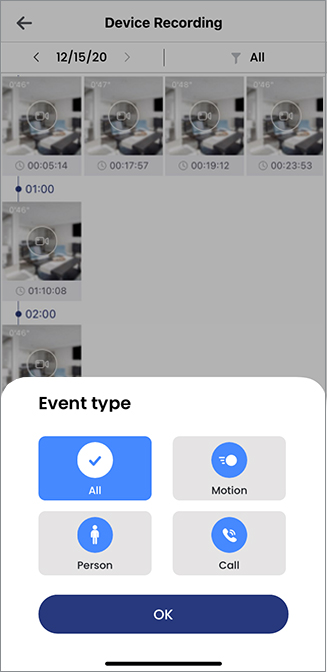
Note: All event types, including both motion events and person detection events, are saved on the microSD card.
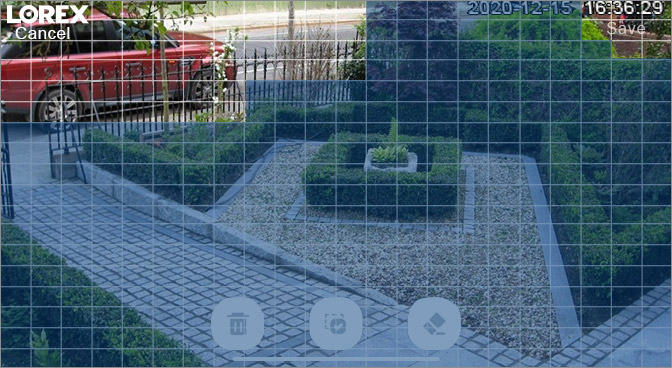
How do I set up Motion Zones™?
- Open the Lorex App.
- Tap on the three dots ••• icon on the top right of the video doorbell (Device Settings) > Motion Detection Settings > Motion Zones™.
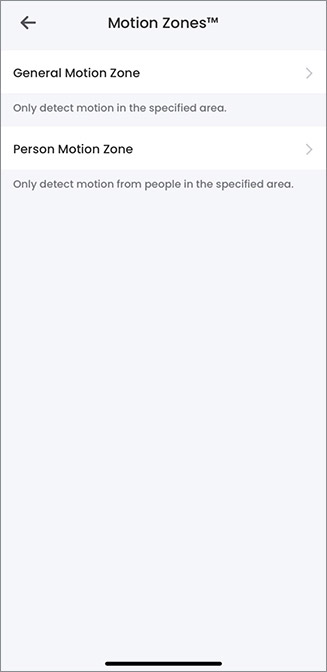
- Tap General Motion Zones to configure the areas of the image that will be enabled for motion detection. The blue grid indicates the active area for motion detection.
- Tap the drawing icon
 and drag to add / remove the active area.
 - Tap Save.
- Tap Person Motion Zones to configure the areas of the image that will be enabled for person detection. The blue overlay indicates the active area for person detection.
- Select any anchor point from the blue overlay and adjust the size/shape for the area you want to monitor.
- Tap the screen to display the drawing buttons.
- Tap the drawing icon
 to add more zones. You can set up to 3 different zones.
 - Tap Save.
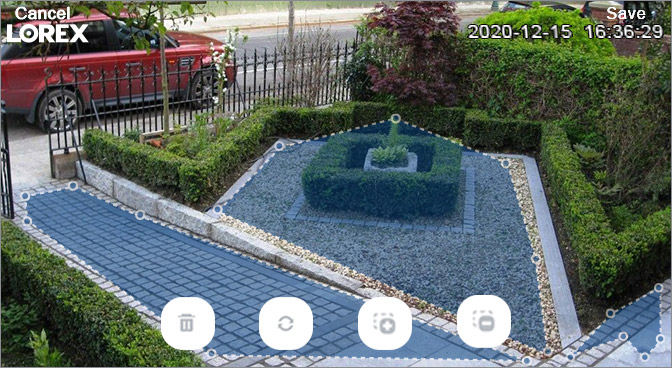
Reminder: Motion detection will be disabled for areas of the image without the blue overlay. Disabling motion detection in certain areas of the image is an effective way to eliminate unwanted recordings and notifications caused by contact movement like trees blowing in the wind or regular traffic.
How do I activate the LED deterrence light when motion is detected?
- Open the Lorex App.
- Tap on the three dots ••• icon on the top right of the video doorbell (Device Settings) > Motion Detection Settings > Light Settings.
- Enable Activate Deterrence Light on Detection.
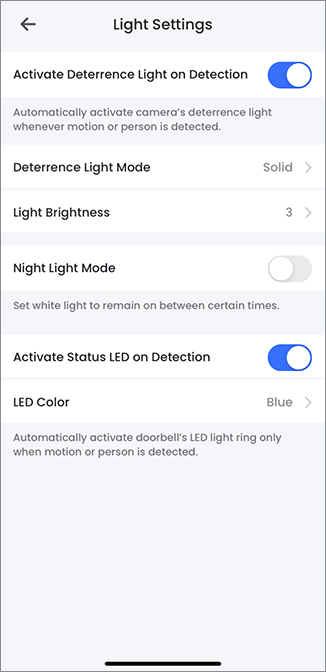
Enabling the deterrence light will reveal more options for customization, such as activating LED colors on the doorbell when motion is detected. To change the LED color during motion detection:
- Enable Activate Status LED on Detection.
- Choose between green, blue, and red.
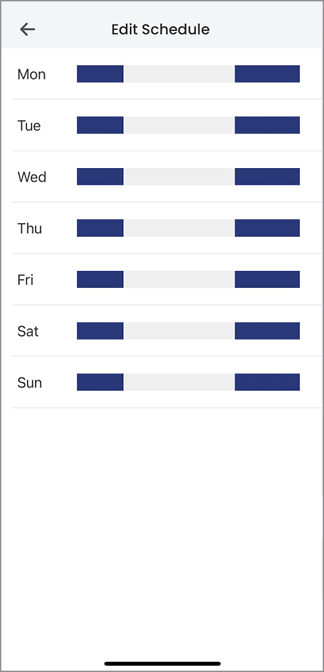
How do I get the video doorbell’s light to stay on at night?
In Device Settings > Motion Detection Settings > Light Settings, enable Night Light Mode.
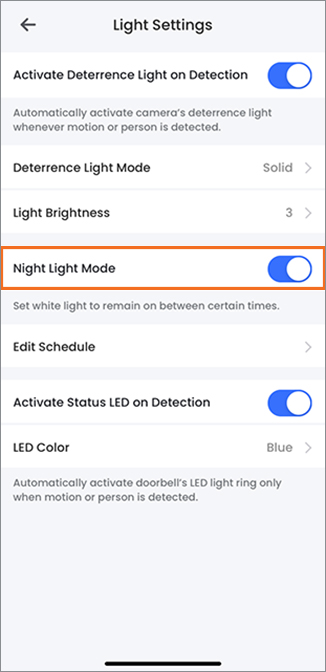
Then select Edit Schedule to set a start time and end time for each given day of the week.
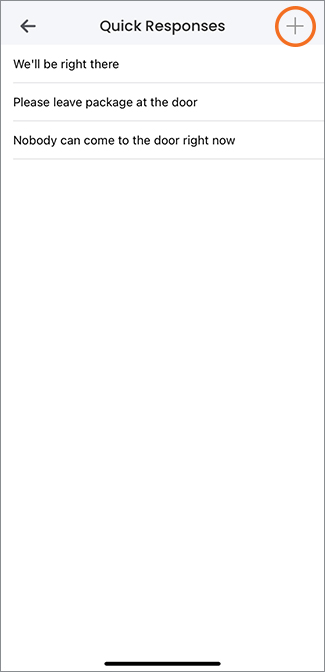
How do I record a custom quick response for the video doorbell?
In Device Settings > Doorbell Quick Responses, tap the + on the top right and record your custom quick response. Tap Next to name and save the recorded message.
How do I disable/enable HDR?
High dyanmic range (HDR) is optimized for outdoor environments to help with over- or under-exposed images of scenes with both bright and dark areas in the same picture. Your video doorbell is enabled by default to determine when to use HDR, but you can disable it. This change takes effect on the next video stream or motion recording.
- Open the Lorex App.
- Tap on the three dots ••• icon on the top right of the video doorbell (Device Settings) > Video Settings.
- Disable/enable HDR(High Dynamic Range)
How do I remove the video doorbell from my account?
- Open the Lorex App.
- Tap on the three dots ••• icon on the top right of the video doorbell.
- Scroll down and tap Remove Device.
What is the aspect ratio of the video doorbell's image?
The video doorbell captures visitors from head to toe with an aspect ratio of 16:9 in vertical view.
Can the video doorbell be used inside an office building?
Yes, the video doorbell can operate in an office setting using the included USB cable. Since it will not be able to connect to a chime box, it must be set to an electronic chime in the Lorex App.
Important:
- Do not use the USB cable while the video doorbell is wet or in an area where it could get wet. The protective charging cover on the back panel will be exposed to liquids which can result in damage to the charging port.
- Make sure that the USB cable is connected to a 5V 2A USB power adapter (not included).
Does my device support WPA2 or WPA3?
Your device supports Wi-Fi Protected Access 2 (WPA2) which is the industry standard security protocol for Wi-Fi networks. WPA2 offers security against unauthorized access and data interception and is supported by most Wi-Fi routers including those that support both WPA2 and WPA3. It employs Advanced Encryption Standard (AES), an encryption mechanism, which secures communication between your camera and Wi-Fi network to keep transmitted data confidential. For information on which devices support WPA2 and which devices support WPA3, please refer to “WPA2 and WPA3 Supportive Devices.”