N910 Series - 4K+ Ultra HD 12MP 16 Camera Capable NVR: Sound Detection
The following article provides instructions on enabling Sound Detection on your camera.
Sound detection uses the built-in microphone to trigger recording when abnormal audio or intense sounds are detected near the camera.
Important: Ensure that the camera is not near constant background noise that will trigger audio detection and create false alerts.
Sound Detection is compatible with certain Lorex IP cameras. For a complete list of compatible cameras, navigate to your recorder series at Product Compatibility Chart.
Configuring Sound Detection
Important: Make sure you already have the camera audio enabled on the main and sub-stream of the channel you are configuring, see Connecting Audio Devices for more details.
To configure sound detection:
- From the Live View display, right-click to open the Quick Menu, then click Main Menu.
- Click Events, then Event Settings. Click the Sound Detection tab from the side panel.
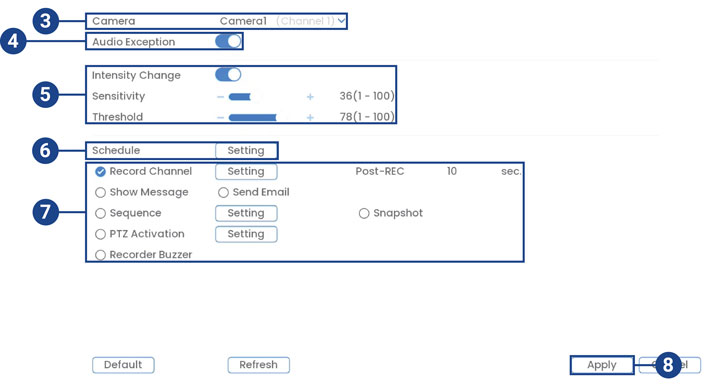
- Select a camera to configure.
- Check to enable Audio Exception which will trigger the system when the audio input is abnormal.
- Check to enable Intensity Change to trigger the system when the sound intensity exceeds the sensitivity and threshold levels:
- Sensitivity: Adjust the sensitivity bar to increase or decrease the amount of sound required to trigger an event above the threshold. Sensitivity is a finer setting than the threshold setting.
- Threshold: Adjust the threshold bar to determine how loud a sound must be to trigger an audio detection event.
Important: To avoid receiving too many notifications from a noisy environment, set the Threshold level to high. The system is triggered easily when the Sensitivity level is set to high and Threshold level is set to low.
- Click Setting next to Schedule to choose which days and times of the week to enable sound detection:
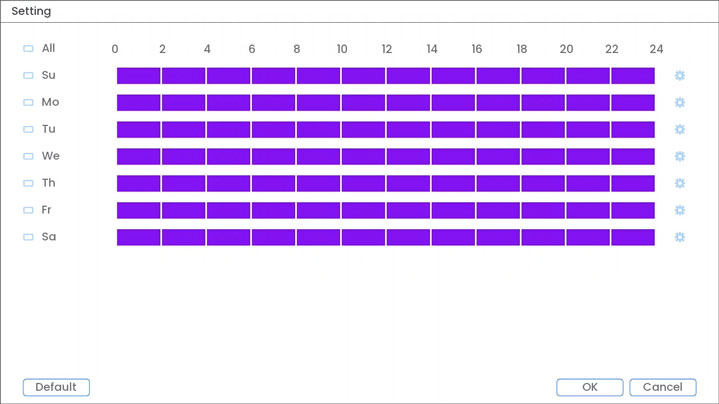
- Click or click-and-drag along each of the red timelines to quickly add or remove time from each day’s schedule in 30–minute segments.
- Click
 beside 2 or more days to link schedules (
 ). This allows you to quickly change multiple schedules at once.
 - To make fine adjustments to a schedule, click
 . This will allow you to set exact start and end times for a schedule.
 - Click OK when finished.
- Choose how the system will react to sound detection:
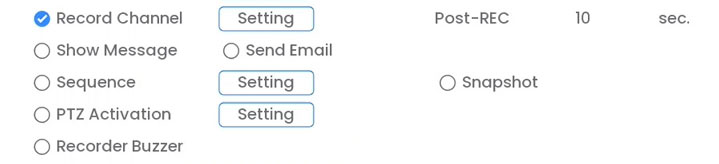
- Record Channel: Select the cameras that will record when abnormal or intense sounds are detected. Set the length of recording following a sound detection event in the Post- REC field.
- Show Message: Check to enable an on-screen pop-up when one of your cameras detects motion. On-screen pop-up shows the channels an event occurred on and the type of event.
- Send Email: Check to enable email alerts. You must configure email alerts before you will be able to receive them, see Setting up email alerts.
- Sequence: Sequence mode will begin. Select the numbered tiles next to this option to include the corresponding cameras in the sequence.
- Snapshot: Select the numbered tiles next to this option to save a snapshot of the corresponding cameras.
- PTZ Activation: Set connected PTZ cameras to start a tour, pattern, or go to a preset location.
- Recorder Buzzer: Check to enable the system buzzer.
- Click Apply to save changes.