N910 Series - 4K+ Ultra HD 12MP 16 Camera Capable NVR: Connecting Audio
The following article provides instructions for connecting audio devices and enabling audio recording on your NVR.
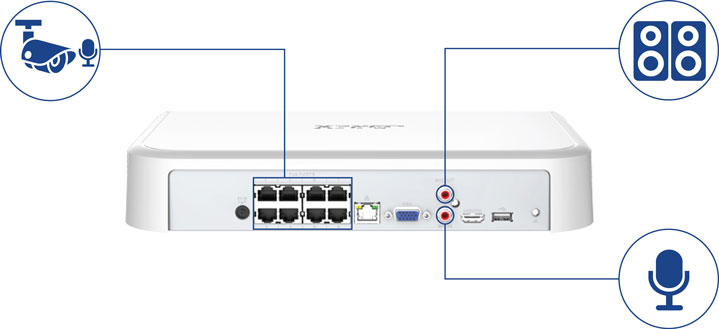
Make sure that you must first have a self-powered microphone or an audio camera with an RCA-type audio connection to use this port.
- To utilize the listen-in feature, your camera must have a built-in speaker.
- To utilize the two-way talk feature, your camera must have a built-in speaker and microphone.
Important: Use of an external microphone allows you to record audio on one channel on the system as long as the connected camera has a built-in speaker.
The first RCA-type connector on the back panel is the AUDIO OUT port, which can be used to connect a self-powered speaker that will play audio from the system (requires audio-capable camera or self-power microphone).
Enable Audio Recording
Caution: Audio recording and/ or use of listen-in audio without consent is illegal in certain jurisdictions. Lorex Corporation assumes no liability for use of its products that does not conform with local laws.
To enable audio recording:
- From the Live View display, right-click to open the Quick Menu, then click Main Menu.
- Click Devices, then Record Settings. Click the Record Settings tab from the side panel.
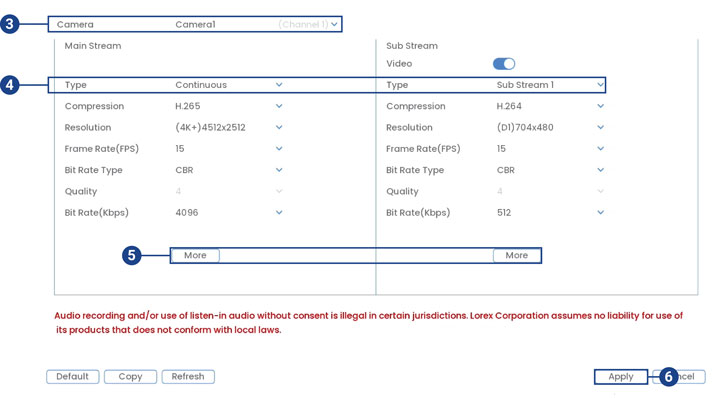
- Select the channel where the audio camera is connected.
- Select the type of recording to enable audio for. If you wish to record audio at all times, ensure you configure both Continuous and Motion recording.
- Click on More to configure the following:
- Audio: Check box to enable/disable.
- Compression: Select an audio codec (G711A recommended).
- Sampling Frequency: Select an audio sampling rate (8K recommended).
- Click OK to save.
- Click Apply to save all changes.