< Back to list
E910AB, E910DD, H Series, H30 - 4K+ 12MP IP Wired Security Camera with Smart Security Lighting: Installation Guide
This article gives installation instructions for your E910AB and E910DD Halo Series IP Wired Security Cameras.
What is included:
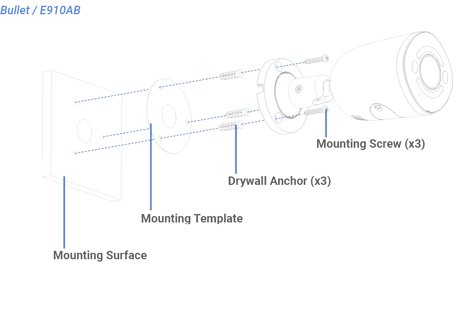
Bullet E910AB Camera:
- 4K+ Bullet Camera
- Mounting Template
- Anchors & Screws (3×)
- Ethernet Extension Cable
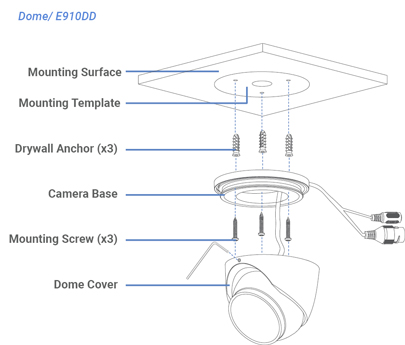
Dome E910DD Camera:
- 4K+ Dome Camera
- Anchors & Screws (4×)
- Mounting Template
- Ethernet Extension Cable
- Allen Key
Camera Placement Tips:
- Take into consideration what you want to monitor and where is the best coverage area.
- Place your camera close to the area of interest.
- Point your camera where there is the least amount of obstructions (i.e. tree branches).
- Install your camera in a location that is difficult for thieves and vandals to reach.
- The best position is 10 ft (3 m) above ground, angled 15° down.
- Secure cabling so that it is not exposed or easily cut.
Mounting your E910AB Bullet Camera:
- Use the mounting template to drill holes for screws, then insert the drywall anchors. Drill a hole for your camera’s cable if you plan to run it through the mounting surface.
- Use the screws to mount your camera base to the surface. If you are running cables along a wall/ceiling, make sure to pass the cable through the cable notch.
- Feed your camera’s cable through the camera base, then connect the cables.
- Loosen the adjustment screw and position your camera as needed, then tighten to secure it in place.
- Remove the vinyl film from the camera lens once your installation is complete.
Mounting your E910DD Dome Camera:
- Use the mounting template to drill holes for screws, then insert the drywall anchors. Drill a hole for your camera’s cable if you plan to run it through the mounting surface.
- Use the Allen key to loosen the camera’s adjustment screw, then remove the dome cover from the camera base.
- Use the screws to mount the camera base to the surface. If you are running cables along a wall/ceiling, make sure to pass the cable through the cable notch.
- Feed your camera’s cable through the camera base, then connect the cables.
- Angle your camera, then use the Allen key to tighten the dome cover firmly onto the camera base.
- Remove the vinyl film from the camera lens once your installation is complete.
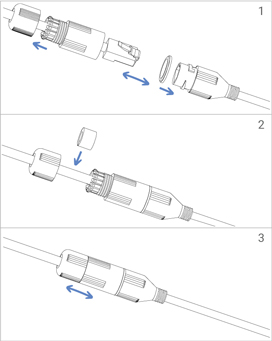
Connecting your Camera:
Connect your camera directly to your recorder using your camera’s Ethernet extension cable.

Twist the Ethernet extension cable’s pre-attached weather-resistant cap securely onto your camera’s Ethernet connector. If exposed to regular precipitation, seal the cap with silicone and electrical tape.
Installing your NVR
For instructions on installing your NVR, please refer to your NVR's Quick Start Guide.