L-View Client Software: Navigating the software on Mac
When viewing or configuring the LNC Series camera on a Mac, the L-View Client software is used to view playback and configure camera settings. Click here for more information on locating software downloads.
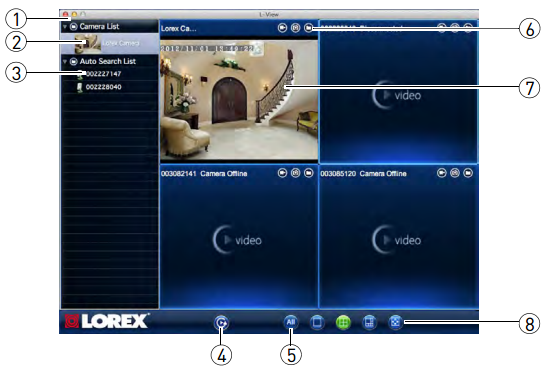
L-View Client software Navigation:

-
Window Controls: Allows for closing, minimizing, and maximizing the L-View Client software.
-
Camera List: Displays a list of all saved cameras. Available cameras will be displayed in blue. Unavailable cameras will be displayed in red. Click here for information on how to connect cameras.
REMINDER: If cameras are displayed in red, check the network connection.
-
Auto Search List: Shows all the cameras available on the Local Area Network (LAN).
- To view a camera, double-click on the camera or click and drag the camera to the Display Area.
- To save the camera, click and drag the camera to the Camera List.
- To change camera settings in a web browser, right-click the camera and click Web configure.
- Playback icon (
 ): Opens playback mode.
 - All Camera Action (
 ): Performs an action on all the cameras being viewed.
 - Recording Controls:
- Record icon (
 ): Start / stop manual recording.
 - Snapshot icon (
 ): Takes a snapshot from the camera. To view snapshots click the Folder icon (
 ) > Snapshot Folder.
 - Folder icon (
 ): Opens the recording folder or snapshot folder.
- Display Area: Shows the video from the camera.
- Click to select a camera and scroll up / down to zoom in / out. When zoomed in, click and drag the camera image to pan locations.
- Double-click to open the image in full-screen. Double-click again to exit full-screen.
- Right-click to open the display sub-menu.
- Split-screen Controls: Allow you to change the camera Live View display configuration.
- Single Camera icon (
 ): Shows one camera on the screen.
 - Four Camera icon (
 ): Shows four cameras on the screen.
 - Six Camera icon (
 ): Shows six cameras on the screen.
 - Full Screen icon (
 ): Opens the current display in full screen. Press Esc to exit full-screen.