FLIR Secure Camera: Getting to know your FLIR Secure camera
Get to know your FLIR Secure indoor camera. See below for an explanation of the parts and functions of your FLIR Secure indoor camera.
-
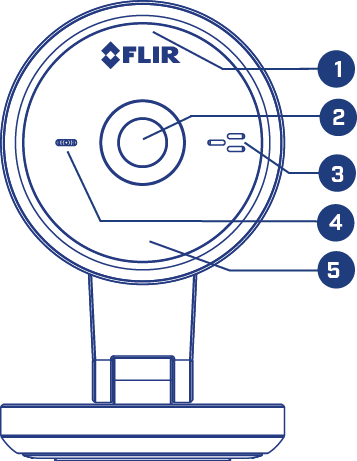
Status LED:
-
Steady Red: Camera is starting up or resetting.
-
Slow-Flashing Red: The router or network that the camera is connected to is down. Check your router settings.
-
Steady Blue: Camera is connected to FLIR Cloud services.
-
Fast-Flashing Blue: Firmware upgrade in progress.
IMPORTANT: Do not power off or unplug your camera during a firmware upgrade.
-
Slow-Flashing Blue: Camera setup in progress.
-
Slow-Flashing Blue / Red: Camera is ready for set-up.
-
LED Off: Camera is in Privacy mode, or is turned off:
- Click here to learn more about enabling Privacy mode using the Lorex Secure / FLIR Secure app.
- Click here to learn more about enabling Privacy mode using the FLIR Secure web portal.
-
-
Camera Lens
-
Speaker: Allows you to talk through your camera from your smartphone or tablet using 2-Way Audio.
-
Microphone: Allows you to hear the area around the camera.
-
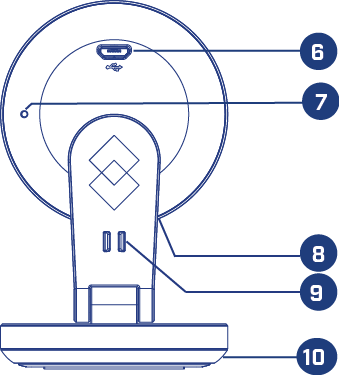
Night Vision LED
-
microUSB Power Port
-
Reset Button
-
microSD Card Memory Slot
-
microUSB Power Cable Clip: Secure the USB power cable with this clip.
-
Camera Base
-
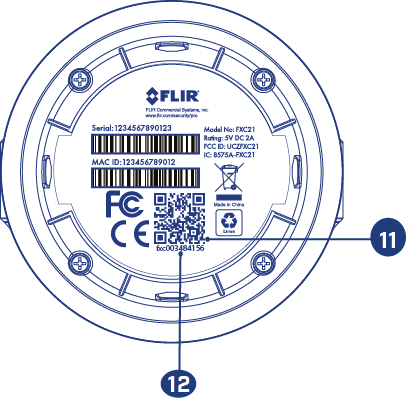
QR Code: Scan during Wi-Fi setup (for Android users only) using the FLIR Secure app.
-
Device ID
-
Mounting Plate: Enables the camera to be mounted to a wall. The mounting plate can be removed from the camera.