LHV Series: Setting up your DVR
You can set up your LHV Series DVR to be used with a monitor (not included) and wired mouse (included).
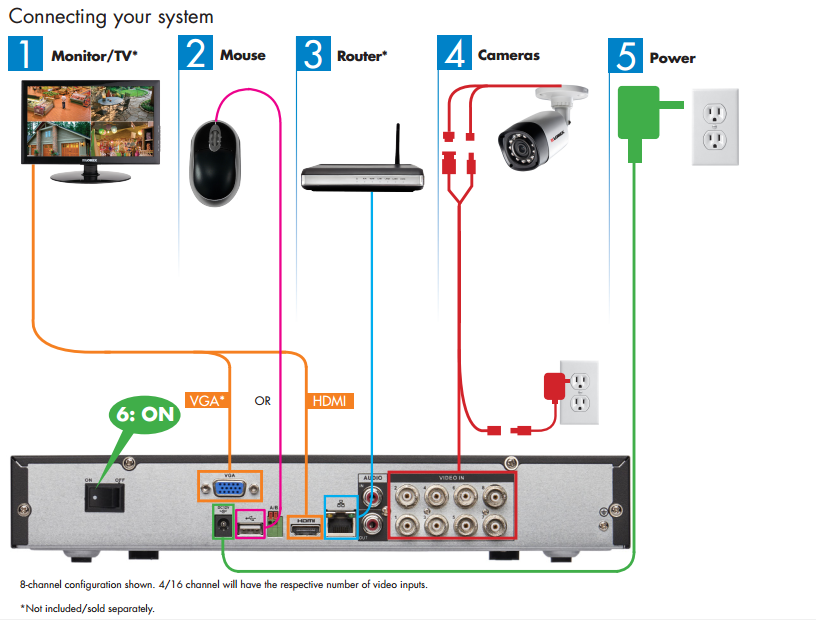
To set up your LHV Series DVR:
-
Connect a monitor (not included) to your DVR. You can either use an HDMI cable (included) or a VGA cable (not included).
TIP: For the best video output, use your DVR with a monitor that supports 1080p resolution or higher.
-
Connect the wired mouse (included) to the USB port on your DVR.
-
Connect your DVR to your Router (not included) to using the Ethernet cable (included).
-
Connect your cameras to your DVR and a power source using the power adapter (included).
REMINDER: Extension cables must be a single stretch of cable between the DVR and camera. You cannot connect multiple extension cables to each other.
-
Connect your DVR to a power source.
-
Switch the DVR on.
If your DVR system is beeping after startup, the Ethernet cable may not be connected to the system or the system may not be connected to the internet.
To stop the beeping:
-
Connect an Ethernet cable from the system to your router.
OR
-
Right-click to open the Quick Menu and click Disable Beep.
IMPORTANT: This system features automatic firmware upgrades for enhanced functionality. It is required to upgrade your system to the latest firmware version. If a firmware version is available, a notification will appear asking you to upgrade the firmware. Click OK to upgrade. The system will download and install the firmware upgrade. Wait for the firmware update to complete. The system may restart during the upgrade process. Do not power off or disconnect the power cable during firmware installation.
Once you have set up your LHV Series DVR, you can also connect to and view it using the Lorex Secure / FLIR Secure app.