< Back to list
LNZ81P25, PTZ Series, P25 - 4K IP Wired Camera with 25x Zoom and IK10 Vandal-Proof Rating: Controlling Your Camera
The following article provides instructions on how to control your 4K Ultra HD IP 25× Pan-Tilt-Zoom Camera from the NVR.
Controlling Your PTZ Camera
- In Live View, double-click the channel that has the PTZ camera connected to open in fullscreen.
- Right-click and click Pan/Tilt/Zoom. Enter the system user name and password if prompted. The PTZ menu opens.
- Use the on-screen controls to control the camera.
PTZ Controls
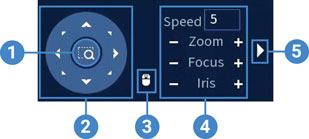
- Zoom-to-Area: Click, then click-and-drag to draw a box on the camera image. The PTZ camera will zoom in to the selected area.
- Navigation Controls: Click the directional arrows to move the PTZ camera manually.
- Mouse Tracking: Click to enable/disable mouse tracking. When enabled, click-and-drag in the direction you would like the PTZ camera to move. The camera will follow the path of the mouse cursor.
- PTZ Settings:
- Speed: Enter a PTZ speed between 1 (slowest) and 8 (fastest).
- Zoom: Optical zoom level. Click + to zoom in, and – to zoom out.
- Focus: Manually control focus level. Click + to focus on objects further from the camera, or – to focus on objects closer to the camera.
- Iris: Controls the amount of light coming through the lens. Click + to allow more light, or – for less.
- Advanced: Expand to show advanced options.
Advanced PTZ Controls
Advanced PTZ controls can be used to save camera positions and cycle through various positions, and automate camera actions.
To open advanced PTZ controls:
- Click the arrow in the PTZ control window to open advanced controls.

Advanced PTZ controls overview:
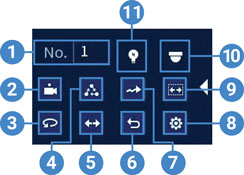
- No.: Enter the ID number for a preset, tour, or pattern you want to activate.
- Preset: Move the camera to the preset number specified in the No. field. For instructions on setting up preset locations, see the article Setting Presets on Your Pan-Tilt-Zoom Camera.
- AutoPan: Set the camera to rotate 180° back and forth.
- Tour: Perform the tour number specified in the No. field. For instructions on creating a tour, see the article Setting Presets on Your Pan-Tilt-Zoom Camera.
- Flip: Rotate the camera 180° from its current position.
- Reset: Move the camera to the home position.
- Pattern: Perform the pattern number specified in the No. field. For instructions on creating a pattern, see the article Setting Presets on Your Pan-Tilt-Zoom Camera.
- Configuration: Click to open the configuration menu, where you can configure presets, tours, patterns and autoscans.
- AutoScan: Move the camera between a predetermined left and right point. For instructions on creating an autoscan, see the article Setting Presets on Your Pan-Tilt-Zoom Camera.
- OSD Menu: Click to open the camera’s OSD menu. This may not be supported on all camera models.
- Auxiliary Settings: Not supported.