W452AS Series - 2K Wired Floodlight: Lorex App: Light Settings
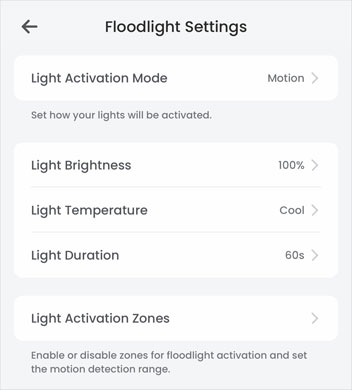
You can configure the Floodlight Settings for your 2K Wired Floodlight camera (W452AS Series). These settings include:
- Light Activation mode
- Light Brightness
- Light Temperature
- Light Duration
- Light Activation Zones (Motion Activation Mode required)
Light Activation Mode
Set how your lights will be activated.
-
Launch the Lorex App
-
Tap
 icon above the channel thumbnail on the Devices screen
 -
Tap Floodlight Settings
-
Tap Light Activation Mode
-
Select one of the four light activation modes:
- Camera Events: The lights will activate based on Motion Detection (Motion, Person, Vehicle, Animal) and Sensitivity Settings.
 For full instructions, see Configuring Motion Detection and Sensitivity Settings.
 - Motion Detection: Lights will activate base on the configured Light Activation Zone settings.
- Scheduled Activated: Light will only be activated during the specific times of day configured by the user
- Manual Activated: Lights will activate only when triggered from the Live View page. Tap the
 icon to enable/disable the lights.
- Tap Save
Light Activation Zones
Light Activation is only available when Motion is selected as the Light Activation mode. The camera uses the Passive InfraRed (PIR) sensor to detect motion and trigger the camera.
The Activation Zones allow you to adjust the PIR sensor zone. Each zone represents a specific area in which the sensor is detecting motion.
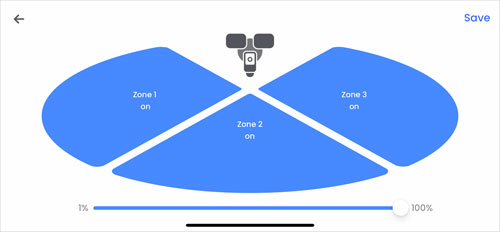
To modify specific zones:
- Slide the bar to adjust the distance at which motion will activate your floodlights.
- Tap the Zone(s) on or off to activate motion detection from three different areas.
- Tap Save. Note: You must save to see or test the new range.
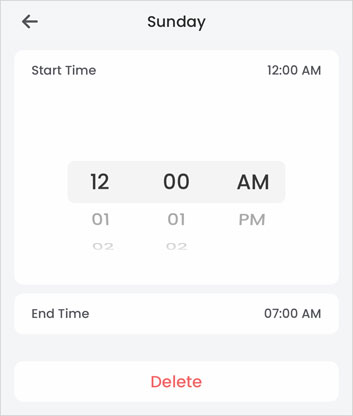
Configure the Schedule:
- Launch the Lorex App
- Tap icon above the channel thumbnail on the Devices screen
- Tap Floodlight Settings
- Tap Edit Schedule
- Tap on bar to edit the schedule. Note: Blue sections are the scheduled active periods when the camera is on.
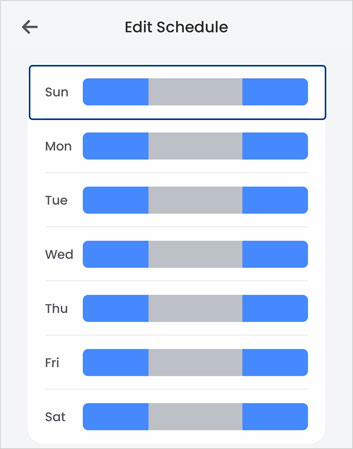
- Tap Repeat to select specific or multiple days. Note: A weekday must always be selected. By default, all days are checked.
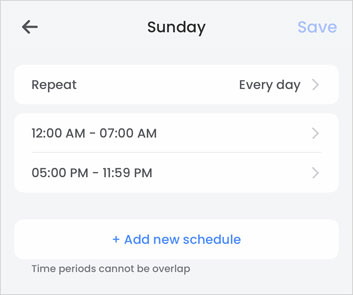
- Tap one of the default timeframe schedules (12:00 AM - 07:00 AM / 05:00 PM - 11:59 PM) to update the Start and End Time, and then tap the
 icon.
icon.
- Tap Delete to delete a schedule. Note: You can quickly delete the time frame by sliding your finger from right to left until the Delete button is revealed, then tap Delete again.
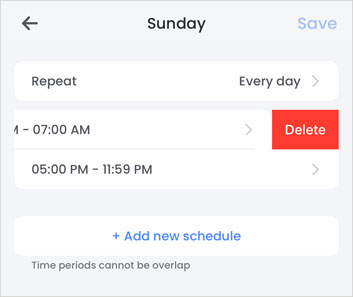
- Tap Save
Light Brightness & Temperature
-
Launch the Lorex App.
-
Tap
icon above the channel thumbnail on the Devices screen. -
Tap Floodlight Settings.
-
Tap Light Brightness.
-
Slide the bar to adjust the floodlight brightness.
-
Tap Save.
-
(Optional): Tap Light Temperature, select Cool or Warm, and then tap Save.
Note: You must save to see the changes.
Light on Duration
The default duration of the floodlight is 1 minute. This means the floodlight will remain on once a motion is detected for 1 minute. Use the light duration menu to set a different duration.
-
Launch the Lorex App.
-
Tap
icon above the channel thumbnail on the Devices screen. -
Tap Floodlight Settings.
-
Tap Light Duration.
-
Select the light on duration. You can choose from 30 seconds, 1 minute, 3 minutes, 5 minutes, or 15 minutes.
-
Tap Save to set the light duration on your device.