E871AB, Halo Series, H20 - 4K Dual-Lens IP Wired Security Camera: Smart Security Lighting
The following article offers instructions for using the Smart Security Lighting feature on your camera (E871AB) through the Lorex app.
To control Smart Security Lighting from a N910 Series recorder, please refer to N910 Series: Smart Security Lighting. For other recorders, please refer to your recorder's product support page, or your recorder's manual for more information.
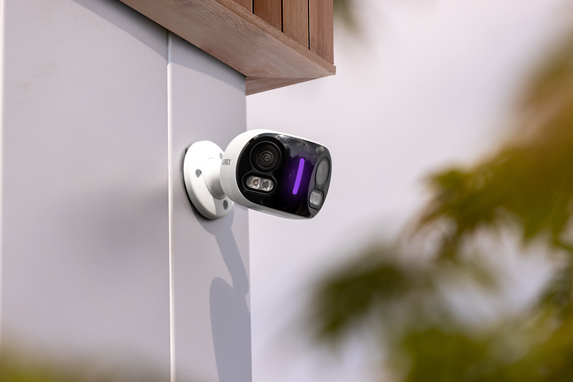
Vertically positioned on the camera's front, between the dual-lenses, the Smart Security Lighting displays a spectrum of up to 16 million colors. You can customize its lighting modes or set it to activate when motion is detected.

Activate Smart Security Lighting on Smart Detection
- Tap
 above the recorder's thumbnail.
 - Select your E871AB camera.
- Click the ellipses (...) in the top right corner of the app
- Tap Light Settings.
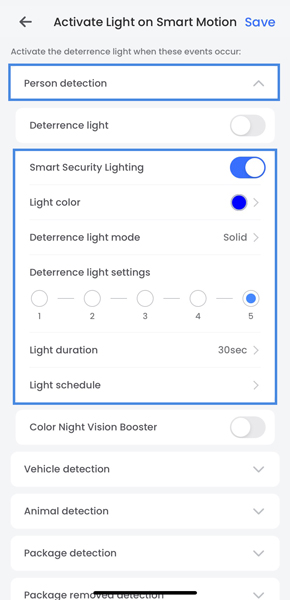
- Tap Activate Light on Smart Motion
- Tap on the type of smart detection you are using.
- Tap
 to enable Smart Security Lighting.
 - Adjust the Smart Security Lighting settings:

- Light color: Tap to open the color settings. Select a color or tap on the rainbow color wheel to swipe through for a custom color. Tap Save.
- Deterrence light mode: Select Solid for a solid light or Flashing for a flashing light. Tap Save.
- Deterrence light settings: Adjust the Smart Security Lighting brightness level, with 1 being the lowest and 5 being the highest.
- Light duration: Tap to choose how long the Smart Security Lighting will stay on after a smart motion event.
- Light schedule: Tap on a weekday to adjust the Smart Security Lighting time schedule preferences. Set the start and end time, then select other weekdays to repeat the schedule. Tap Save.
- Tap Save.
Smart Security Lighting Modes
- Tap
 above the recorder's thumbnail.
 - Select your E871AB camera.
- Click the ellipses (...) in the top right corner of the app
- Tap Light Settings.
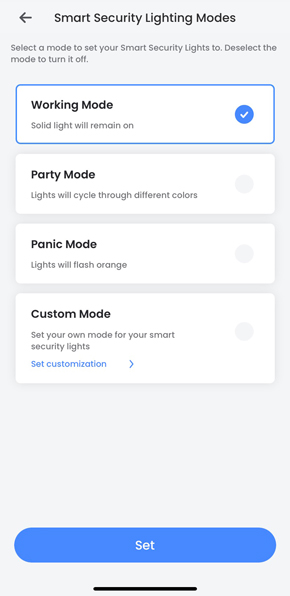
- Tap Smart Security Lighting Modes.
- Select one the Smart Security Lighting Mode options, and then tap Set.

For a Custom Mode
- Select Custom Mode, and then tap Set customization >
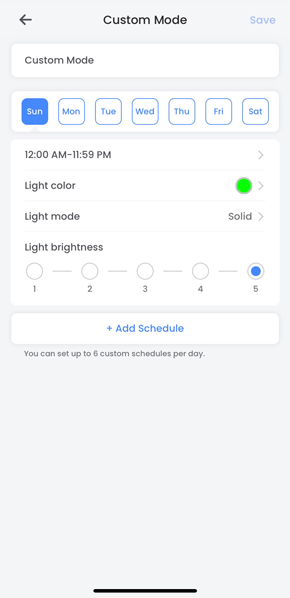
- Adjust the Custom Mode settings:

- Sun / Mon / Tue / Wed / Thu / Fri / Sat: Select a weekday.
- 12:00 AM-11:59 PM: Set the start and end time.
- Light color: Tap to open the color settings. Select a color or tap on the rainbow color wheel to swipe through for a custom color. Tap Save.
- Light mode: Select Solid for a solid light or Flashing for a flashing light. Tap Save.
- Light brightness: Adjust the Smart Security Lighting brightness level, with 1 being the lowest and 5 being the highest.
- + Add Schedule: Tap for additional scheduling preferences. Set the start and end time, then select other weekdays to repeat the schedule. Tap Save.
- Tap Save, and then Set.