ACSOL3 Series - Solar Panel for Battery-Operated Cameras: Frequently Asked Questions
The following frequently asked questions (FAQs) provide more information about the Lorex Solar Panel (ACSOL3 Series). Where applicable, the FAQ includes links to articles where you may find more information.
General Questions:
What is the purpose of this product?
This product is a Solar Panel that converts sunlight into energy that your Battery-Operated Camera can use.
What are the dimensions of the Solar Panel?
Width: 7.28" / 185 mm Depth: 4.72" / 120 mm Height: 0.26" / 6.5 mm
What are the Electronic Specifications?
- Solar Cell: Monocrystalline Silicon
- Solar Conversion Rate: 20%
- Maximum Power: 3.2 W
- Voltage: 6 V
- Current: 530 mA
- Operating Temperature: 86 °F to 158 °F / -30 ºC to 70 ºC
What is the weight of the Solar Panel?
The weight of the solar panel is 0.63 lbs / 0.286 kg.
What kind of power interface is used?
The Solar Panel uses a Micro USB power interface which is included in the package.
What is the length of the included Micro USB cable?
The length of the Micro USB cable is 13 ft / 4 m.
Is the Solar Panel waterproof?
The Solar Panel has a waterproof level of IP65. This means the Solar Panel can withstand rain and storms, but should not be submerged in water.
What is included?
- 1 Solar Panel
- 1 Mounting Bracket
- 1 Micro USB Adapter
- 1 Drill Bit
- 6 Mounting Anchors and Screws
How do I check the battery of my camera?
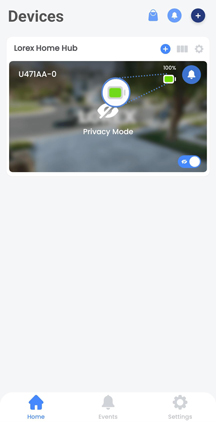
Open the Lorex Home app, and then check the device battery status to ensure the Solar Panel is receiving enough light to power on the device.
What devices are compatible with the Solar Panel?
Please see the ACSOL3 Series Solar Panel Compatibility Chart
Setup Questions:
Do I need to charge my camera before using the Solar Panel?
Yes. The Solar Panel is designed to maintain the camera battery pack’s charge. Please fully charge your battery pack first using the Micro USB cable included with the camera. This will take 4-6 hours. The purpose is to allow for camera setup time and if the initial days are not sunny.
How do I install the Solar Panel?
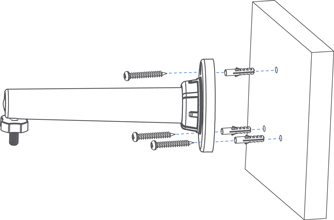
- Set the Bracket to the desired mounting position.
- Mark holes through the Bracket.
- Using the included drill bit, drill holes where marked.
- Using a screwdriver, secure the Bracket with the provided screws.
Optional: If you are mounting the Solar Panel into drywall, use the provided drywall anchors.
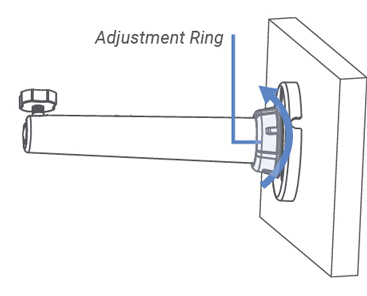
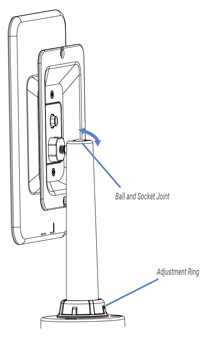
- To adjust the Bracket, loosen the Bracket adjustment ring by turning it counterclockwise.
- Turn the Bracket’s Threaded Ring counterclockwise, to lower the Ring.
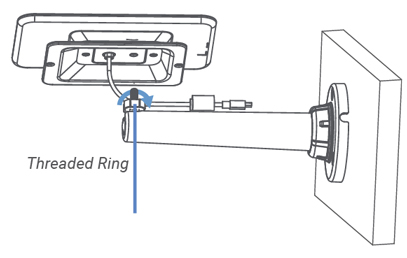
- Twist the solar panel clockwise onto the Bracket.
- Adjust the angle of the solar panel to receive direct sunlight, then tighten the Adjustment Ring.
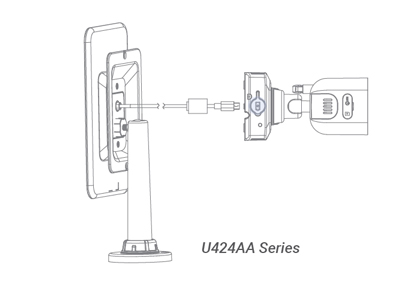
- Connect the Solar Panel cord to the desired adapter.
How do I connect the Solar Panel directly to my camera?
- Run the Solar Panel cord to the camera.
- Pull up the power port cover on the camera, and then connect the Solar Panel cord to the camera.
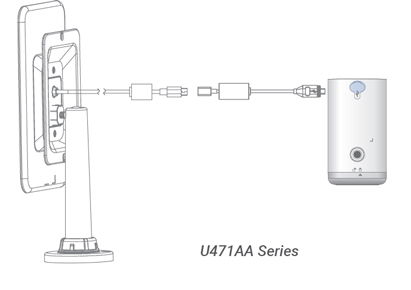
How do I connect to my camera using an adapter?
- Connect the Micro USB Adapter to the Solar Panel cord.
- Run the Solar Panel cord to the camera.
- Pull up the power port cover on the camera.
- Connect the adapter to the camera power port.
What are the ways that I can mount the Solar Panel?
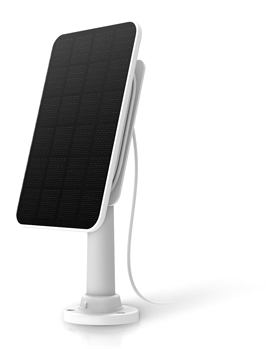
The Solar Panel can be secured to a wall horizontally, to a roof vertically, or on a flat surface indoors.
Note: If installed indoors vertically and in a secure location, it is not necessary to use screws to hold the Solar Panel upright. The mount is able to hold the weight of the Solar Panel when standing vertically.
Why is my Solar Panel not charging my camera?
Make sure of the following:
- Fully charge the camera battery pack. Refer to the product documentation for charging instructions.
- Choose a location for the solar panel with plenty of direct sunlight exposure. Do not install in a covered or shaded area. Performance is dependent on temperature and light exposure.
- You must have the latest camera firmware. Upgrading the NVR firmware will not resolve compability issues.
Please refer to your camera's NVR, Home Hub, or Lorex Home Center Device instructions, for information on updating your device's firmware.
How do I position the Solar Panel to get the most sunlight?
Location: Choose a location for your Solar Panel that gets the most sunlight. Avoid placing the Solar Panel in a shady spot or in front of trees and buildings, as they will significantly reduce the power output.
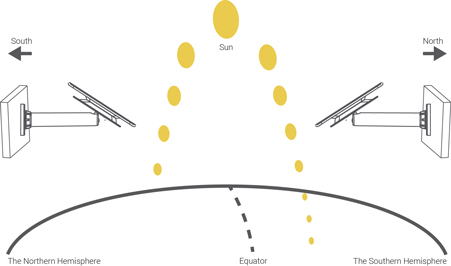
Direction: The optimal angle varies throughout the year, depending on seasonal changes and your geographic location. As a general guideline, the Solar Panel should be facing the equator; in the northern hemisphere, the Solar Panel faces south and in the southern hemisphere, the Solar Panel faces north.
Note: In North America that means pointing the panel south.
How do I adjust the angle of my Solar Panel?
Use the adjustment ring on the wall mount to angle the Solar Panel towards direct sunlight. You can manually change the angle of the Solar Panel using the ball and socket joint at the top of the mount.
Where can I use the Solar Panel?
- You can use the Solar Panel in any outdoor location that falls within the operating temperature range of 86° to 158 °F (-30° to 70° C).
- The Solar Panel and included wall mount should be placed in an area that gets at least a few hours of sun each day. Be sure to look out for anything that could block the sun, such as overhanging branches.
- The included wall mount can attach to walls, roofs, or fences. The wall mount’s adjustment ring and the attached 13 ft (4 m) weather-resistant power cable provide a wide range of mounting and positioning options.
What factors can affect the efficiency of my Solar Panel?
External factors can affect the effectiveness of the Solar Panel generating power, such as shade, temperature, cloudy or snowy weather, and the amount of dust or debris on its surface.