E851AD, E851ADB, A Series, A10 - 4K IP Wired Dome Camera: Troubleshooting
This article provides troubleshooting guidance for issues related to connectivity, functionality, or image quality in your camera.
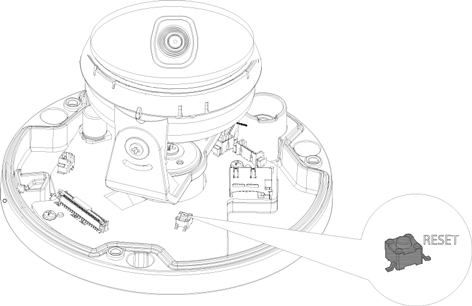
Need to reset my camera
- Dismount your camera and bring it to a dry location.
- Make sure your camera is connected to an external power source, or using a separate network cable, connect to one of the available PoE ports of your NVR.
- With clean, dry hands remove the dome cover.
- Press the Reset button.
No picture / signal
- Ensure your camera is connected to a compatible NVR supporting 4K camera input. For full camera compatibility, visit the relevant compatibility chart.
- Your camera may take up to 2 minutes to power up after being connected to the NVR.
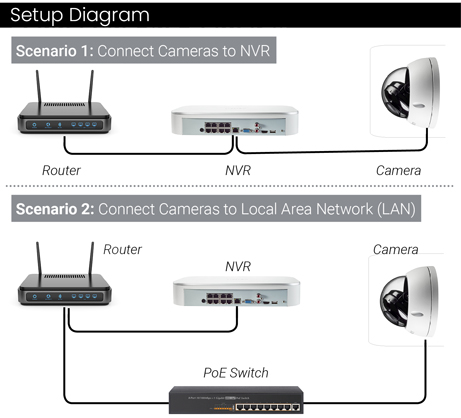
- Ensure your camera is connected to your NVR or to your local network.
- If you are not using PoE, you must connect your camera to a 12V DC power adapter (not included).
- If your camera is connected to the LAN, you must search your network for cameras using the NVR. See the NVR’s instruction manual.
- Note: If you're connecting your camera to a LAN port that does not support PoE, you must connect your camera to a 12V DC poer adapter (not included).
- Ensure your NVR is properly connected to a TV/monitor.
- There may be an issue with your extension cable run. Connect your camera to the NVR using a different Ethernet cable.
Picture is too bright
- Ensure your camera isn’t pointed directly at a source of light (e.g., sun or spot light).
- Move your camera to a different location.
- Check the brightness and contrast settings on the NVR.
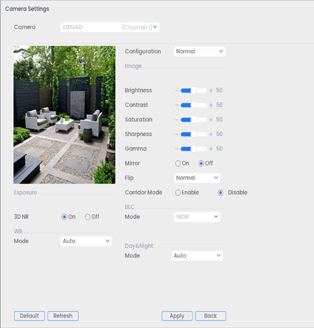
- Test out using the Wide Dynamin Range (WDR) setting on your NVR. To do this select Camera Settings, then under BLC Mode, Select WDR. WDR allows the camera to compensate for changes in brightness across the inhance the picture quality of both light and dark areas.
Picture is too dark
- If using during the day, your camera may not be getting enough light. Slide the sunshade backwards to let in more light.
- Check the brightness and contrast settings on the NVR.
- Ensure that there are no obstacles close to the camera, such as pillars, walls, trees. This causes the focus and auto adjustments of the camera to work on the object directly in front of it, and will make the background really dark.
- Test out using the Wide Dynamin Range (WDR) setting on your NVR. To do this select Camera Settings, then under BLC Mode, Select WDR. WDR allows the camera to compensate for changes in brightness across the inhance the picture quality of both light and dark areas.
Night vision is not working
Note: The night vision activates when light levels drop.
- Nearby bright artificial lights or other sources of light pollution may lead to overexposure, reducing the effectiveness of IR night vision.
- IR light can bounce off surfaces, causing reflections that may interfere with your camera's night vision capabilities. Avoid physical obstructions that are up-close to your camera.
- Heavy rain, snow, or fog can obscure the infrared light and reduce the effectiveness of IR night vision.
Night Vision is blurry
- It is recommended that you brighten the ambient light surrounding your camera. This can be achieved by using the camera in a location near streetlights, installing a floodlight, or setting up external nocturnal lights in the same area as your camera.
- Dust inside the dome cover may cause the picture to be blurry, periodically clean the inside of your dome camera cover to avoid this.
Picture is not clear
- Check your camera's dome cover for dirt, dust, spiderwebs. Clean the lens with a soft, clean cloth.
- Make sure that the cable run is within the limitations.
- Remove the vinyl film from your camera's dome cover when your installation is complete.
- In humid or dusty environments, taking off your camera's dome cover may allow water or dirt to infiltrate, potentially obstructing the camera lens. Ensure the camera lens is clean and remember to wash and dry your hands before handling your camera.
Bright spot in video when viewing camera at night
- Night vision reflects when pointing a camera through a window. Move your camera to a different location.
- It is important to keep the dome clean, otherwise the IR light will reflect on dust and as a result, you may see a bright spot on the image.
Need to playback my camera's footage
The following instructions refer to the N910 Recorder
- From the Live View display, right-click to open the Quick Menu, then click Playback.
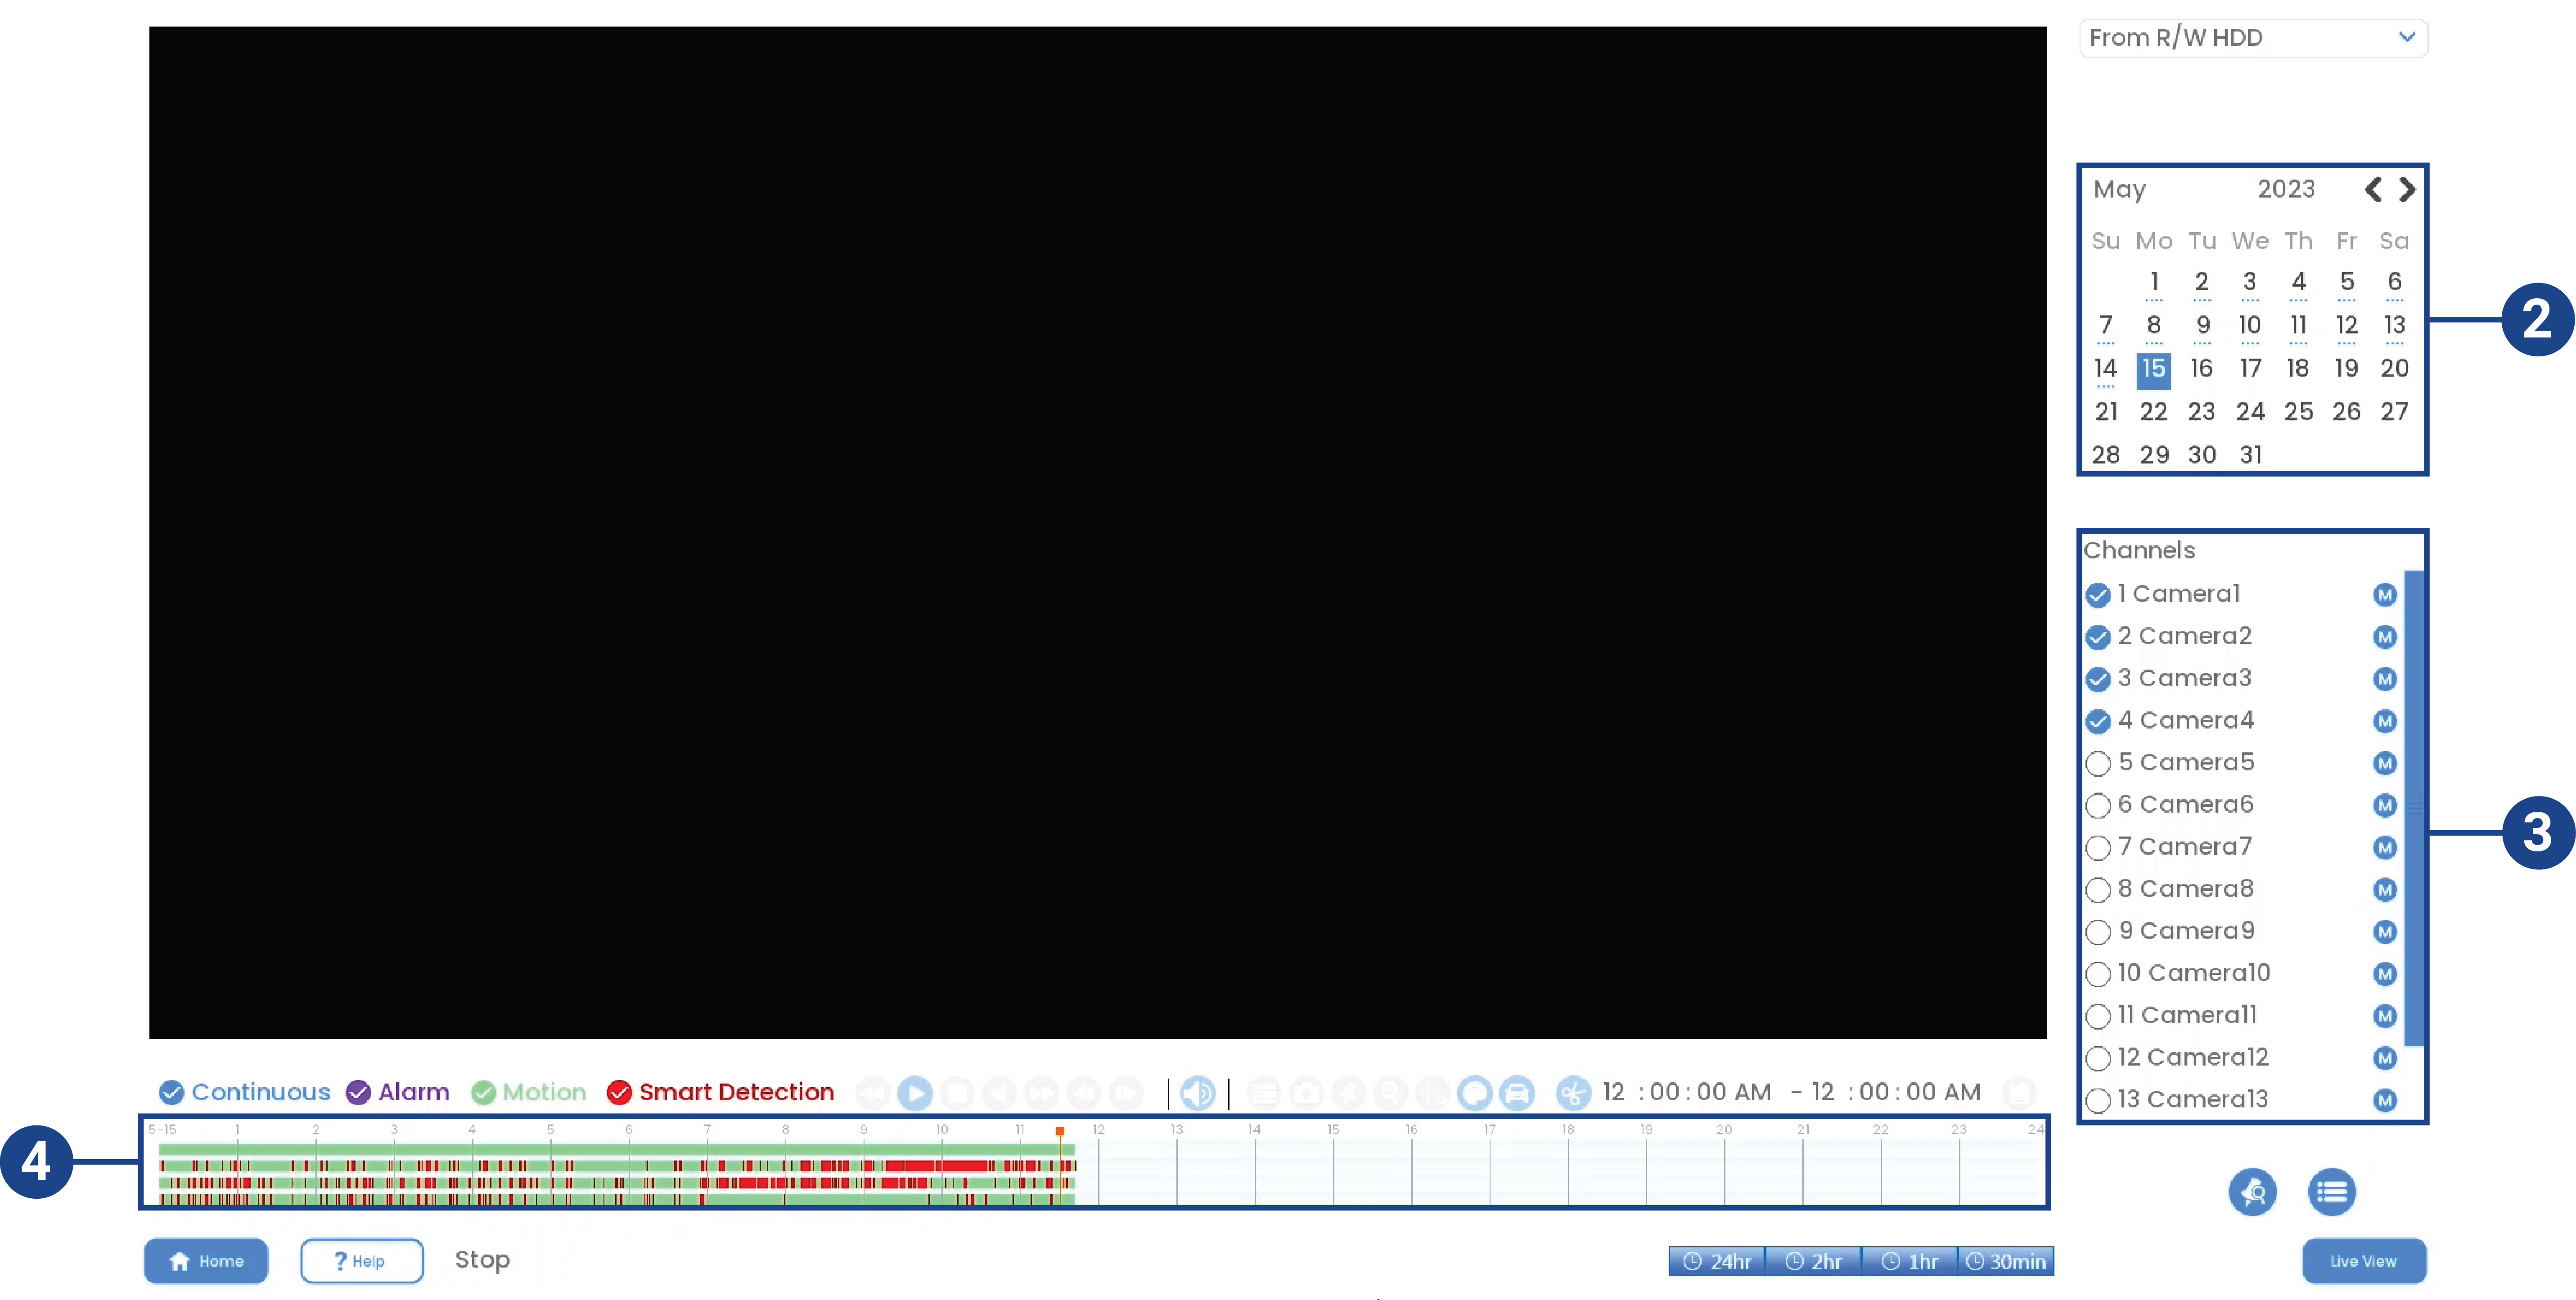
- Use the calendar on the right to select the day to playback.
- Check the channels you want to playback. Click the icons to the right of each channel name to choose the video quality (
 for Main Stream,
  for Sub Stream).
 - Click inside the video bar to select the playback time. The system will begin playing back video from the selected time.
No audio
- Audio is only supported on Lorex HD NVRs. For a list of compatible recorders, visit the relevant compatibility chart.
- Ensure NVR volume is turned on / turned up.
- Ensure audio function on your camera is turned on, see Enable Audio Recording.
- Ensure audio is turned up on viewing device.
Too many notifications
You may find that your camera is triggering frequently and sending too many event notifications. Refer to the article "Lorex App - Too Many Notifications" for a few troubleshooting tips to help reduce false alerts.
Camera's image has high contrast/glare
- Avoid mounting your camera too low to the ground or up-close to reflective surfaces, particularly in sunny or mirrored spaces, as these can cause high contrast and glare in your camera's image.
- During rainfall, the reflection of car headlights on the pavement may lead to glare or trigger false motion alerts. If this becomes a recurring problem, consider modifying the camera's active motion zones to exclude areas affected by rain-induced glare and false motion detection notifications. Refer to the article "Lorex App - Too Many Notifications" for a few troubleshooting tips to help reduce false alerts.
Camera feed is upside down
Enable Image Rotation:
The following steps are applicable to compatible recorders that use the Lorex App.
- Tap
 above the recorder's thumbnail.
 - Select your camera.
- Click the ellipses (...) in the top right corner of the app.
- Tap
 to enable Image Rotation.
Need to change the recording angle
When the dome cover on your camera is removed, the camera can be manually adjusted so that the camera records the angle you want it to record. Use your hands to move the camera to the proper position, and attatch the dome cover. Please check the recording to ensure that the final viewing angle is optimal, as tilting the camera directly out (away from the base) can cause a slight curvature in the camera's view. Please ensure that your hands are clean, and the environment in which you are configuring your camera is dry.
The camera can be adjusted in the following ways:
- rotate 90° from at the bottom axle
- rotate 45° at the camera axle
- tilt 45° from upright

Note: Please ensure that your hands are clean, and the environment in which you are configuring your camera is dry.
Camera is not recording at all hours
The following steps are applicable to compatible recorders that use the Lorex App.
- Tap above the recorder's thumbnail.
- Select your camera.
- Click the ellipses (...) in the top right corner of the app.
- Tap Local Storage.
- Tap to enable Continuous Recording.
Need replace the SD card
- Dismount your camera and bring it to a dry location.
- With clean, dry hands remove the dome cover.
- Remove the SD card carefully.
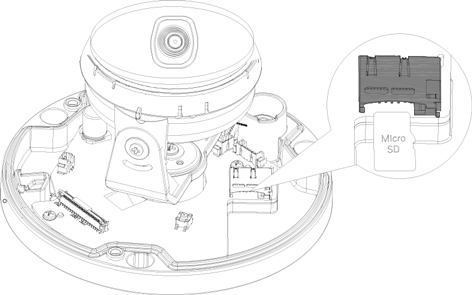
- Insert your new SD card.
- Reinstall your camera.
Note: your camera can support SD cards with up to 256GB of storage.
Ways to avoid persperation inside your camera
- Inside your camera there is a Sillica Gel Package that helps to remove moisture under the dome cover. Please do not remove this package.
- Do not remove the dome cover in humid or dusty environments.
- Use clean, dry hands when handling your camera without the dome cover.
General troubleshooting support
Many issues can be resolved with the following troubleshooting steps:
- Ensure the latest version of the required software/app is installed and has the most recent firmware (if applicable).
- If using client software or a mobile app, ensure your device meets the minimum system requirements.
- Ensure the Internet connection and speed meet the minimum requirements for the product.
- Check the power connection(s).
- Power cycle the product(s). To power cycle your product, please power off (if applicable) and disconnect the power source for approximately 30 seconds. Reconnect, and power on.