B861AJ Series - 4K Battery Doorbell - Frequently Asked Questions
The following FAQ answers many of the general questions about your 4K Battery Video Doorbell. Where applicable, the FAQ includes links to articles where you may find more information.
Setup Questions:
How do I install My Battery Doorbell?
For optional wired setup:
For more information please read our Installation Guide.
Why is my battery doorbell not turning on?
Make sure your doorbell is fully charged.
How many Wi-Fi Chimeboxes (ACCHM2) can I connect to my doorbell?
10 or more.
Why is my doorbell not charging to 100% when Wired?
Wired setup allows for continous charging of the battery. To protect the lifetime of the battery your doorbell will never show 100% and will only charge up to approx. 85%.
How do I activate my doorbell?
- During intitial setup, make sure the doorbell is connected to power or fully charged, and then press the reset button to initiate pairing. The status indicator ring will turn blue when fully charged.
- After setup, in the in-app liveview, can be triggered by Person detection, pressing the Call button, or Alexa/Google.
How do you remove my video doorbell from the mounting bracket?
To remove your doorbell from the bracket, hold onto the doorbell, and then insert the Release Pin into the hole at the bottom of the Mounting Bracket until the release tab is reached.

What is the maximum storage capacity.
You can upgrade up to a 256GB MicroSD card.
How do you reset my video doorbell?
- Pull back the RESET/MicroSD card slot cover located on the side of your video doorbell.
- Press and hold the Reset Button for 10 seconds until you hear the audio prompts.

How do you insert or remove the MicroSD card from my video doorbell?
- Pull back the RESET/MicroSD card slot cover located on the side of your video doorbell.
- If inserting, slide the MicroSD card into the slot (with the label side down) until it clicks into place.
- If removing, push down gently on the MicroSD card. It will pop out and can then be removed.
What is the minimum recommended upload speed required for remote video streaming?
A minimum upload speed of 10 Mbps is required for best performance.
App Questions:
How do I activate the Deterrence Light and/or Activate Status LED on Detection when motion is detected?
- Open the Lorex app and tap
 above the camera’s thumbnail.
 - Tap Light Settings, and then
 to enable Activate Deterrence
Light on Detection and then Light Brightness to adjust the brightness level.
to enable Activate Deterrence
Light on Detection and then Light Brightness to adjust the brightness level. - Tap to enable Activate Status LED on Detection, and then LED Color to set a custom Smart Security LED color.
- Tap Deterrence Light Mode to select if the deterrence light should be solid or flashing.
- Tap Light Brightness to select the brightness of your light.
- Tap Edit Schedule to choose when you would like the deterrence light to activate.
How do I enable a Quick Response?
- Open the Lorex app and tap above the camera’s thumbnail.
- Tap Quick Responses, and then select one of the pre-recorded messages to answer for you.
- Tap Quick Response Cycles to set how many times the response will repeat.
How do I create my own quick responses?
- Open the Lorex app and tap above the camera’s thumbnail.
- Tap Quick Responses, and then tap + to create your own custom response.
- Record your quick response and tap Next.
- Name your quick response and tap Save.
How do I configure notifications?
- Open the Lorex app and tap above the camera’s thumbnail.
- Tap Notifications.
- Tap to enable Alert Notifications, Alert and Event thumbnails, Offline Notifications, and Low Battery Email Alerts.
- Tap Notification Schedule to receive push notifications only during your selected schedule.
How do I configure Motion Detection?
- Open the Lorex app and tap above the camera’s thumbnail.
- Tap Motion Detection Settings.
- Tap to enable Motion Detection and Person Detection.
- Tap Motion Sensitivity to set how sensitive you would like motion detection to be.
- Tap Motion Zones > General Motion Zone to draw the general motion detection zone.
- Tap Motion Zones > Person Motion Zone to draw the person motion detection zone.
How do I enable HDR (High Dynamic Range)
- Open the Lorex app and tap above the camera’s thumbnail.
- Tap Video Settings.
- Tap to enable HDR.
How do I configure Volume Settings?
Volume settings refer to your doorbell's volume at which it will play quick responses and chimes (speaker volume), and the volume at which the Two-Way Talk function will play.
- Open the Lorex app and tap above the camera’s thumbnail.
- Tap Sound Settings.
- Tap Speaker Volume to set the volume of your speaker.
- Tap Two-Way Talk Volume to select the volume of the two-way talk feature.
How do I set the doorbell ringtone?
- Open the Lorex app and tap above the camera’s thumbnail.
- Tap Sound Settings.
- Tap Doorbell Ringtone.
- Set your desired ringtone.
- Press Save.
How Do I enable Local Recording?
- Open the Lorex app and tap above the camera’s thumbnail.
- Tap to enable Local Recording.
How do I enable Colour Night Vision?
Auto Night Vision is a function that causes your doorbell's camera to switch to black and white to see more clearly in the dark. Disabling Auto Night Vision will force your camera into colour mode and enable colour night vision.
- Open the Lorex app and tap above the camera’s thumbnail.
- Tap to disable Auto Night Vision.
How do I enable Privacy Mode?
Privacy mode deactivates the camera in your doorbell so that it is not recording while in privacy mode.
- Open the Lorex app and tap above the camera’s thumbnail.
- Tap to enable Privacy Mode.
How do I customise battery performance when motion is detected?
- Open the Lorex app and tap above the camera’s thumbnail.
- Tap Performance Mode.
- Tap Performance Optimization Mode to record at 1080p FHD for up to 60 seconds after motion is detected.
- Tap Power-Saving mode to record at 720p HD for up to 15 seconds after motion is recorded with a 60 second interval between events. This will disable the deterrence light by default and is recomended for optimized battery life.
- Tap High Performance Mode to record at 4K QHD for up to 60 seconds after motion is detected. This is only recommended when your doorbell is plugged into a battery source.
- Tap Custom Mode, then select Video Quality and Recording Duration to customize your doorbell's recording performance when motion is detected.
- Tap Motion Detection Interval Duration to set the minimum duration between when motions can be detected.
- Tap Save.
How do I enable Audio Recording?
Caution: Audio recording and / or use of listen-in audio without consent is illegal in certain jurisdictions. Lorex Corporation assumes no liability for use of its products that does not conform with local laws.
- Open the Lorex app and tap above the camera’s thumbnail.
- Tap to enable Audio Recording.
How do I add another user?
- Open the Lorex app and tap above the camera’s thumbnail.
- Tap Shared Users.
- Tap Add Shared User.
- Enter their email address and tap to configure their permissions.
- Press Confirm.
How do I enable the Status LED?
- Open the Lorex app and tap above the camera’s thumbnail.
- Tap to enable Status LED.
How do I change the time zone?
- Open the Lorex app and tap above the camera’s thumbnail.
- Tap Time Zone.
- Tap Time Zone again and choose your time zone.
- Tap to enable Daylight Savings Time.
- Tap Time Format to select how you would like time to be displayed.
- Tap Save.
How do I change resolution to SD or HD?
- Tap your cameras live view footage in the Home Screen.
- Tap the SD/HD icon at the bottom of the live view footage in your camera's screen.
- Tap your desired resolution.
How do I take a snapshot of the recording?
- Tap your cameras live view footage in the Home Screen.
- Tap the Snapshot icon to capture an image.
- Tap on the snapshot to view all of your snapshots and recordings.
- Tap on your desired image and press Save to store it on your device.
How do I take a recording of the recording?
- Tap your cameras live view footage in the Home Screen.
- Tap the Record Video icon to capture an image.
- Tap on the Recording to view all of your snapshots and recordings.
- Tap on your desired Recording and press Save to store it on your device.
How do I enable the siren?
- Tap your cameras live view footage in the Home Screen.
- Tap the Siren icon and confirm.
- Tap SIren again to turn off.
How do I activate the Status LED on command.
- Tap your cameras live view footage in the Home Screen.
- Tap the Light icon to activate the status LED.
- Tap again to turn the status LED.
I hear an echo when I use 2-way talk (iPhones Only)
Users experiencing an echo or other audio issues, should upgrade their iPhone firmware to iOS 16.1 or later.
General Questions:
Is my battery doorbell dual-band or single-band?
This is a single-band 2.4GHz Wi-Fi battery doorbell.
What is the battery life of my doorbell?
Battery life is dependent on ambient temperature, motion settings, number of events, etc. The battery life can last between 2-4 months. The following are estimates of battery life based on daily events:
- 25 events per day: approx. 2 months
- 12 events per day: approx. 3.5 months
- 6 events per day: approx. 7 months
Why do I get an offline message and a blank screen for my doorbell's channel on the Fusion recorder?
Being a battery-operated doorbell, it will always go to sleep after a period of inactivity to conserve battery life. Once your doorbell is correctly paired to your Fusion recorder, the offline message means the doorbell has gone to sleep but is still connected and can be awakened. When motion is detected, or when the call button is pressed, there will be live video from that channel. You can also manually wake up the doorbell through the Lorex app, by activating the liveview.
What is the aspect ratio of my video doorbell's image?
Your video doorbell captures visitors from head to toe with an aspect ratio of 9:16 in vertical view.
What's the wireless range of my video doorbell?
Your doorbell has a range of approximately 32 meters (105 ft) dependent on the environment.
Note:
- Reduce the number of obstructive materials between your doorbell and the router or access point.
- Other electronic devices such as microwaves, TVs, cordless phones, and baby monitors can cause signal interference.
Why is my video doorbell not turning on?
- During setup, make sure your doorbell is connected to power and turned on. Press the reset button to initiate pairing.
- Check that the USB cable is connected to to the power adapter and plugged into an outlet.
- Make sure you have the right adapter voltage (5V 2A) (not included).
- Check if the power outlet is working properly: Connect another device and power it on.
- Make sure the breaker is turned on. Wait 5 minutes for the doorbell to fully power on and press the doorbell’s button to ensure that the chime is operating correctly.
- Make sure the power source is 8-24V AC. Check the voltage printed on your transformer and/or use a multi-metre to test the power.
Refer to the article “What transformer should I use with my Wired Video Doorbells?” for more information.
Why can't I see my doorbell Live View?
Even when continously charging (Wired Setup), your doorbell will go to sleep to conserve energy.
When does my doorbell sleep?
Your doorbell will sleep after the following durations, even when there is a wired connection:
- When activated by the PIR (Passive Infrared) sensor, your doorbell will sleep after a few seconds.
- When activated from the liveview in the Lorex App, your doorbell will sleep after no activity for 2 minutes.
- When activated by Alexa or Google, after no activity for 5 mins, your doorbell will sleep.
At what temperatures can my camera operate?
-4° to 122° F / -20° to 50° C.
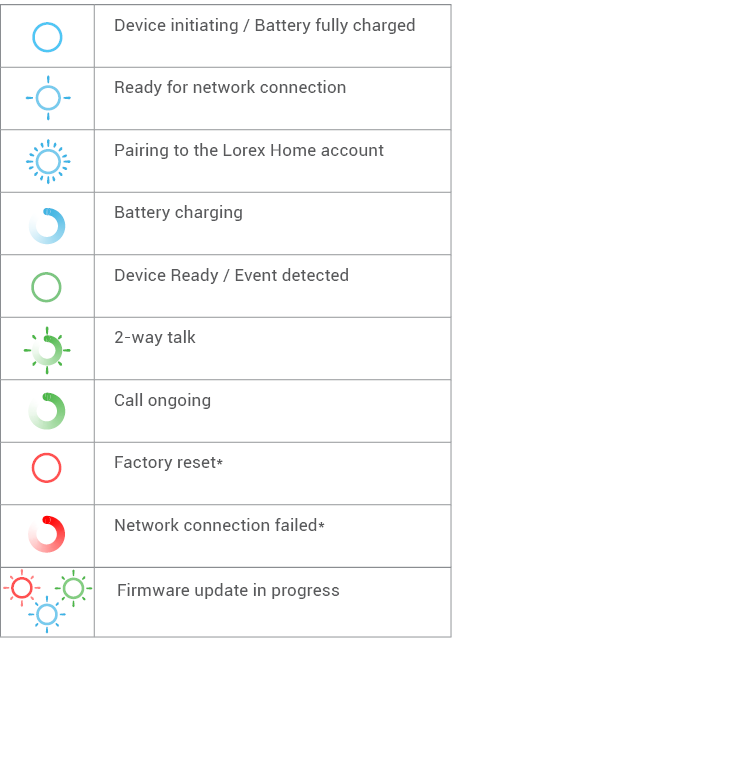
What is my video doorbell's LED status indicator?
The LED is on the outside of your doorbell button and indicates how the doorbell is operating. The following section describes how the LED works if you didn’t change the default LED settings.
Does my device support WPA2 or WPA3?
Your B861AJ 4K battery doorbell supports Wi-Fi Protected Access 3 (WPA3). This is the most up-to-date Wi-Fi security protocol for Wi-Fi networks. Devices that support WPA3 are less susceptible to cyber attacks, have extended authentication methods, have a 128-bit encryption, and are supported by all routers including. 128-bits is the length of the encryption key which secures the data transmissions between devices in a Wi-Fi network and denotes the encryption algorithm strength. A longer encryption key implies more difficulty for unauthorized parties to decrypt data without the correct key. For information on which devices support WPA2 and which devices support WPA3, please refer to “WPA2 and WPA3 Supportive Devices.”