Wireless Home Monitor: Viewing and recording modes
There are three recording modes available on the Wireless Home Monitor systems: manual, motion, and scheduled recording. There are four different viewing modes available on the system: Single-Channel Live View, Auto Sequence Viewing mode, Quad mode, and Scan mode. Some models also have digital zoom capabilities.
REMINDER: Not all models have the same viewing mode or recording mode capabilities. See your product user manual for more information on the features included with your system. Click here for downloads and documentation for your product.
Viewing Modes
Single channel viewing:
- Tap the Channel Select icon (
 ) to switch between channels in single channel view.
Auto Sequence Viewing mode:
-
Tap the Quad / Sequence Viewing icon (
 ) to switch between Quad mode / half-Quad mode and Auto Sequence Viewing mode.
 -
Auto Sequence Viewing mode is enabled when one channel is visible on screen.
-
When activated, Auto Sequence Viewing mode cycles through the connected channels in full-screen.

-
To exit, tap the Quad / Sequence Viewing icon (
) to switch to Quad mode, or the Channel Select icon () to switch to single channel viewing.
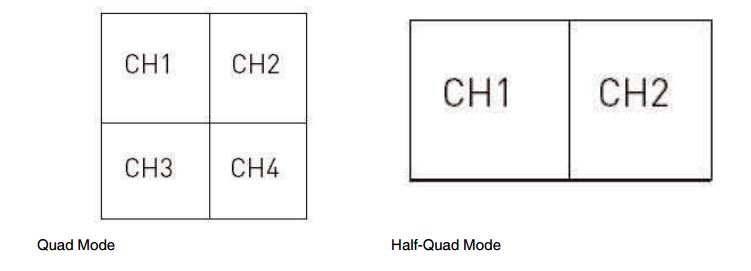
Quad mode:
-
Tap the Quad / Sequence Viewing icon (
) to switch between Quad mode / half-Quad mode and Auto Sequence Viewing mode. -
Quad mode is used to view video feed from up to four cameras simultaneously.
-
If only two cameras are connected to the system, Quad mode will display a half-Quad or split-screen view.
Scan mode:
- In Scan mode, the receiver’s LCD screen and speaker will turn off unless motion is detected by one of the cameras.
- This conserves battery power and alerts you only when needed.
- To enable Scan mode from the Live View, press the Power button (
 ). Press the power button () again to exit.
Digital Zoom:
- The digital zoom feature allows you to zoom in 2× on a single camera while in Live View.
- To enable digital zoom:
- Tap the Channel Select icon () until the desired channel is visible.
- Tap the Digital Zoom icon (
 ). A zoom indicator will appear on the screen (
 ).
). - Move the joystick to view different areas of the image.
- Tap the Channel Select icon (
Recording Modes
REMINDER: Power failure can interrupt recording modes on the system. If a power failure occurs, the system restarts in Auto Sequence Viewing Mode and Motion Recording to ensure that some form of recording is immediately active on the system.
Manual Recording:
- Useful for emergency recording or for low traffic environments.
- Activated using the Manual Recording icon (
 ) on the monitor.
 - Allows for continuous recording from one camera.
- Allows you to manually start and stop recording from one channel at a time.
- You cannot record while in Quad mode.
- You can record while using digital zoom.
- You cannot change channels or enable Auto Sequence Viewing mode during Manual Recording.
Motion Recording:
- Useful for low traffic areas, or non-sensitive/non-critical recording environments and overnight monitoring.
- Activated using the Motion Recording icon (
 ) on the monitor.
 - System only records when a Quad mode compatible camera detects motion.
- The camera that appears on-screen is the only camera that is recording.
- If you manually select a channel while the system is in Motion Recording, only the selected channel will record if motion is detected.
- Motion Recording can be enabled to function during Scan mode.
- Motion Recording can be toggled on and off from Live View.
Scheduled Recording:
- Scheduled Recording is useful for capturing a sensitive or important target that needs to be recorded daily. It is also recommended for high traffic environments.
- Scheduled Recording must be set up in the Record menu on the system. Depending on your model, you can configure the schedule to include Continuous Recording and / or Motion Recording.
- Manual Recording and Motion Recording must not be active to enable Scheduled Continuous or Scheduled Motion Recording.
- Scheduled Recording is activated in the Record menu.
- Allows for continuous recording from one camera, or from Auto Sequence Viewing mode.
- Ensure you have set the date and time on the receiver prior to setting a recording schedule.
- Auto Sequence Viewing mode is available during Scheduled Recording, but the system will record the sequence instead of a single channel. You cannot play back the video of individual cameras during Auto Sequence Viewing mode.