FLIR Client 12 Software: Enabling and configuring Auto Capture of snapshots
You can set the your DVR / NVR system to record snapshots using the Auto Capture feature on your FLIR Client 12 software. Auto Capture automatically saves snapshots of a camera image at time intervals, and help to conserve hard disk drive (HDD) space during times when video recording is not required. Auto Capture is disabled by default.
Prerequisites:
- Ensure that you have downloaded and installed the FLIR Client 12 software on your PC / Ma
- Ensure that you have logged in and added your DVR / NVR system to the FLIR Client 12 software
To enable and configure Auto Capture:
-
Launch the FLIR Client 12 software for PC / Mac.
-
Click Remote Setting in the top-right corner of the window.
-
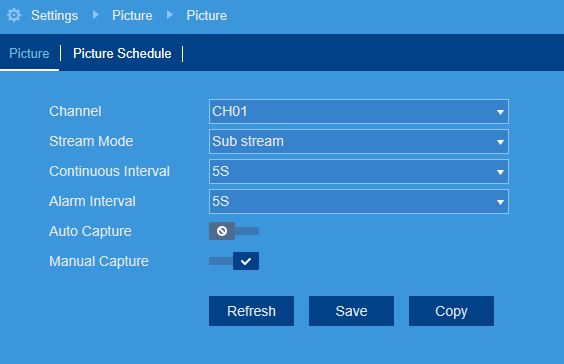
Under Settings, click Picture to open the Picture tab.

-
In the Channel drop-down menu, select a channel to configure Auto Capture for.
-
In the Stream Mode drop-down menu, select Main stream or Sub stream for Auto Captures.
-
In the Continuous Interval drop-down menu, select a time period. A snapshot will be captured at every continuous interval even if there is no activity in the camera image.
-
In the Alarm Interval drop-down menu, select a time period. A snapshot will be captured at every alarm interval while a motion event is occurring.
-
Click the Auto Capture switch to enable (
 ) or disable (
 ) Auto Capture for the selected channel.
 -
Click Save.
Enable and configure Auto Capture of snapshots on your LHA / LNK Series DVR / NVR system