U471AA - 2K Wire-Free Camera: Frequently Asked Questions (FAQ)
The following frequently asked questions (FAQs) provide more information about the 2K HD Smart Deterrence Camera (U471AA).
When I check the camera's live view, why does the video look washed out in the first second?
The camera boots up very quickly and will only need a second to adjust the video resolution.
Does the camera battery pack come fully charged?
The battery pack comes partially charged (due to safety regulations). Please, fully charge the battery prior to use and before you begin setup. This will take a few hours.
How do I charge the camera's battery pack?
There are two options for charging the battery pack.
- Charge the battery pack by itself by twisting the camera's bottom cover counter-clockwise, removing the battery pack from the camera and plugging the charging adapter into the battery pack.
- Charge the battery pack inside the camera (only applies if the battery is inserted into the camera). Simply lift the power port cover, then use the included charging adapter and cable to connect to the camera’s power port and plug into a power outlet.
How long does it take to charge the 2K smart deterrence camera?
When using the included charging adapter it will take 4 to 6 hours to fully charge the camera's battery pack.
IMPORTANT: We recommend only using the included charging adapters to charge the Home Hub and 2K cameras.
How long does the battery last?
While the batteries can last between 6-9 months, this is dependent on a number of factors, such as number of events or notifications, length of the recording, camera location, ambient temperature, and settings on the camera. As a guideline, please see the below scenerios.
- Installed in busy areas (25 events/day, 10s/event), battery life is estimated at 2-3 months.
- Installed in typical areas (12 events/day, 10s/event), battery life is estimate at 3-5 months.
- Installed in quiet areas (4 events/day, 10s/event), battery life is approximately 7-9 months.
The section "The camera battery life is too short" in the article 2K QHD Wire-Free system - Troubleshooting details some of the factors that may cause your batteries to drain faster.
Can I use the included power adapter outdoors?
The included power adapter and cable is meant for charging the camera indoors only. Optional outdoor power supply is available for continuous power.
You can purchase the proper add-on accessory here.
Can I power the cameras permanently if I have a nearby outlet?
Yes. You can permanently connect the included power adapter and cable to the camera, but you will need to disconnect the camera to recharge additional battery packs.
Add-on battery packs and power adapters can be purchased here.
If you want to have the power source located outdoors do not use the included power adapter and cable.
Are the cameras Solar Panel compatible?
Yes. Click here to purchase.
Why is the Solar Panel not charging my cameras?
Make sure of the following:
- Fully charge the camera battery pack. Refer to the product documentation for charging instructions.
- Choose a location for the solar panel with plenty of direct sunlight exposure. Do not install in a covered or shaded area. Performance is dependent on temperature and light exposure.
- You must have the latest camera firmware. Upgrading the NVR firmware will not resolve compability issues.
To upgrade the camera firmware:
- Call tech support at 1 888 425 6739 and request the latest camera firmware.
- Place the file on a USB drive (not included).
- Insert the USB drive into one of the USB ports.
- From the NVR Live View screen, click
 > Setup > System > Maintenance > Upgrade.
 - Click Select File
- The drive menu appears. Navigate to and select the .bin firmware file, then click OK.
- Click Upgrade to confirm when the pop-up appears.
- Allow 5-10 minutes for the camera and system to reboot. Do not power off the recorder or cameras during the firmware upgrade.
The camera is not picking up motion detection and has a strong reflection when facing glass
The camera’s motion sensor will not work when facing glass or any other building material. The camera needs to be located outside when trying to monitor motion outdoors.
See below for more details about how to position your camera.
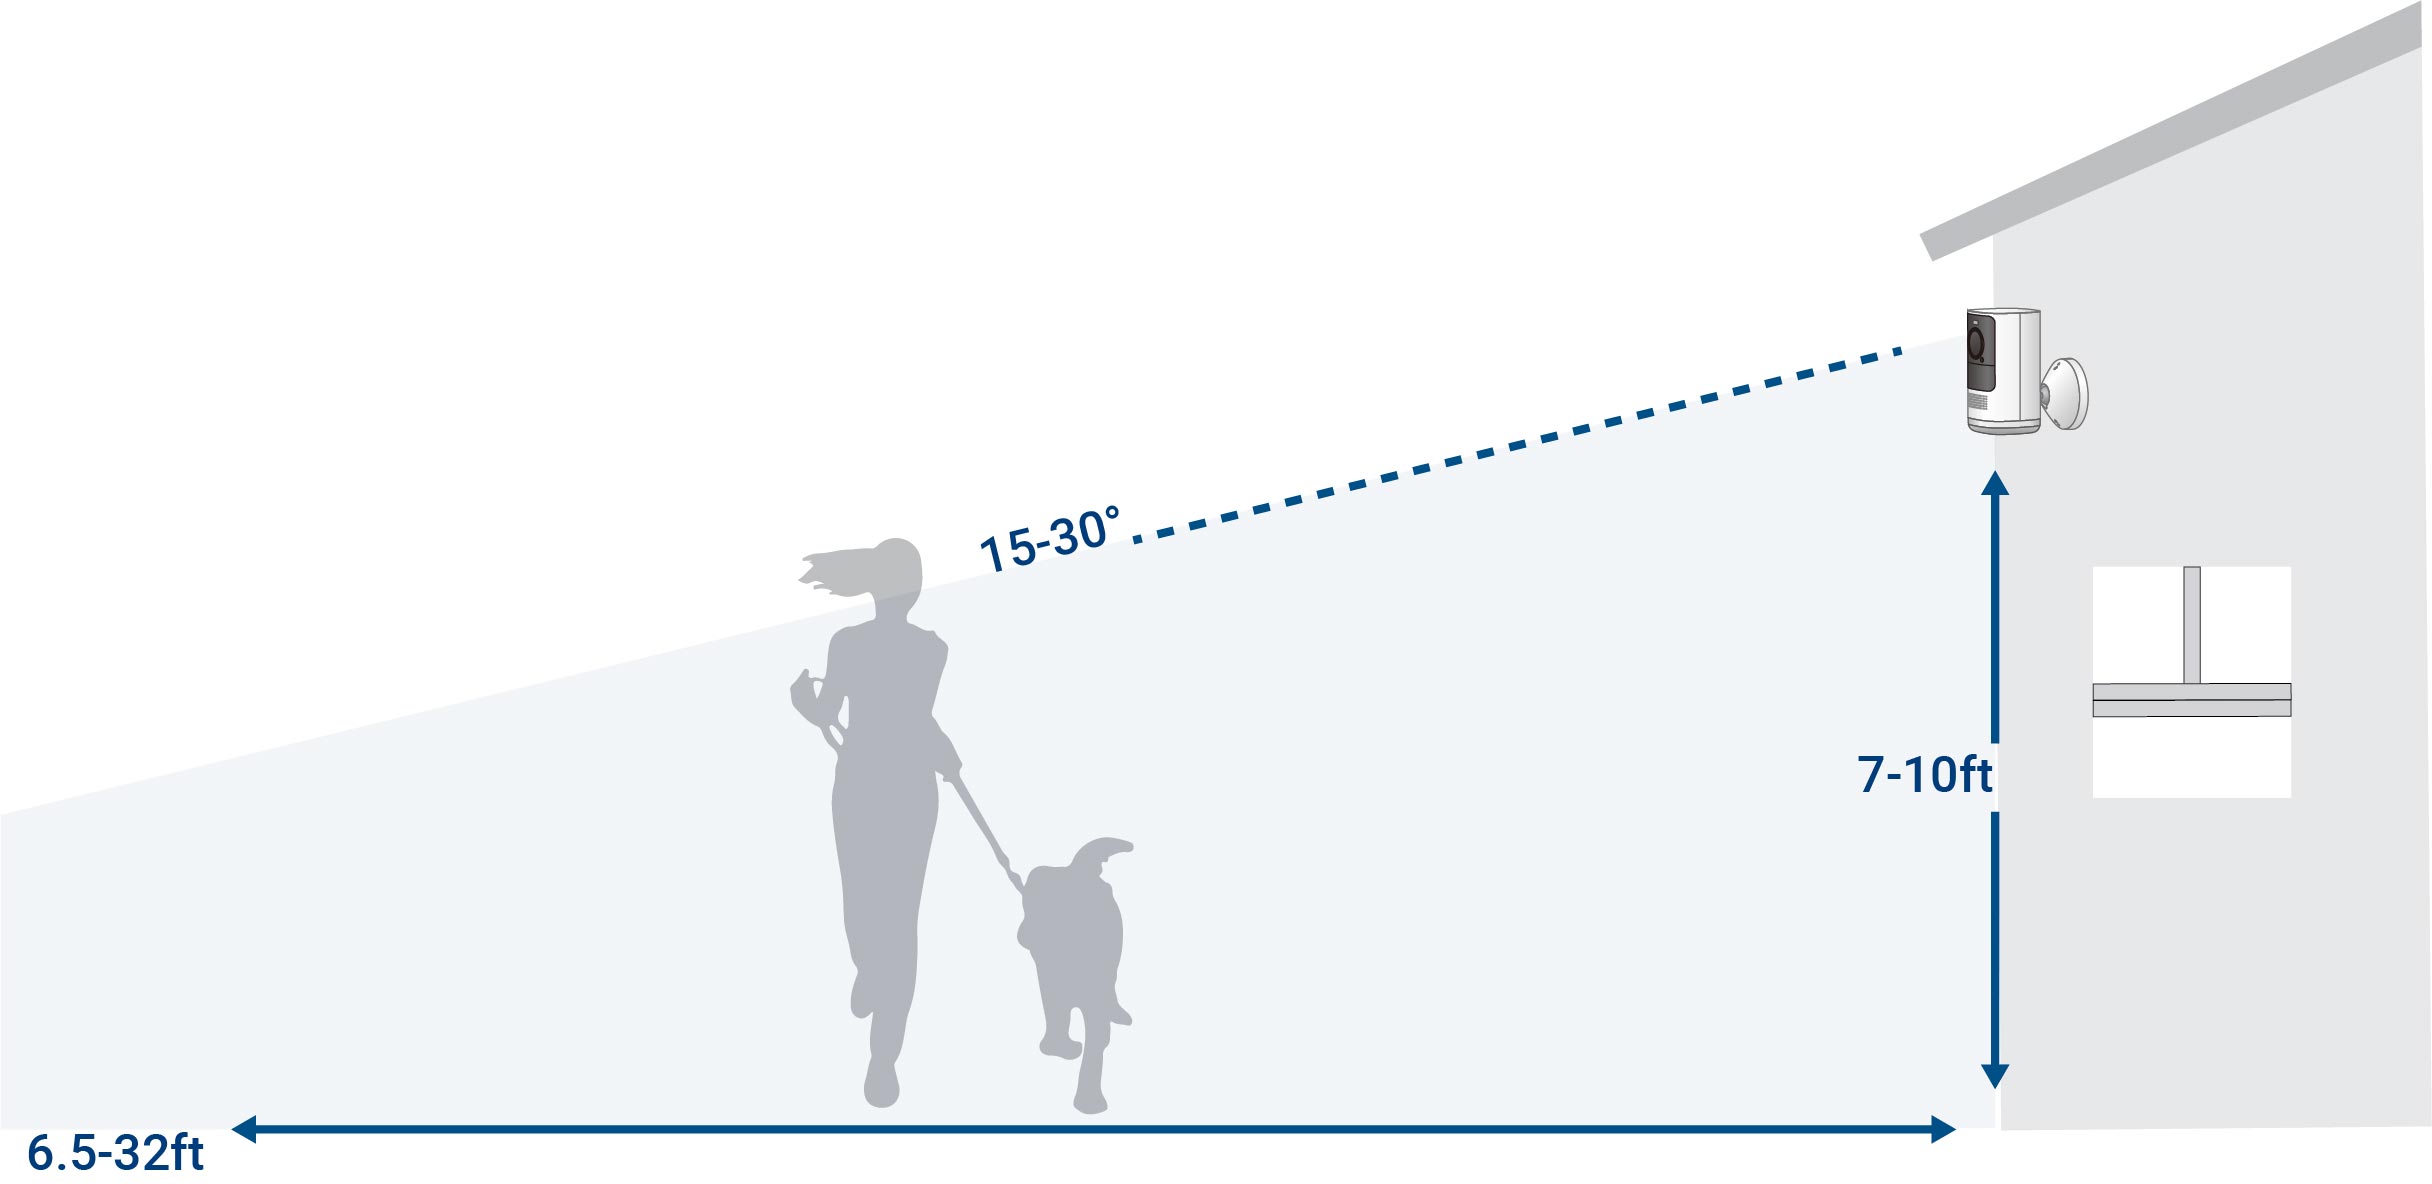
How should I position my Lorex 2K smart deterrence camera?
- Place the camera on any flat surface or mount it to a wall.
- Do not place the camera near air conditioners and other air outlets.
- Install the camera at the recommended angle and height to optimize motion detection accuracy.
When mounting the camera on a wall (indoor/outdoor), make sure of the following:
- Distance: Optimal accuracy for objects within 6.5ft to 32ft (2~10m).
- Angle: Angle the camera around 15°-30° down from the level position.
- Height: Install the camera between 7-10 ft (2~3m) off of the ground.
When placing the camera on a shelf (indoor/outdoor), make sure of the following:
- Distance: Optimal accuracy for objects within 6.5-32ft (2~10m).
- Angle: Place the camera on a flat surface. Make sure the flat surface/shelf is not obstructing the camera’s field of view.
- Height: Place the camera between 4.5ft to 6.5ft (1.5~2m) off of the ground.
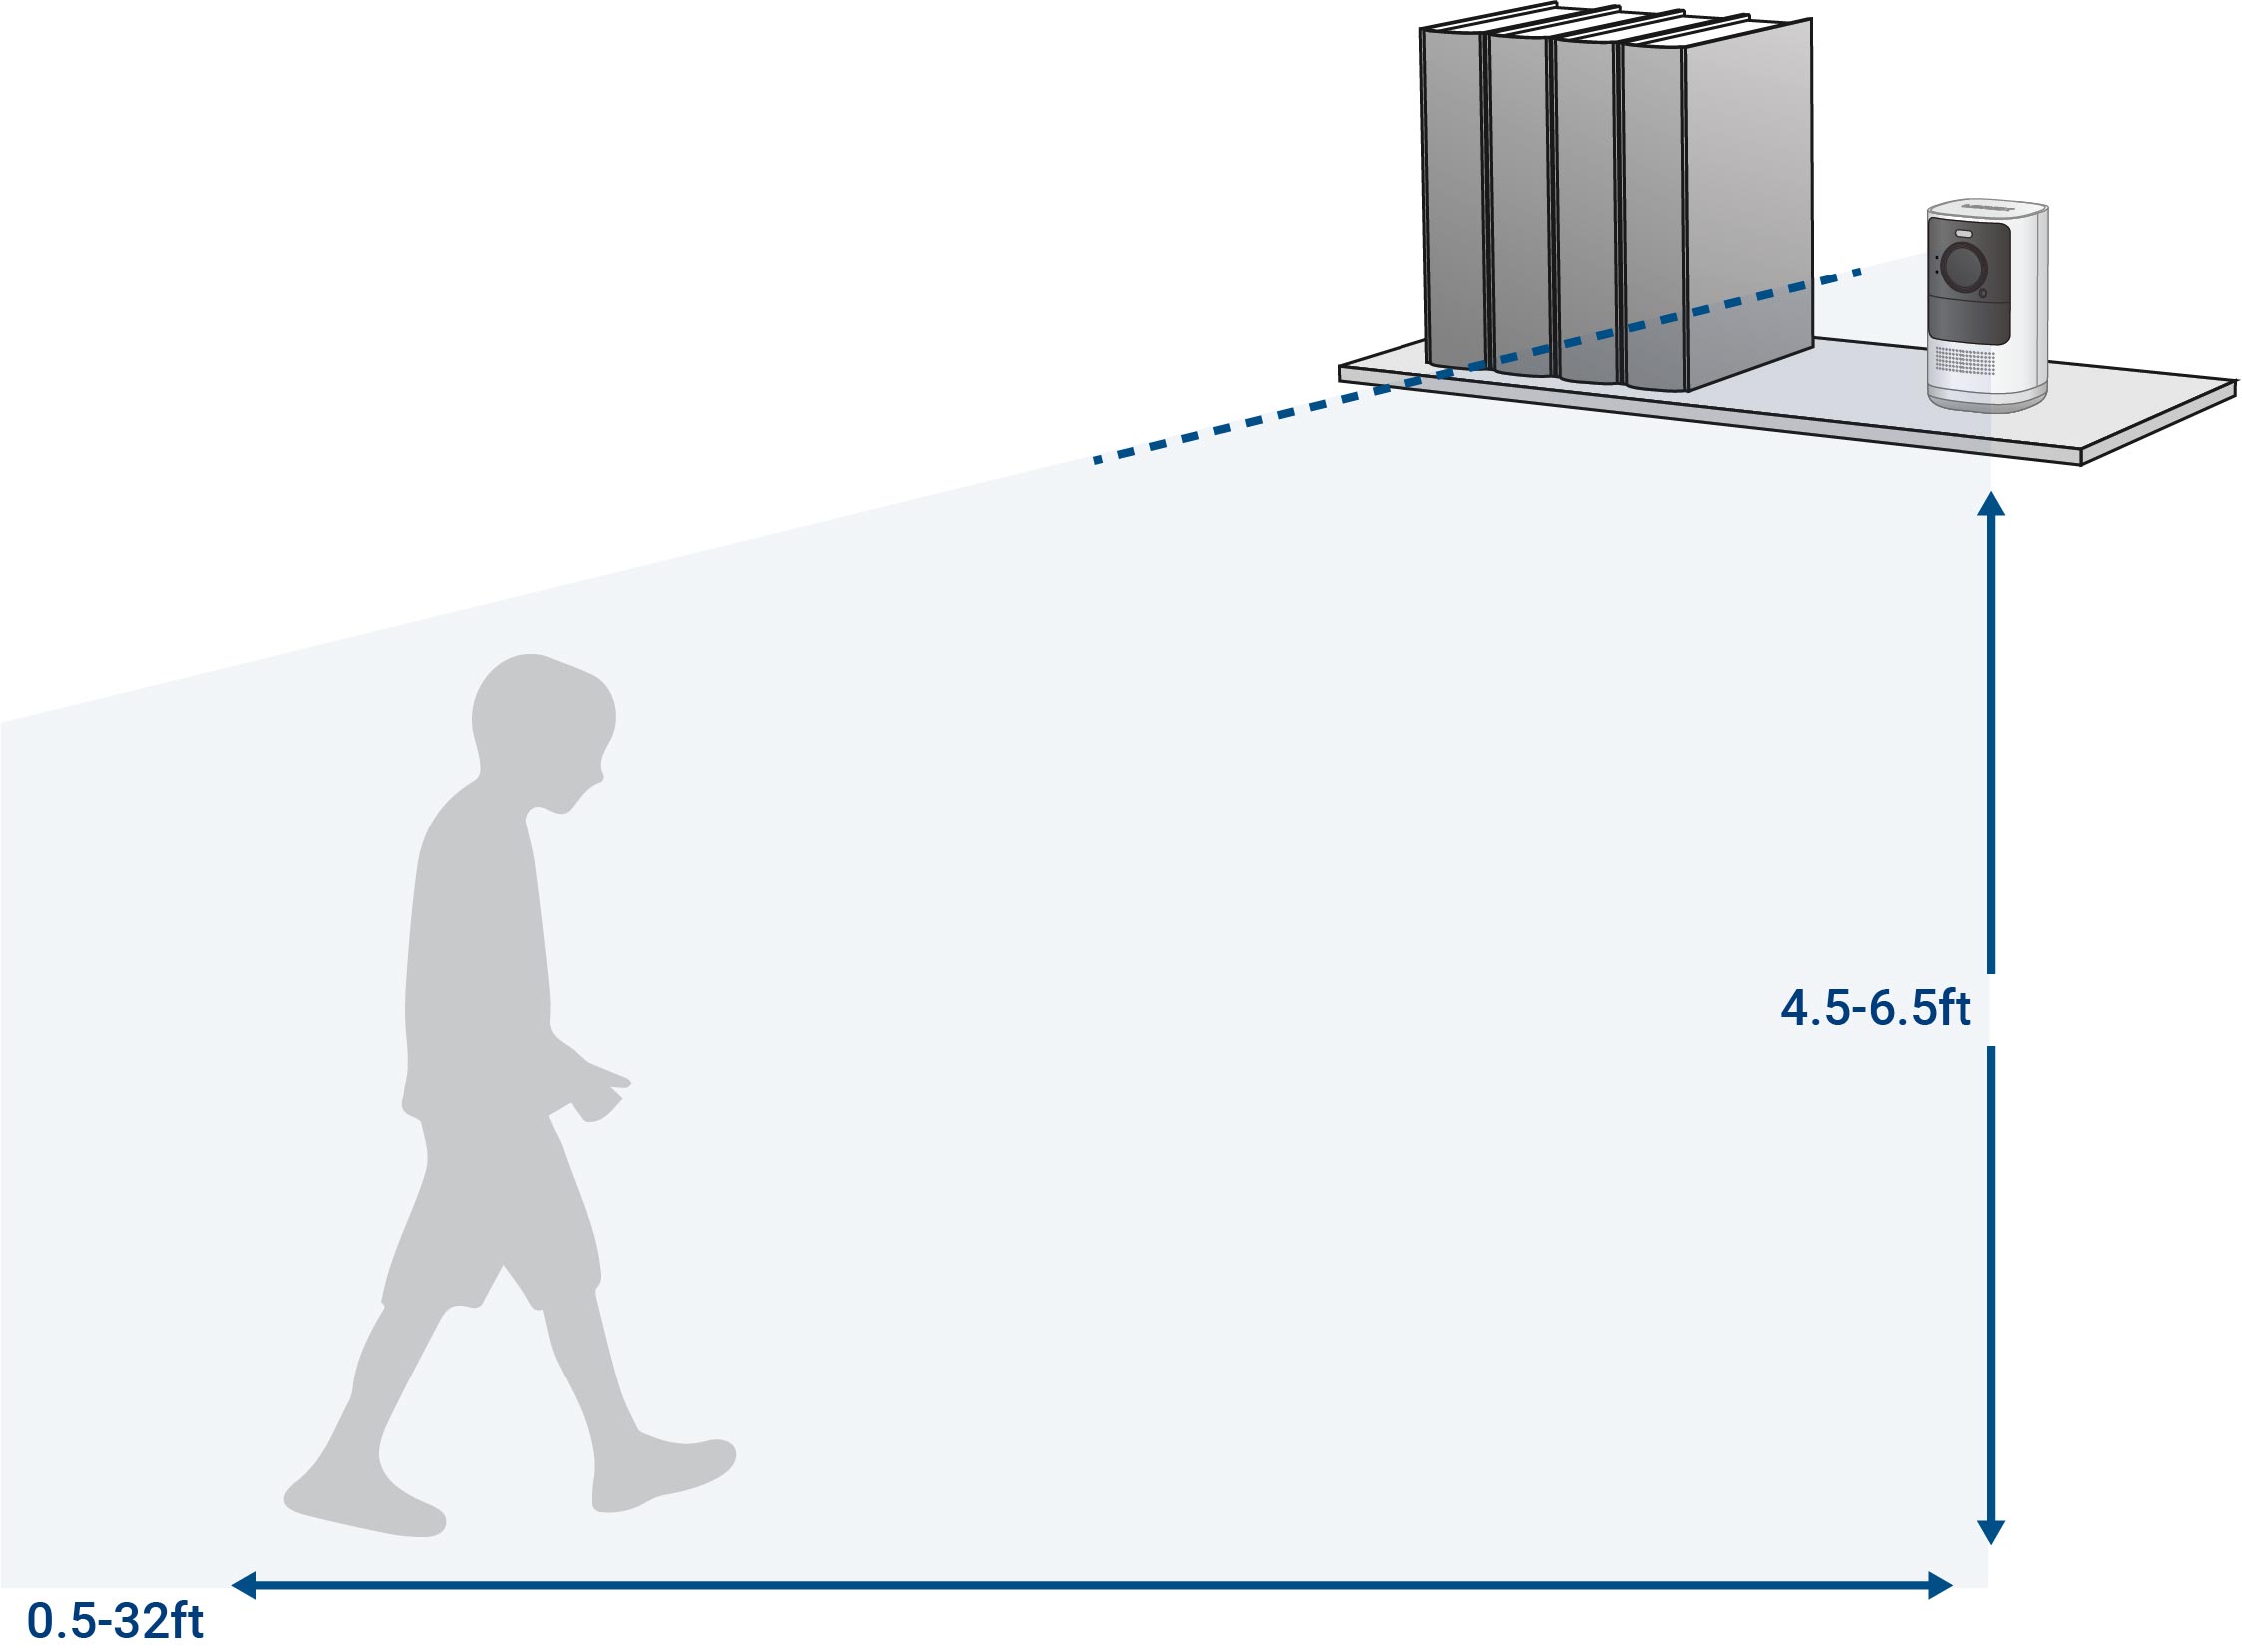
Note: Accuracy of person detection will be influenced by multiple factors, such as the person’s distance from the camera, the height of the person, and the height and angle of the camera. Night vision will also impact the accuracy and distance of detection.
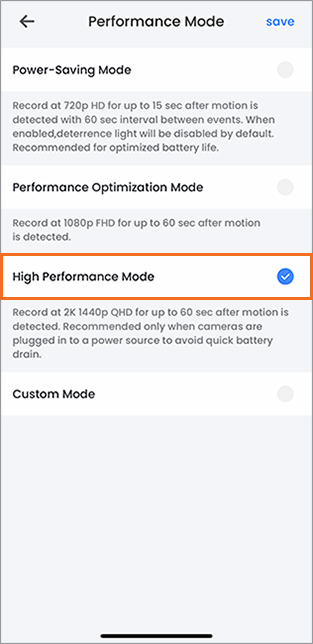
How do I change the camera resolution to 2K?
The camera's default resolution is 1080p full high definition (FHD) for up to a minute after motion is detected. To change it to 2K you must change the performance mode.
Note: This is only recommended when the camera is plugged into a power source to avoid quick battery drain.
To change the camera resolution to 2K:
- Launch the Lorex App.
- Swipe left or right to select a channel.
- Tap the live view for the selected channel.
 4. Tap the
 ![]() icon at the top-right corner.
icon at the top-right corner.
 5. Tap Performance Mode.
6. Tap High Performance Mode, then tap Save at the top-right corner.
5. Tap Performance Mode.
6. Tap High Performance Mode, then tap Save at the top-right corner.
OR
-
Tap to select Custom Mode, tap Video Quality, scroll to High (2K QHD), then tap save.
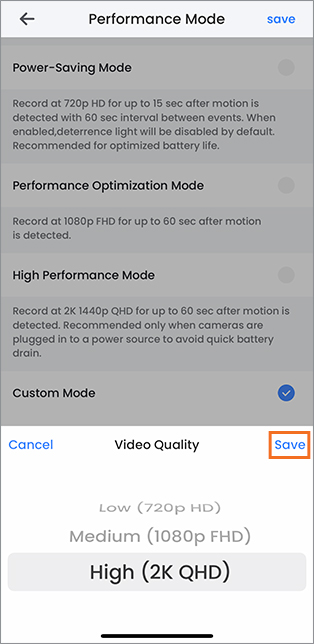
-
Tap Save at the top-right corner.
How do I enable Color Night Vision?
- Launch the Lorex App.
- Swipe left or right to select a channel.
- Tap the live view for the selected channel.
4. Tap the ![]() icon at the top-right corner.
icon at the top-right corner.
5. In the Device Settings screen beside Auto Night Vision tap the ![]() icon to disable Auto Night Vision and enable Color Night Vision.
icon to disable Auto Night Vision and enable Color Night Vision.
When I add a camera I cannot see the live view
If you cannot see the camera's live view, during the camera setup, tap Skip this step to exit the setup and return to the Devices screen.
At the Devices screen, tap and drag down to refresh the screen, then check if the camera's live view is visible.
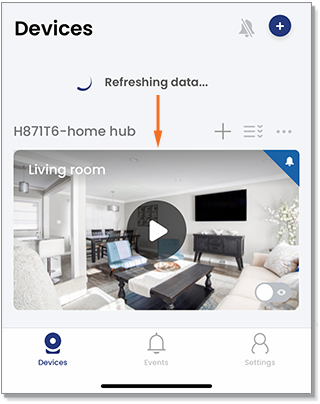
If the issue persists, press and hold the camera's reset button and repeat the camera setup.
See the article 2K HD Wire-Free system - How to add a camera, for more information.