N845, N846, N847, N864 Series: Package and Envelope Detection
The following article provides instructions for setting up your system for package/envelope detection.
The package/envelope detection feature allows you to set an area within the camera’s field-of-view to notify you of package/envelope deliveries or pick-ups. This feature is used to detect and record mail, boxes, a courier, or a mail truck. Upon detection, the camera begins recording and will have an exact update on the event.
Package/envelope detection is compatible with certain Lorex IP cameras. For a complete list of compatible cameras, navigate to your recorder series at lorex.com/compatibility.
Ensuring Package/Envelope Detection Accuracy
The optimal installation location including height, distance, and angle for your camera will depend on the type of smart motion detection settings that you want to use. Refer to the article Smart Motion Detection Camera Placement Tips for details.
Enable Smart Plan Feature
If a Smart Plan is not enabled properly on your camera, the package/envelope detection feature will not work. Please make sure to enable the Package and Envelope feature before continuing. Refer to the article Setting Your Camera's Smart Plan.
Using Package/Envelope Detection
Select channels that you want to enable package/envelope detection on and adjust preferences.
- From the Live View display, right-click to open the Quick Menu, then click Main Menu.
- Click Events, then Event Settings. Click the Package/Envelop Detection tab from the side panel.
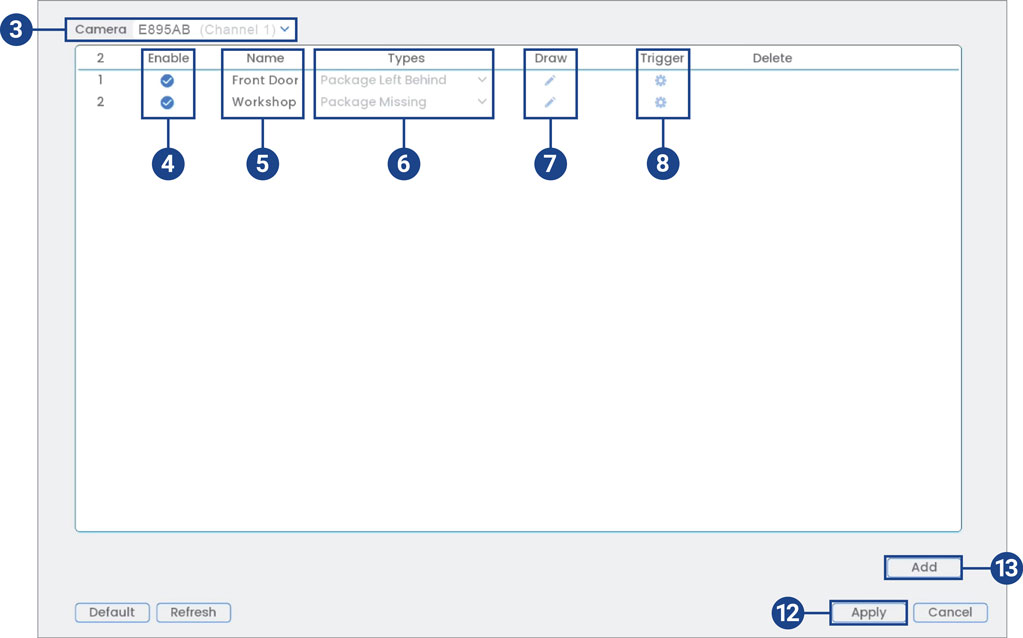
- Select a channel with a compatible camera you would like to configure package/envelope detection.
- Check to enable the package/envelope detection rules that you want to use.
- Set a name for the rule by double-clicking the mouse over the Name of the rule.
- Select between Package Left Behind or Package Missing detection types.
Note: The first two package/envelope detection rules were added by default. The detection type for the two default rules cannot change and the areas can only be enabled or disabled. All details from rules added after can be changed or deleted.
- Click the drawing icon and customize the active area for package/envelope detection:
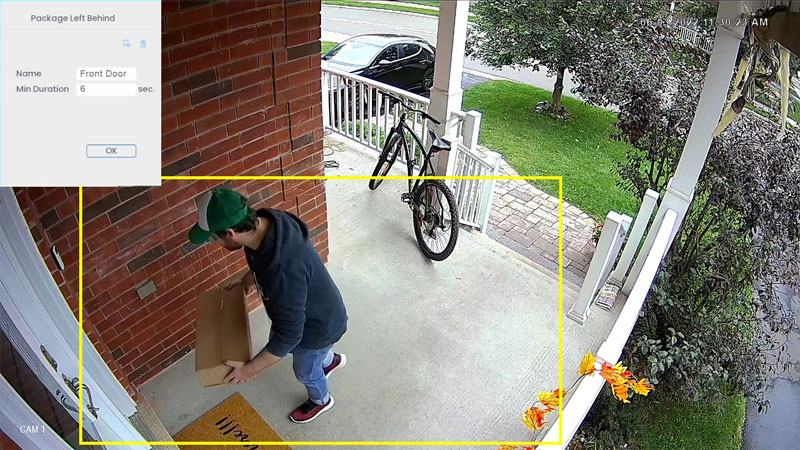
- To draw, click-and-drag the corners of the yellow box to resize the area. For most accurate results, set an area where objects of interest will move within the bounding box as well as into/out of.
- Under Min Duration, type in the number of seconds before the device triggers an event.
- Click OK when finished.
- Click the trigger modifying icon to adjust how the system will react to package/envelope detection.
- Click Set next to Schedule to choose which days and times of the week to enable package/envelope detection:
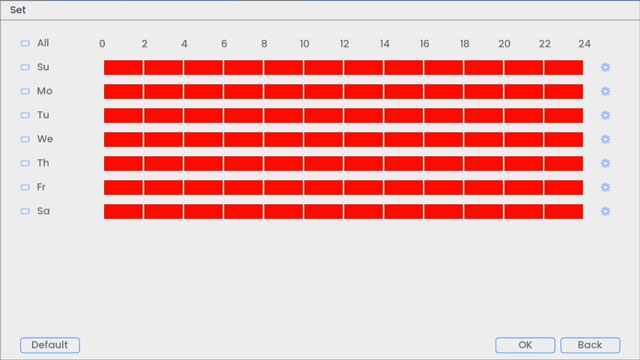
- Click or click-and-drag along each of the red timelines to quickly add or remove time from each day’s schedule in 30–minute segments.
- Click
 beside 2 or more days to link schedules (
 ). This allows you to quickly change multiple schedules at once.
 - To make fine adjustments to a schedule, click
 . This will allow you to set exact start and end times for a schedule.
- Choose how the system will react to package/envelope detection:
- Record Channel: Select the channels that will record when a package or envelope is left behind or missing on the selected channel. Set the length of recording following a package/envelope detection event in the Post_REC field.
- Send Email: Check to enable email alerts. You must configure email alerts before you will be able to receive them.
- PTZ Activation: Set connected PTZ cameras to start a tour, pattern, or go to a preset location.
- Sequence: Sequence mode will begin. Select the numbered tiles next to this option to include the corresponding channels in the sequence.
- Buzzer: Check to enable the system buzzer.
- Camera Light: Check to enable the deterrence light. Click Set to change the deterrence light's mode to Strobe or choose how long the deterrence light will stay on following a package/envelope detection event.
- Camera Audio: Check to enable Quick Responses. Click Set to select a pre-recorded voice message or alarm sound. Choose how many times the quick response will play following a package/envelope detection event.
- Smart Light: Check to enable Smart Security Lighting™. Click Set to select a custom color or choose how long the light will stay on following a package/envelope detection event. Click on the red color box to open the custom color settings.
- Click OK, click OK again.
- Click Apply to save changes.
- Click Add to create additional active areas for smart motion detection on the selected channel.
Searching for Package/Envelope Detection (Smart Search)
Search for package/envelope events on a specific channel or the entire system. You can also choose to back up events (USB flash drive required – not included).
- From the Live View display, right-click to open the Quick Menu, then click Smart Search.
- Click the Package/Envelop Detection tab from the side panel.
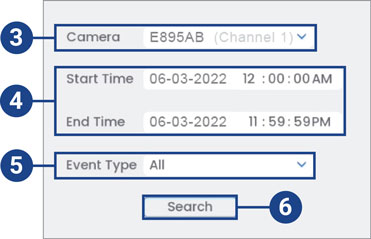
- Select a channel to search for detection events from, or select All.
- Enter a start and end time for your search.
- Select the type of package/envelope detection for your search, or select All.
- Click Search.
- Events that match your search criteria are displayed. You now have the following options:
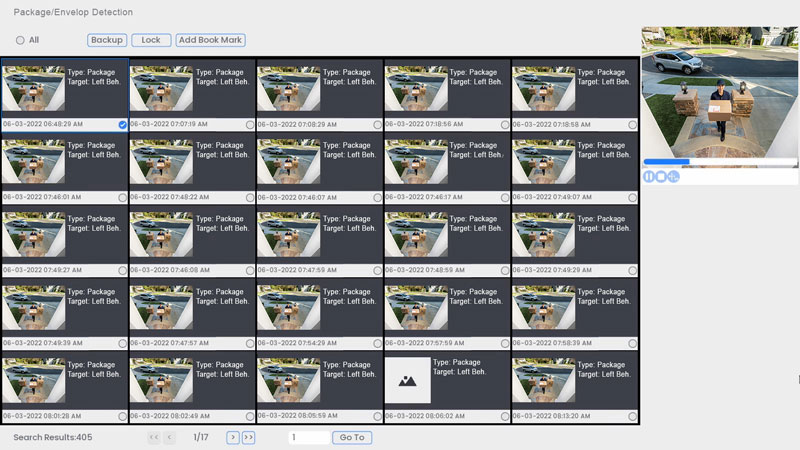
- Click a thumbnail to preview the event. Double-click the preview window to view in full screen.
- Check thumbnails to perform other actions:
- Backup: Back up events.
- Lock: Lock events.
- Add Book Mark: Bookmark events.
For detailed instructions on configuring your system, refer to your recorder's Series Manual on the product support page. Visit help.lorextechnology.com and search your recorder's model number.