N910 Series - 4K+ Ultra HD 12MP 16 Camera Capable NVR: Person & Vehicle Detection
The following article provides both Lorex App and recorder instructions for using Person and Vehicle Detection on your IP security cameras.
The system supports detection of people and vehicles with compatible IP cameras only. This helps deliver more relevant notifications when using the Lorex App for remote viewing.
You can also link the warning lights, sirens, and more to person and vehicle detection on compatible Lorex deterrence cameras for an added level of smart security.
Table of Contents:
- Ensuring Accurate Person Detection
- Ensuring Accurate Vehicle Detection & Number Search
- Configuring Person & Vehicle Detection
- Searching for Person & Vehicle Detection (Smart Search)
- Configuring Active View
- Configuring Person and Vehicle Detection in the Lorex App
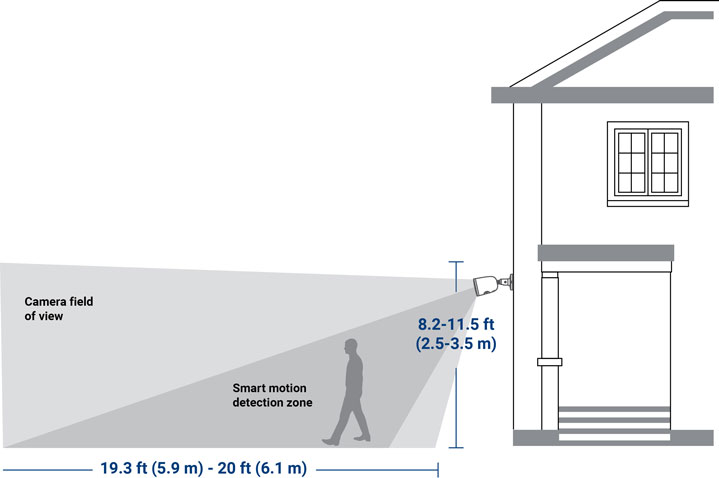
Ensuring Accurate Person Detection
The following are important camera installation notes to ensure accurate person detection. Refer to the documentation that came with your camera or search for your camera model number at lorex.com for full mounting instructions.
Person Detection
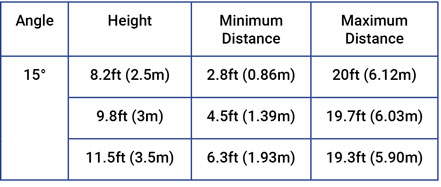
- Angle the camera so that objects of interest appear in the bottom 2/3 of the camera image.
- Choose a location where objects of interest will be no further than 20 ft (6.1 m) from the camera.
- Angle the camera 15 ° down from the level position.
- Install the camera between 8.2-11.5 ft (2.5-3.5 m) off of the ground.
Accuracy of person detection will be influenced by multiple factors, such as:
- The object’s distance from the camera.
- The size of the object.
- The height and angle of the camera.
Night vision will also impact the accuracy of detection.
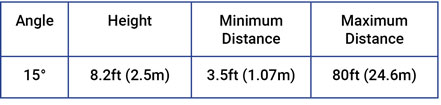
Ensuring Accurate Vehicle Detection & Number Search
The following are important camera installation notes to ensure accurate vehicle detection. Refer to the documentation that came with your camera or search for your camera model number at lorex.com for full mounting instructions.
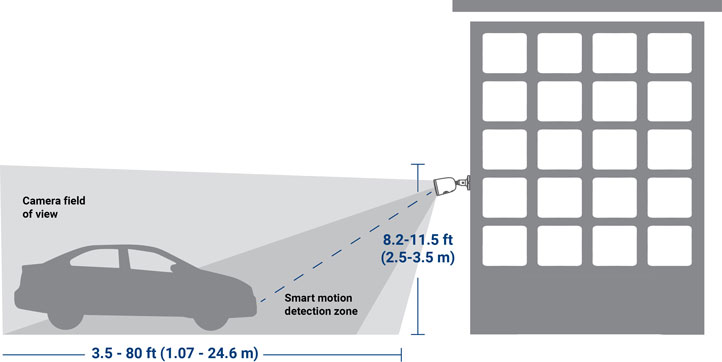
Vehicle Detection
-
Angle the camera so that objects of interest appear in the bottom 2/3 of the camera image.
-
Choose a location where objects of interest will be no further than 20 ft (6.1 m) from the camera.
-
Angle the camera 15 ° down from the level position.
-
Install the camera between 8.2-11.5 ft (2.5-3.5 m) off of the ground.
-
Install your camera in a focused area where you can accurately predict vehicle movement, speed, and position.
-
Good examples of focused areas include a parking lot entrance/exit, an alleyway, a driveway, or a road.
-
Position your camera to view license plate numbers perpendicularly (as close to straight on as possible) with clear visibility of the plates passing through.
Accuracy of person detection will be influenced by multiple factors, such as:
- The object’s distance from the camera.
- The size of the object.
- The height and angle of the camera.
Night vision will also impact the accuracy of detection.
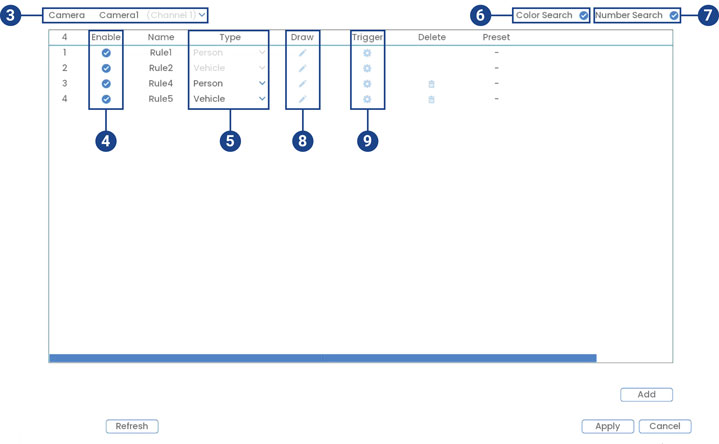
Configuring Person & Vehicle Detection
The system allows you to monitor for smart motion events and differentiate between person, vehicle, and animal shapes. Adjust preferences for person, vehicle, and/or animal detection per channel.
Important: If a Smart Plan is not enabled properly on your camera, the Smart Motion feature will not work. Please make sure to enable the Smart Motion feature before continuing, see Change Your Recoder's Smart Plan.
To configure person & vehicle detection:
-
From the Live View display, right-click to open the Quick Menu, then click Main Menu.
-
Click Events, then Event Settings. Click the Person & Vehicle tab from the side panel.
-
Select a camera to configure.
-
Check to enable the person & vehicle detection rules that you want to use.
-
Select between Person or Vehicle detection types.
Important: The first two person & vehicle detection rules were added by default. The detection type for the two default rules cannot change and the areas can only be enabled or disabled. All details from rules added after can be changed or deleted.
- Check to enable Color Search. The system can search through recorded detection events for certain colors on a person or vehicle. For details on searching color, see 16.5 Searching for Colors (Smart Search), page 72.
- Check to enable Number Search. The system can search through recorded detection events for numbers on vehicle license plates. For details on searching for numbers, see 16.6 Searching for Numbers on Vehicle License Plates (Smart Search), page 73.
- Click the Draw icon
 and customize the active area for animal detection:
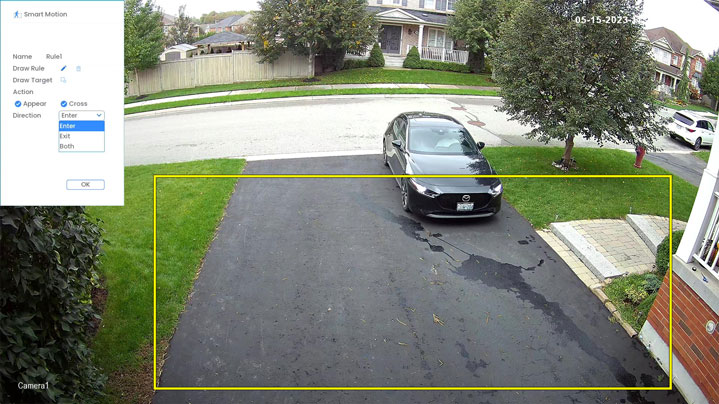
- Name: Click to enter a custom name for the detection area.
- Draw Rule: Click-and-drag the corners of the yellow box to resize the area. To create a new bounding box, click the delete icon
 to remove the current one, then click on the camera’s live view image and draw a line around the area that you want to monitor. Continue to click to change the direction and then right-click to close the area.
 - Action: Check Appear to detect if an object of interest appears in the defined area. Check Cross to detect if an object of interest enters or crosses through the defined area. Check both to enable each type of action.
- Direction: Determine which direction an object needs to travel in order to trigger automatic deterrence. You can select Enter for movement entering the defined area, or Exit for movement exiting the defined area, or Both for both types of directions.
- Click OK when finished.
- Click the Trigger icon
 to adjust how the system will react to person & vehicle detection.
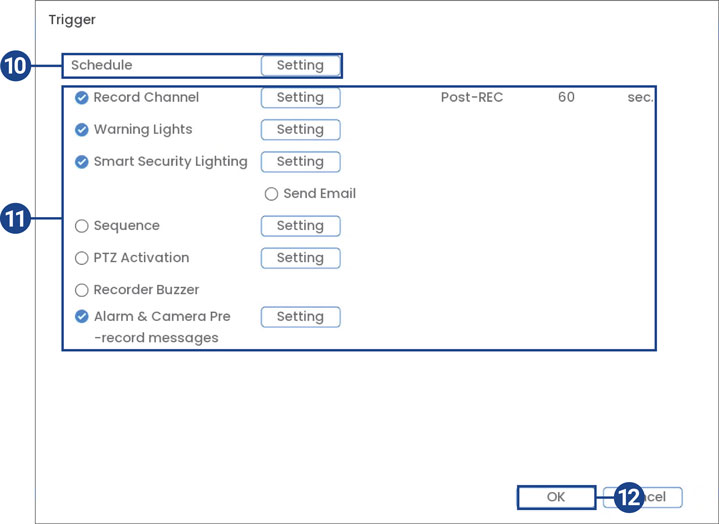
- Click Setting next to Schedule to choose which days and times of the week to enable person & vehicle detection.
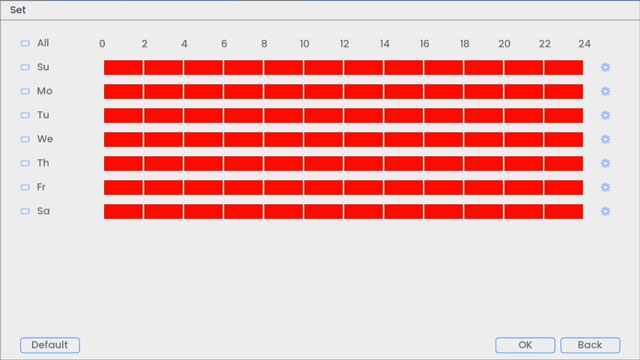
- Click or click-and-drag along each of the red timelines to quickly add or remove time from each day’s schedule in 30–minute segments.
- Click
 beside 2 or more days to link schedules (
 ). This allows you to quickly change multiple schedules at once.
 - To make fine adjustments to a schedule, click . This will allow you to set exact start and end times for a schedule.
- Click OK when finished.
- Choose how the system will react to smart motion detection:
- Record Channel: Select the cameras that will record when a person & vehicle is detected. Set the length of recording following a person & vehicle detection event in the Post-REC field.
- Warning Lights: Check to enable warning lights. Click Setting to change the warning light mode to Flashing or choose how long the warning light will stay on following a person & vehicle detection event. To learn more, see 14.1.1 Smart Motion Activated Warning Lights, page 50.
- Smart Security Lighting: Check to enable Smart Security Lighting. Click Setting to select a custom color or choose how long the light will stay on following a smart motion detection event. Click on the red color box to open the custom color settings. To learn more, see 14.1.3 Smart Motion Activated Smart Security Lighting, page 56.
- Sequence: Sequence mode will begin. Select the numbered tiles next to this option to include the corresponding cameras in the sequence.
- Send Email: Check to enable email alerts. You must configure email alerts before you will be able to receive them, see 26.6.5 Configuring Email Alerts, page 132.
- PTZ Activation: Set connected PTZ cameras to start a tour, pattern, or go to a preset location.
- Recorder Buzzer: Check to enable the system buzzer.
- Alarm & Camera Pre-record Messages: Check to enable alarm & camera pre-record messages. Click Setting to select a pre-recorded voice message or alarm sound. Choose how many times the prompt will play following a person & vehicle detection event. To learn more, see 14.1.2 Smart Motion Activated Alarm & Camera Pre-record Messages, page 53.
- Click OK.
- Click the Delete icon to remove the rule.
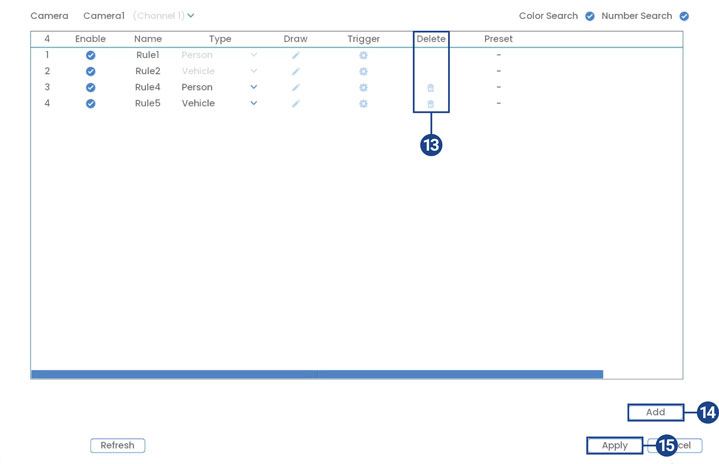
- Click Add to create additional active areas for person and vehicle detection.
- Click Apply to save changes.
Searching for Person & Vehicle Detection (Smart Search)
Smart Search lets you filter recorded video to search for person and/or vehicle detection events.
Important: In order to use Smart Search, you must configure at least one camera’s smart detection settings. See [Person and Vehicle Detection]() for full instructions.
To perform a Smart Search:
- From the Live View display, right-click to open the Quick Menu, then click Smart Search.
- Click the Person & Vehicle tab from the side panel.
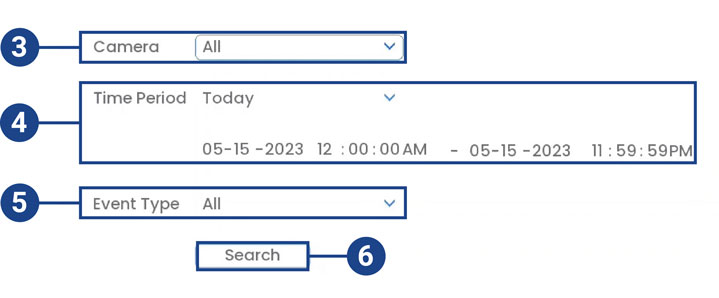
- Select a camera to search for detection events from, or select All.
- Select the time period for your search, then enter the start and end time.
- Select the type of smart motion detection for your search, or select All.
- Click Search.
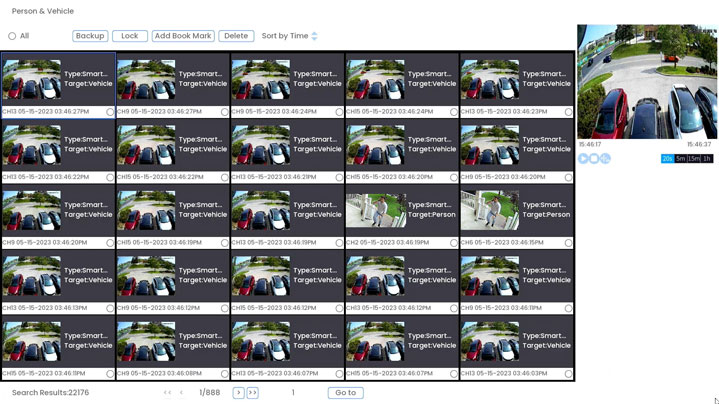
- Events that match your search criteria are displayed. You now have the following options:
- Click a thumbnail to preview the event. Double-click the preview window to view in full screen.
- Check thumbnails to perform other actions:
- Backup: Back up events.
- Lock: Lock events.
- Add Book Mark: Bookmark events.
- Delete: Delete events.
Configuring Active View
Track motion that is detected by following and zooming in on the moving object.
To configure the active view settings:
- From the Live View display, right-click to open the Quick Menu, then click Main Menu.
- Click Events, then Event Settings. Click the Motion tab from the side panel, then Active View from the top panel.
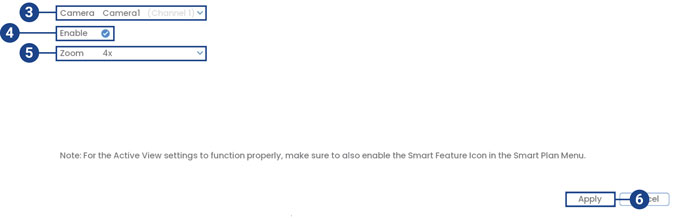
- Select a camera to configure active view for.
- Check to enable active view.
- Click to select the zoom setting between 2x, 4x, 6x, or 8x.
- Click Apply to save changes.
Configuring Person and Vehicle Detection in the Lorex App
The following steps are applicable to the Lorex App.
- Tap
 above the recorder's thumbnail.
 - Select your camera.
- Tap the ellipses (...) in the top right corner of the app.
- Tap Motion Detection Settings.
- Tap
 to enable Person Detection or Vehicle Detection.
 - Tap Motion Zones™.
- Tap the Motion Zones™ to set up the detection area:
- Person Motion Zone
- Vehicle Motion Zone
 This will take you to a new screen where you can shrink, stretch, or reposition your Person and Vehicle Motion Zones™ as needed. For full instructions on how to set customized Motion Zones™, refer to "Configure Motion Zones™".