N910 Series - 4K+ Ultra HD 12MP 16 Camera Capable NVR: Face Detection
The following article helps you detect and capture faces in the camera’s field-of-view while triggering alarms and/or notifications.
Caution: Facial recording without consent is illegal in certain jurisdictions. Lorex Technology does not assume liability for any use of its product that fails to conform with local laws.
Face Detection is compatible with certain Lorex IP cameras. For a complete list of compatible cameras, navigate to your recorder series at Product Compatibility Chart.
Table of Contents:
- Ensuring Face & Mask Detection Accuracy
- Configuring Face Detection
- Configuring Mask Detection
- Live Preview of Face & Mask Detection
- Configuring Face Dection Through the Lorex App
Ensuring Face & Mask Detection Accuracy
The following are important camera installation notes to ensure accurate Face Detection. For full camera mounting instructions, see your camera’s documentation at lorex.com.

- Install in a bright area and avoid facing direct sunlight with strong backlights and dark shadows.
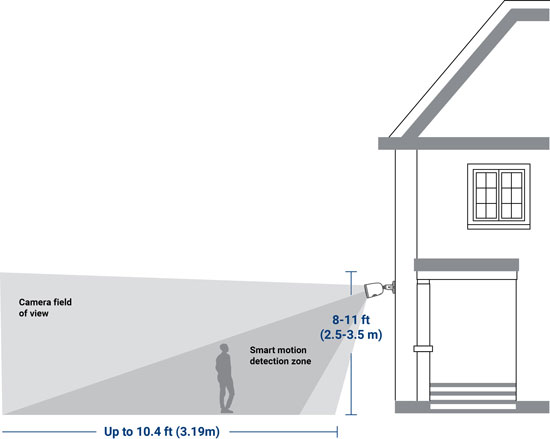
- Choose a location where objects of interest will be no further than 10.4 ft (3.19 m) from the camera.
- Position the camera about 9.8 ft (3 m) off the ground to detect the full proportion of a face.
- Angle the camera around 15° down from the level position.
- Point the camera directly where objects of interest will be facing.
Configuring Face Detection
The face detection option cannot be used simultaneously with other smart plans. Make sure you have disabled all other smart plans to enable the Face Detection feature. To enable face detection in smart plan settings, see Change Your Recorder's Smart Plan
The system allows you to monitor for face events. Select channels that you want to enable face detection on and adjust preferences.
To configure face detection:
- From the Live View display, right-click to open the Quick Menu, then click Main Menu.
- Click Events, then Event Settings. Click the Face Detection tab from the side panel.
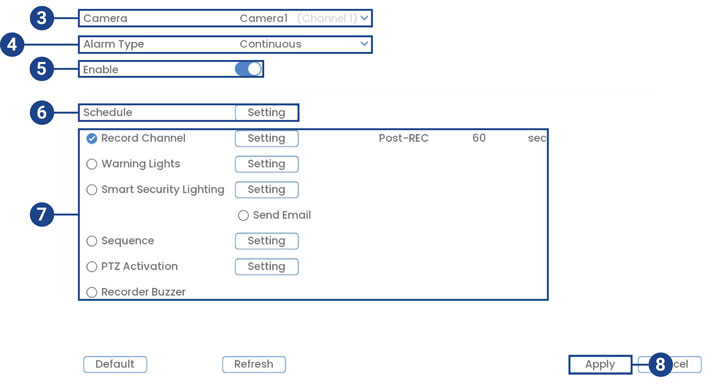
- Select a camera to configure.
- Select Continuous.
- Check to enable face detection on the selected channel.
- Click Setting next to Schedule to choose which days of the week to enable face detection:
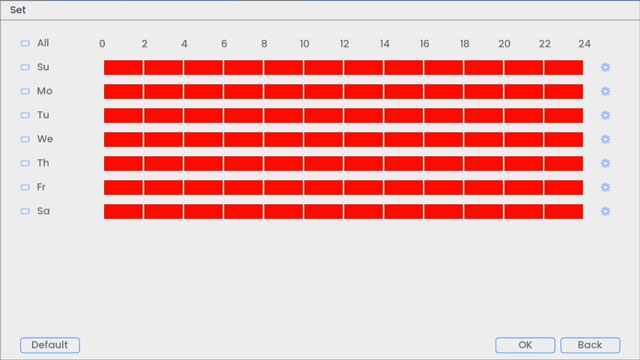
- Click or click-and-drag along each of the red timelines to quickly add or remove time from each day’s schedule in 30–minute segments.
- Click
 beside 2 or more days to link schedules (
 ). This allows you to quickly change multiple schedules at once.
 - To make fine adjustments to a schedule, click
 . This will allow you to set exact start and end times for a schedule.
 - Click OK when finished.
- Choose how the system will react to face detection:
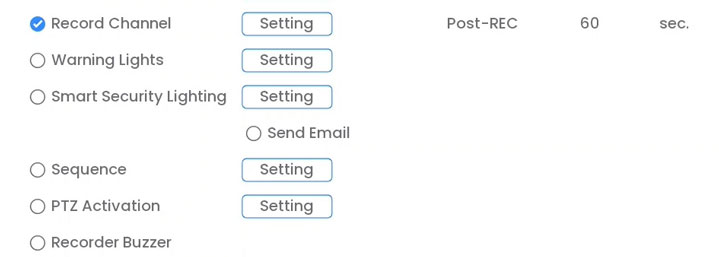
- Record Channel: Select the cameras that will record when a face is detected. Set the length of recording following a face detection event in the Post-REC field.
- Warning Lights: Check to enable warning light. Click Setting to change the warning light mode to Flashing or choose how long the warning light will stay on following a face detection event. To learn more, see 14.1.1 Smart Motion Activated Warning Lights, page 52.
- Smart Security Lighting: Check to enable Smart Security Lighting. Click Setting to select a custom color or choose how long the light will stay on following a face detection event. Click on the red color box to open the custom color settings. To learn more, see 14.1.3 Smart Motion Activated Smart Security Lighting, page 58.
- Send Email: Check to enable email alerts. You must configure email alerts before you will be able to receive them , see 26.6.5 Configuring Email Alerts, page 134.
- Sequence: Sequence mode will begin. Select the numbered tiles next to this option to include the corresponding cameras in the sequence.
- PTZ Activation: Set connected PTZ cameras to start a tour, pattern, or go to a preset location.
- Recorder Buzzer: Check to enable the system buzzer.
- Click Apply to save changes.
- (OPTIONAL) Click Copy to apply the settings to one or more other cameras.
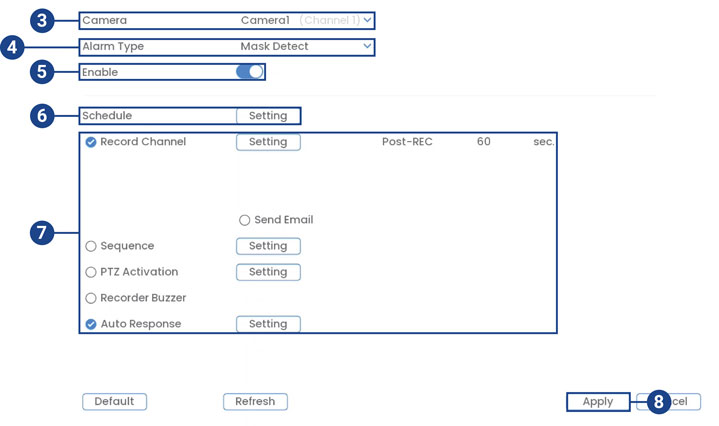
Configuring Mask Detection
Select channels that you want to enable mask detection on and adjust preferences.
To configure mask detection:
- From the Live View display, right-click to open the Quick Menu, then click Main Menu.
- Click Events, then Event Settings. Click the Face Detection tab from the side panel.
 3. Select a camera to configure.
4. Select Continuous.
5. Check to enable face detection on the selected channel.
6. Click Setting next to Schedule to choose which days of the week to enable face detection:
3. Select a camera to configure.
4. Select Continuous.
5. Check to enable face detection on the selected channel.
6. Click Setting next to Schedule to choose which days of the week to enable face detection:
- Click or click-and-drag along each of the red timelines to quickly add or remove time from each day’s schedule in 30–minute segments.
- Click beside 2 or more days to link schedules (). This allows you to quickly change multiple schedules at once.
- To make fine adjustments to a schedule, click . This will allow you to set exact start and end times for a schedule.
- Click OK when finished.
- You can configure how the system will react to mask detection, see.
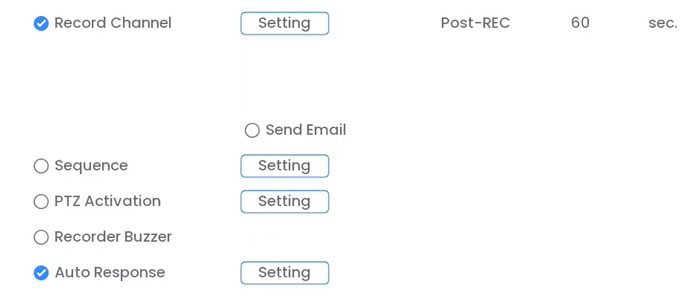
- Record Channel: Select the cameras that will record when a face is detected. Set the length of recording following a face detection event in the Post-REC field.
- Send Email: Check to enable email alerts. You must configure email alerts before you will be able to receive them , see 26.6.5 Configuring Email Alerts, page 134.
- Sequence: Sequence mode will begin. Select the numbered tiles next to this option to include the corresponding cameras in the sequence.
- PTZ Activation: Set connected PTZ cameras to start a tour, pattern, or go to a preset location.
- Recorder Buzzer: Check to enable the system buzzer.
- Auto Response: Check to enable an automatic audio response when a face is detected without a mask. Click Setting to create a schedule for auto response.
- Click Apply to save changes.
- (OPTIONAL) Click Copy to apply the settings to one or more other cameras.
Live Preview of Face & Mask Detection
You can now preview captured face detection and mask detection on your camera’s live view display.
To preview face and/or mask detection:
- From the Live View display, right-click to open the Quick Menu, then click Face Preview.
- Click Enable for the face preview panel to appear on the right side of the screen. Click Disable for the face preview panel to disappear from live view.
You can also search for face detection events on a specific camera or the entire system. You can also choose to back up events (USB flash drive required – not included).To perform a Smart Search, see Searching for Person & Vehicle Detection (Smart Search) in Person & Vehicle Detection.
Configuring Face Detection Through the Lorex App
- Tap
 above the recorder's thumbnail.
 - Select your camera.
- Tap the ellipses (...) in the top right corner of the app.
- Tap Motion Detection Settings.
- Tap
 to enable Face Detection.
 - Tap Motion Zones™.
- Here you can setup the general motion detection zone.
 Configuring Smart Motion Detection Zones (including face detection) can only be done using your recorder. For full instructions on how to set customized Motion Zones™, refer to "Configure Motion Zones™".