E871AB, Halo Series, H20 - 4K Dual-Lens IP Wired Security Camera: Troubleshooting
The following are some of the most common issues and troubleshooting tips for your 4K Dual-Lens IP Wired Camera E871AB Series.
How to reset camera
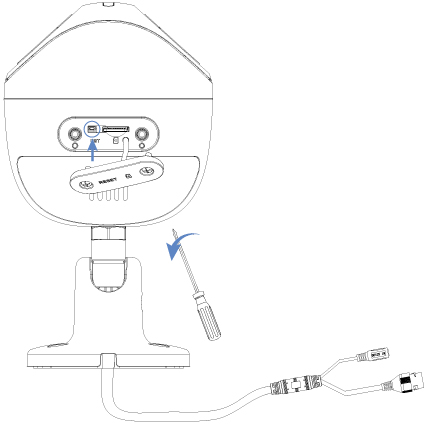
Ensure your camera is plugged in and powered ON throughout the reset process.
- Use a Phillips head screwdriver to remove the Reset/MicroSD cover located on the bottom side of the camera.
- Press and hold the reset button for 10 seconds until there is an audio prompt that your device is resetting.
 A solid or steady green light indicates that the camera has not been fully reset. You may have to redo the process again.
No picture/signal
- Ensure the camera is connected to a compatible Network Video Recorder (NVR). For full compatibility, visit lorex.com/compatibility.
- The camera may take up to 1 minute to power up after being connected to the NVR. Wait two minutes before following the steps below.
- Ensure the camera is connected to your NVR or to your local network.
- If you are not using PoE, you must connect the camera to a 12V DC power adapter (not included).
- If the camera is connected to the LAN, you must search your network for cameras using the NVR. See the NVR’s instruction manual.
- Ensure your NVR is properly connected to a monitor.
- There may be an issue with your extension cable run. Connect the camera to the NVR using a different Ethernet cable.
Picture does not appear to be 4K
- To ensure that you are viewing camera video in full 4K resolution (4K monitor required), check the video output resolution of your NVR.
Picture is too bright
- Ensure your camera isn’t pointed directly at a source of light (e.g., sun or spot light).
- Move your camera to a different location.
- Check the brightness and contrast settings on the NVR.
Picture is too dark
- Check the brightness and contrast settings on the NVR.
Night vision is not working
- The night vision activates when light levels drop. The area may have too much light.
Bright spot in video when viewing camera at night
- Night vision reflects when pointing a camera through a window. Move the camera to a different location.
Picture is not clear
- Check the camera lens for dirt, dust, spiderwebs. Clean the lens with a soft, clean cloth.
- Make sure that the cable run is within the limitations specified in the section ‘Cable extension options’.
- Remove the vinyl film from the camera lens when your installation is complete.
Picture is in color in in dark conditions
- This camera’s image sensor is extra sensitive to light, meaning that the camera stays in color mode at low-light conditions. Follow these instructions to switch to night mode:
The following steps are applicable to compatible recorders that use the Lorex App.
-
Lauch the Lorex App.
-
From the Devices screen, tap
 icon to configure device settings.
 -
Tap
 icon to disable Auto Night Vision.
Note: Disabling Auto Night Vision will force the camera into Color Night Vision mode. Recommended in low-light conditions.
The camera siren is not switching on automatically
- Ensure the active areas and schedule for white light deterrence are set properly. The default schedule for the warning light is night times (between 5PM and 7AM).
The camera warning light is not switching on automatically
- The camera siren cannot switch on automatically. You can control the camera siren manually using a compatible Lorex NVR or app.
- Ensure that you have enabled and configured white light deterrence using a compatible NVR.
No audio
- Audio is only supported on Lorex NVRs. For a list of compatible NVRs, visit lorex.com/compatibility.
- Ensure NVR volume is turned on/turned up.
- Ensure audio function on camera is turned on.
- Ensure audio is turned up on viewing device.
Two-way talk not working
- Use the Lorex app specified in your NVR documentation to activate two-way talk.
- Tap
 from the
camera’s live view, then speak into the microphone on your mobile device. Tap again when finished speaking.
from the
camera’s live view, then speak into the microphone on your mobile device. Tap again when finished speaking.
How to align the dual-lens image
In order for your camera to achieve the wide 180° field-of-view (FoV), the two connected views are stitched together using image Stitching Technology. This may result in a slight misalignment of the image.
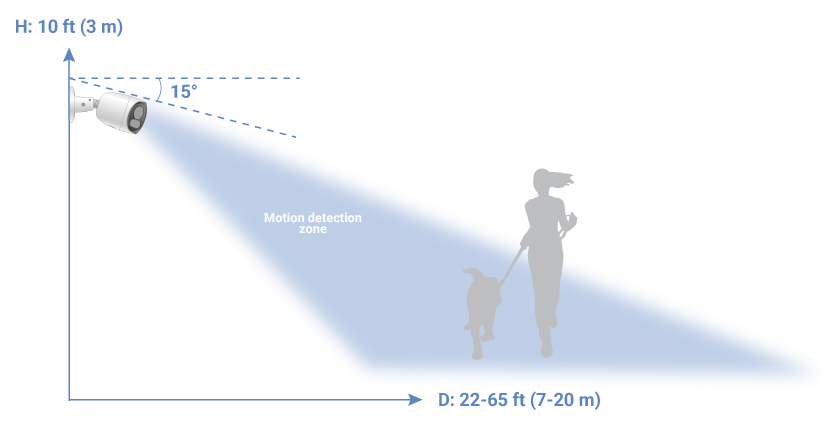
Be sure to follow these mounting instructions to ensure a clear panoramic overview of your property:
- Location: Place your camera in a wide, open space, and avoid placing it near any obstructions.
- Height: Install your camera at a height of 10 feet (3 meters) above the ground.
- Angle: Angle your camera to face outwards between 15-30°.
- Distance: Position your camera 22-65 feet (7-20 meters) within points of interest.
The following steps are applicable to compatible recorders that use the Lorex App.
To adjust the right image's vertical alignment in the Lorex app:
- Tap
 above the recorder's thumbnail.
 - Select your E871AB camera.
- Click the ellipses (...) in the top right corner of the app.
- Tap Splice Distance Setting.
- Adjust the splice distance number for the right image to improve its alignment with the left image.
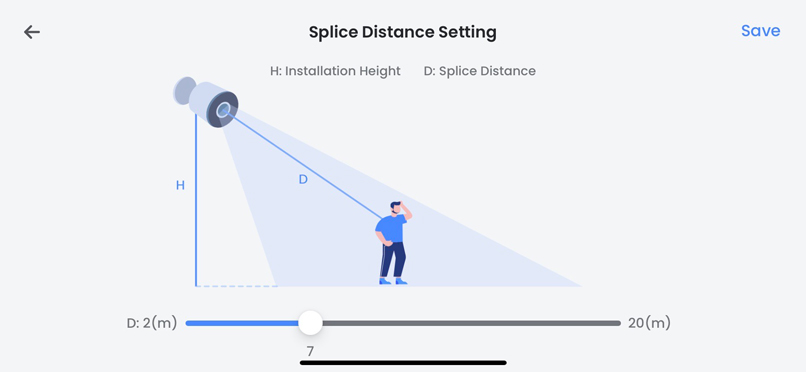
- To shift the right image upwards: Increase the splice distance number
- To shift the right image downwards: Decrease the splice distance number
- Tap Save.
Review your camera's Liveview while making adjustments, as it might require a few attempts to determine the correct splice distance number for aligning the dual-lens image.
Note: As a result of the camera's Stitching Technology, a subtle distortion may be present at the center line of the image.
How to improve the wide-angle perspective
The curvature effect in your camera's image may vary in specific scenarios. To minimize this effect, follow the recommended camera placement guidelines.
Given the wide 180° field-of-view (FoV) of your camera, it is recommended to install it in a wide, open space. Avoid installing your camera in areas with shallow depth or in close proximity to obstructions like roofing structures or soffits.
Your camera should be positioned to face outward at an angle between 15-30° from the level position, avoiding installation at angles exceeding 30°.
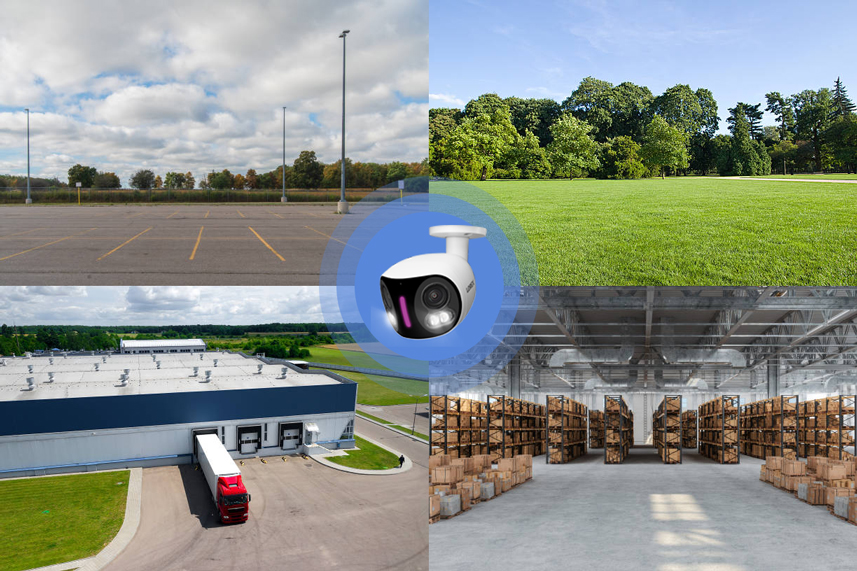
These images are for reference only.
Too many notifications
You may find that your camera is triggering frequently and sending too many event notifications. Refer to the article "Lorex App - Too Many Notifications" for a few troubleshooting tips to help reduce false alerts.
Camera's image has high contrast/glare
Avoid mounting your camera too low to the ground or up-close to reflective surfaces, particularly in sunny or mirrored spaces, as these can cause high contrast and glare in your camera's image.
Camera feed is upside down
Enable Image Rotation:
The following steps are applicable to compatible recorders that use the Lorex App.
- Tap above the recorder's thumbnail.
- Select your E871AB camera.
- Click the ellipses (...) in the top right corner of the app.
- Tap
 to enable Image Rotation.
Camera is not recording at all hours
The following steps are applicable to compatible recorders that use the Lorex App.
- Tap above the recorder's thumbnail.
- Select your E871AB camera.
- Click the ellipses (...) in the top right corner of the app.
- Tap Local Storage.
- Tap to enable Continuous Recording.
General troubleshooting support
Many issues can be resolved with the following troubleshooting steps:
- Ensure the latest version of the required software/app is installed and has the most recent firmware (if applicable).
- If using client software or a mobile app, ensure your device meets the minimum system requirements.
- Ensure the Internet connection and speed meet the minimum requirements for the product.
- Check the power connection(s).
- Power cycle the product(s). To power cycle your product, please power off (if applicable) and disconnect the power source for approximately 30 seconds. Reconnect, and power on.