LNE45DDB, LNE45DDW, Aurora Series - 4MP IP PoE Wired Turret Camera: Frequently Asked Questions
This article answers questions about your LNE45DDB and LNE45DDW 4MP IP PoE Wired Turret Cameras.
Setup:
What is the power source for this camera?
The camera is powered using Power over Ethernet (PoE) technology, allowing both power and data to be transmitted through a single Ethernet cable.
How do I install my camera?
Follow the included instructions for step-by-step guidance.
Is my camera suitable for outdoor use, and what level of weather resistance does it offer?
Your camera has an environmental rating of IP67. IP67 signifies excellent protection against dust, and water. Therefore, it is well-suited for outdoor use in various weather conditions.
Ensure the mounting surface can support at least three times the weight of your camera (3.18 lbs / 1.44 kg), combined with three times the weight of any added accessories.
How do I gain remote access of my security system?
- Connect your camera to your recorder.
- Connect your recorder to your network.
- Download the corresponding app for your recorder.
- Add your recorder to the app, and you're ready for remote access.
How do I reset my camera?
- Dismount your camera and bring it to a dry location.
- With clean, dry hands, remove the reset button cover with a screwdriver.
- Press the Reset button.
- Reinstall your camera.

How do I install an SD card?
Note: Your camera does include with an SD card with purchase.
- Dismount your camera and bring it to a dry location.
- With clean, dry hands, remove the SD card slot button cover with a screwdriver.
- Remove the old SD card, and insert the new one.
- Reinstall your camera.
Need to play back my camera footage
- From the Live View display, right-click to open the Quick Menu, then click Playback.
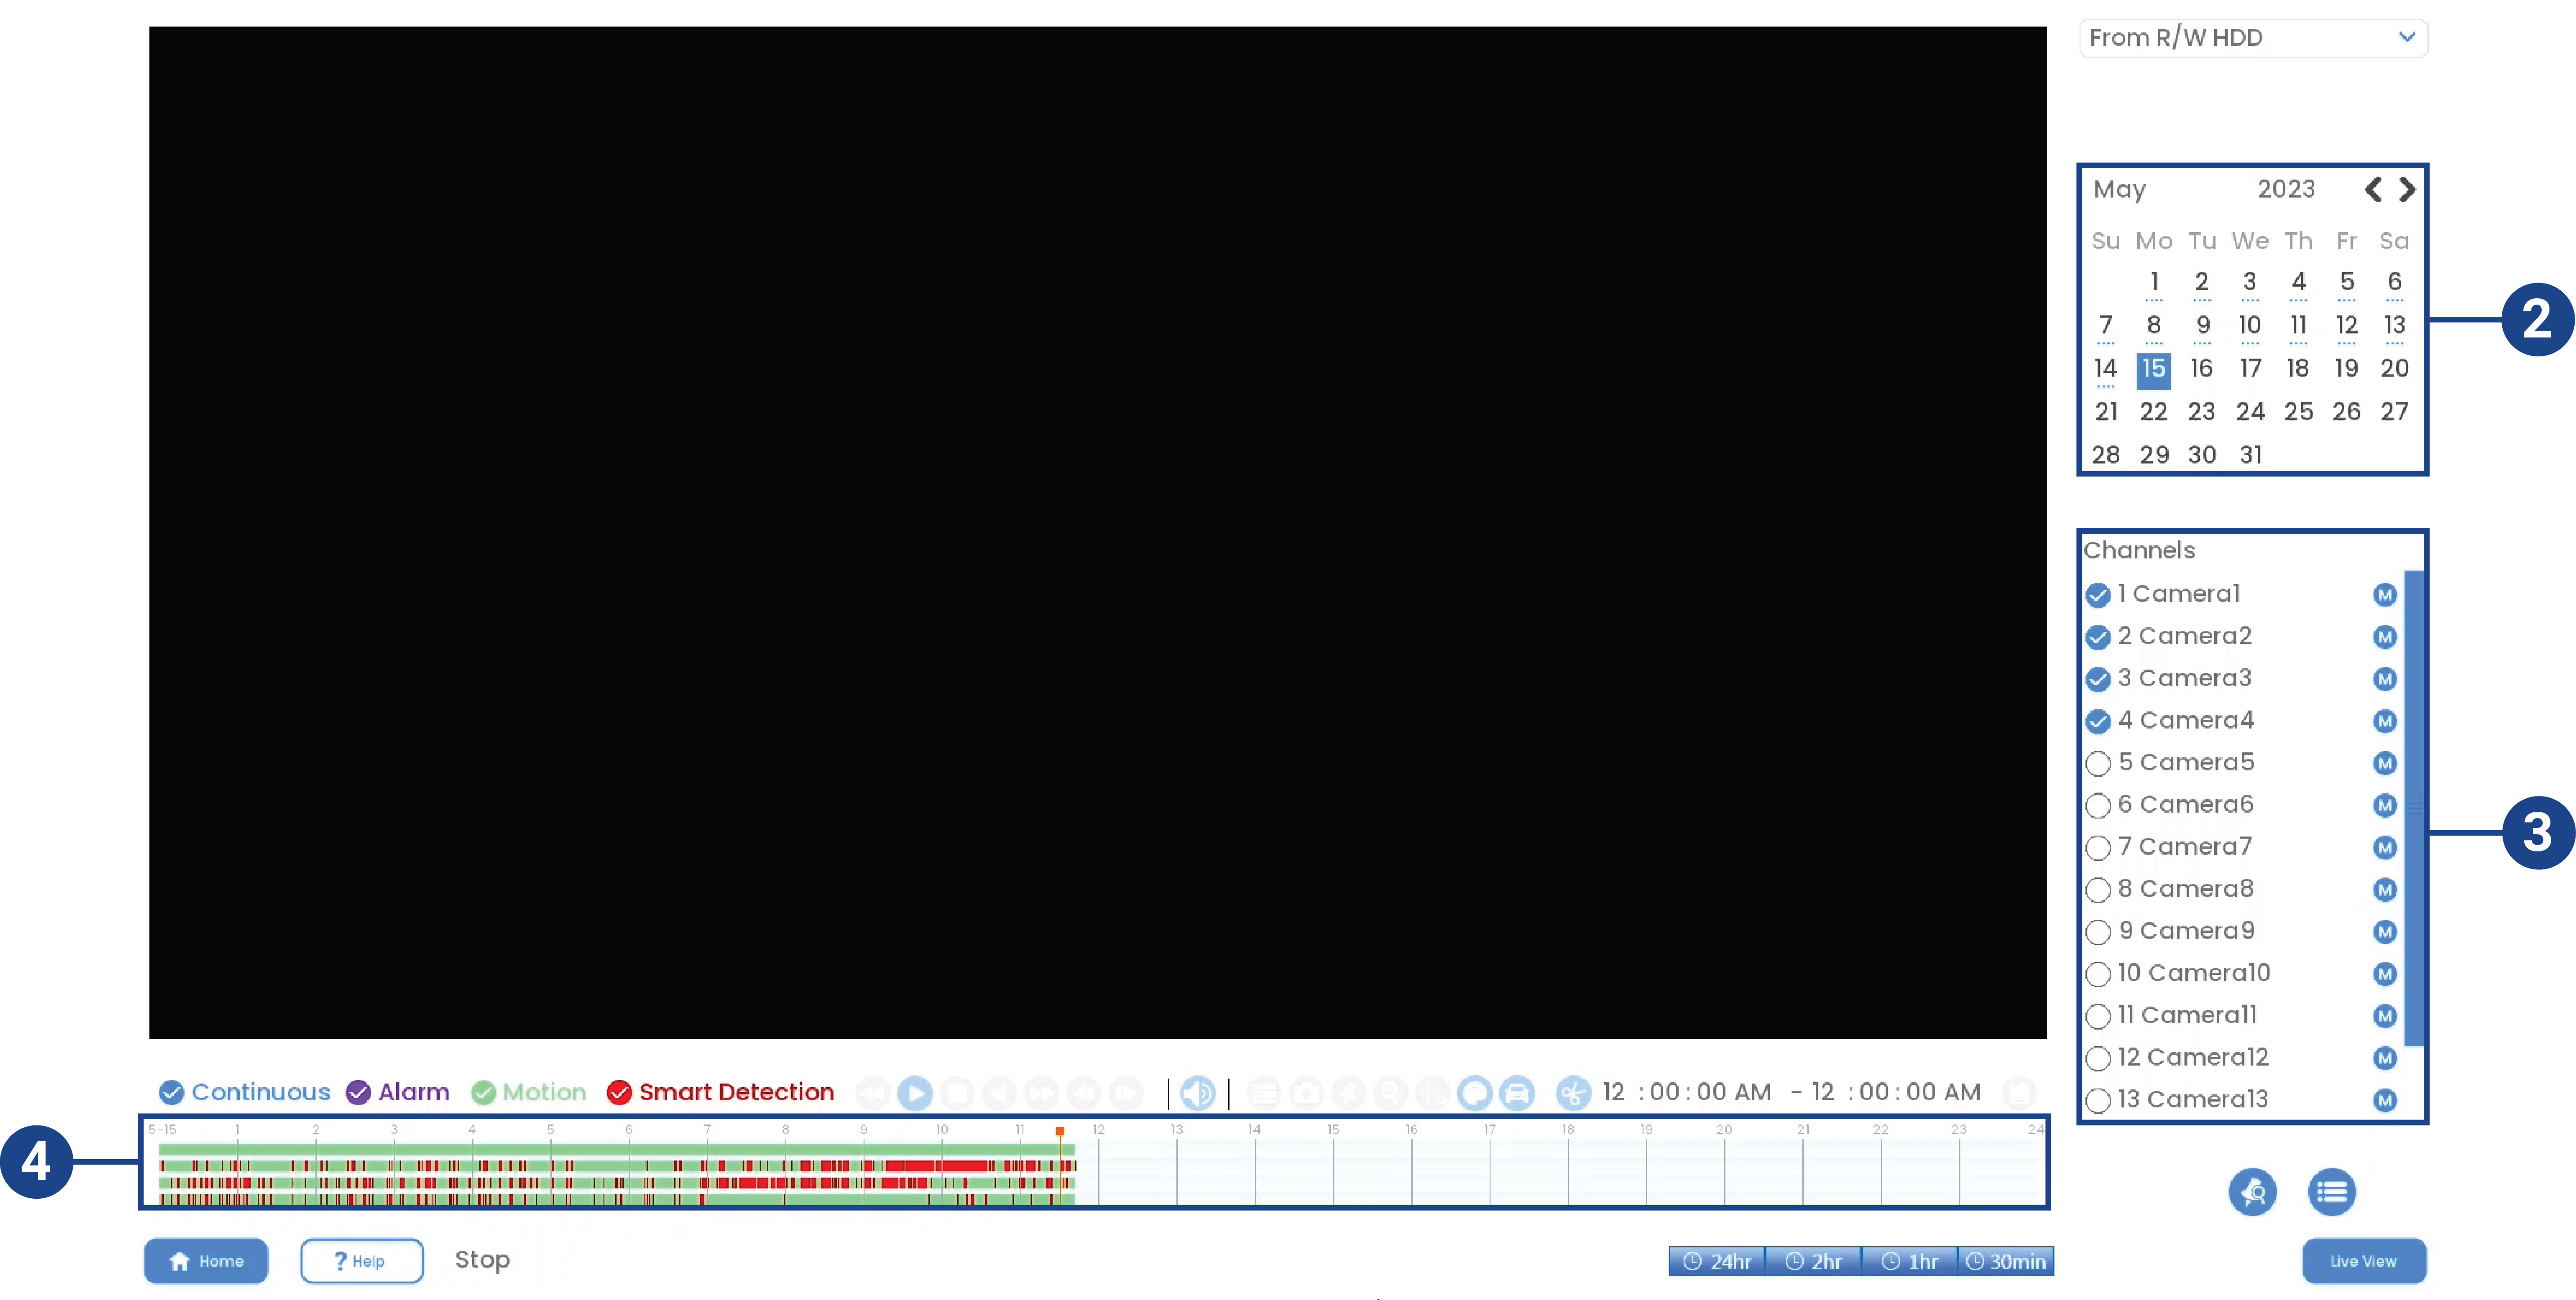
- Use the calendar on the right to select the day to play back.
- Check the channels you want to playback. Click the icons to the right of each channel name to choose the video quality (for Main Stream, for Sub Stream).
- Click inside the video bar to select the playback time. The system will begin playing back video from the selected time.
How should I install the Ethernet Cable?
The Ethernet Cable can be installed through the wall. A hole can be drilled through the wall, behind where you want your camera to be installed. The cable can then be fed through the hole during installation.

How do I change the angle that my camera is recording?
Loosen the adjustment screw with a screwdriver to position the camera, then securely tighten it in place.

How can I optimize the placement of my camera?
Here are some strategic camera placement tips to ensure optimal coverage.
-
Entry Points: Install your cameras near entry points such as doors, windows, or gates. This helps capture clear footage of individuals entering or exiting the premises.
-
Perimeter Coverage: Place your cameras along the perimeter of your property to monitor the entire surrounding area. This can deter potential intruders and provide comprehensive surveillance.
-
High Traffic Areas: Focus on areas with high foot traffic or valuable assets. This could include driveways, walkways, parking lots, or outdoor storage areas.
-
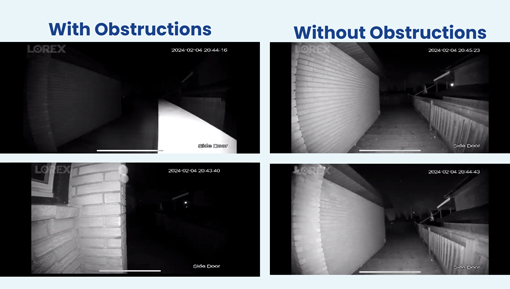
Avoid Obstructions: Identify critical viewpoints that offer a clear line of sight. Avoid obstacles like trees or structures that could obstruct your camera's view. These obstructions can also reduce the nighttime view range.
-
Consider Lighting Conditions: Be mindful of lighting conditions, ensuring your camera is not pointing directly into bright light sources. Position your camera to take advantage of natural or existing lighting for optimal image quality.
-
Camera Height: Install your cameras at an optimal height to deter tampering while providing a clear view. A recommended height is typically around 10 feet above ground level.
-
Camera Tilt and Angle: Tilt your camera slightly downward to capture facial features and minimize the risk of glare. Experiment with different angles to find the best view.
-
Compliance with Laws: Be aware of privacy laws and regulations related to surveillance cameras in your region. Avoid pointing your cameras directly into neighboring properties.
How do you connect this camera to an NVR?
- Unpackage your NVR and cameras.
- Plug your NVR and its power supply into the wall. Power your NVR on.
- Use the Ethernet Extension Cable to connect to your NVR’s PoE ports.
- Connect the other end of the Ethernet Extension Cable to your camera.
- Wait up to 5 minutes for your camera to boot up and your NVR to connect to your camera.
App Settings:
Is there a mobile app for remote monitoring, and is it compatible with both iOS and Android?
Yes, Lorex cameras enable remote access and monitoring via the Lorex NVR's app, which is accessible on both iOS and Android.
How do I customize Motion Zones™?
Motion Zones™ allows you to customize your camera’s motion detection region. The following steps are applicable to compatible recorders that use the Lorex App.
- Tap
 above the recorder's thumbnail.
 - Select your camera.
- Tap the ellipses (...) in the top right corner of the app.
- Tap Motion Detection Settings.
- Tap Motion Zones™.
- Tap the Motion Zones™ to set up the detection area:
- General Motion Zone
- Person Motion Zone
- Vehicle Motion Zone
 This will take you to a new screen where you can shrink, stretch, or reposition your Motion Zones™ as needed. For full instructions on how to set customized Motion Zones™, refer to "Configure Motion Zones™".
How do I change the viewing resolution to SD, HD?
SD and HD are the possible viewing resolutions for your camera. SD refers to a lower viewing resolution which is idea for smooth viewing in lower internet speed conditions. HD refers to a higher definition viewing resolution. The following steps are applicable to compatible recorders that use the Lorex App.
- Tap above the recorder's thumbnail.
- Select your camera.
- Tap the SD button in the liveview bar.
- Select the resolution that you would like to start viewing.
How do I ensure that my camera is always recording?
The following steps are applicable to compatible recorders that use the Lorex App.
- Tap above the recorder's thumbnail.
- Select your camera.
- Tap the ellipses (...) in the top right corner of the app.
- Tap Local Storage.
- Tap
 to enable Continuous Recording if it is not already enabled.
How do I take a recording and back it up to my phone?
The following steps are applicable to compatible recorders that use the Lorex App.
- Tap above the recorder's thumbnail.
- Select your camera.
- Tap Record Video and tap it again to stop recording.
- Select the thumbnail of your recording in the bottom left corner of your camera's footage.
- Tap your video recording thumbnail.
- Tap Save to download the video to your phone.
How do I back up a video of an event up to my phone?
The following steps are applicable to compatible recorders that use the Lorex App.
- Tap above the recorder's thumbnail.
- Select your camera.
- Tap View Events.
- Select the event.
- Tap Record and tap it again to stop recording.
- Tap the thumbnail of the video in the left hand corner of the event footage.
- Tap the thumbnail of the desired recording.
- Tap Save to download the video to your phone.
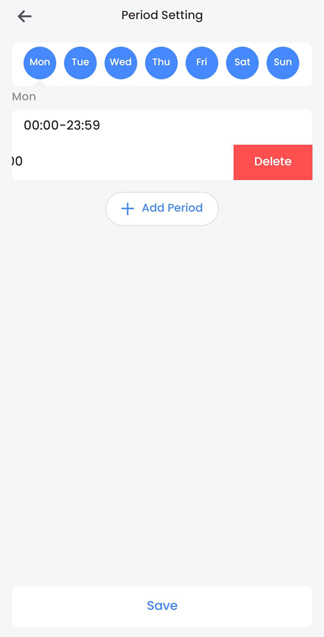
What if I only want to record at at certain times?
The following steps are applicable to compatible recorders that use the Lorex App.
- Tap above the recorder's thumbnail.
- Select your camera.
- Tap the ellipses (...) in the top right corner of the app.
- Tap Local Storage.
- Tap Recording Schedule. You will see your current recording schedule appear.
- Tap in the top right corner.
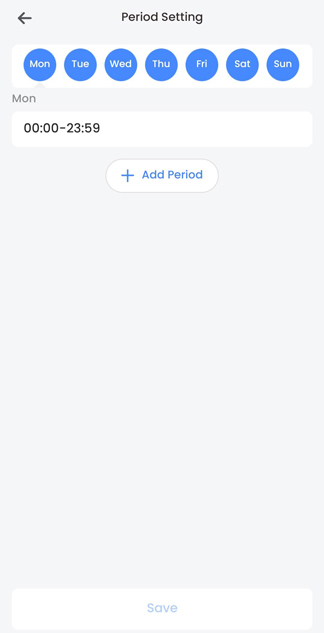
- Tap the day you would like to set a schedule for.
- Tap Add Period.
- Select a start and end time and tap Save.
- To create another schedule, return to step 7.
- To delete a period, swipe left on the period and tap Delete.
How do I record audio with my camera?
Caution: Audio recording and / or use of listen-in audio without consent is illegal in certain jurisdictions. Lorex Corporation assumes no liability for use of its products that does not conform with local laws.
The following steps are applicable to compatible recorders that use the Lorex App.
- Tap above the recorder's thumbnail.
- Select your camera.
- Tap the ellipses (...) in the top right corner of the app.
- Tap to enable Audio Recording.
The following instructions are applicable to the N910A62 NVR .
- From the Live View display, right-click to open the Quick Menu, then click Main Menu.
- Click Devices, then Record Settings. Click the Record Settings tab from the side panel.
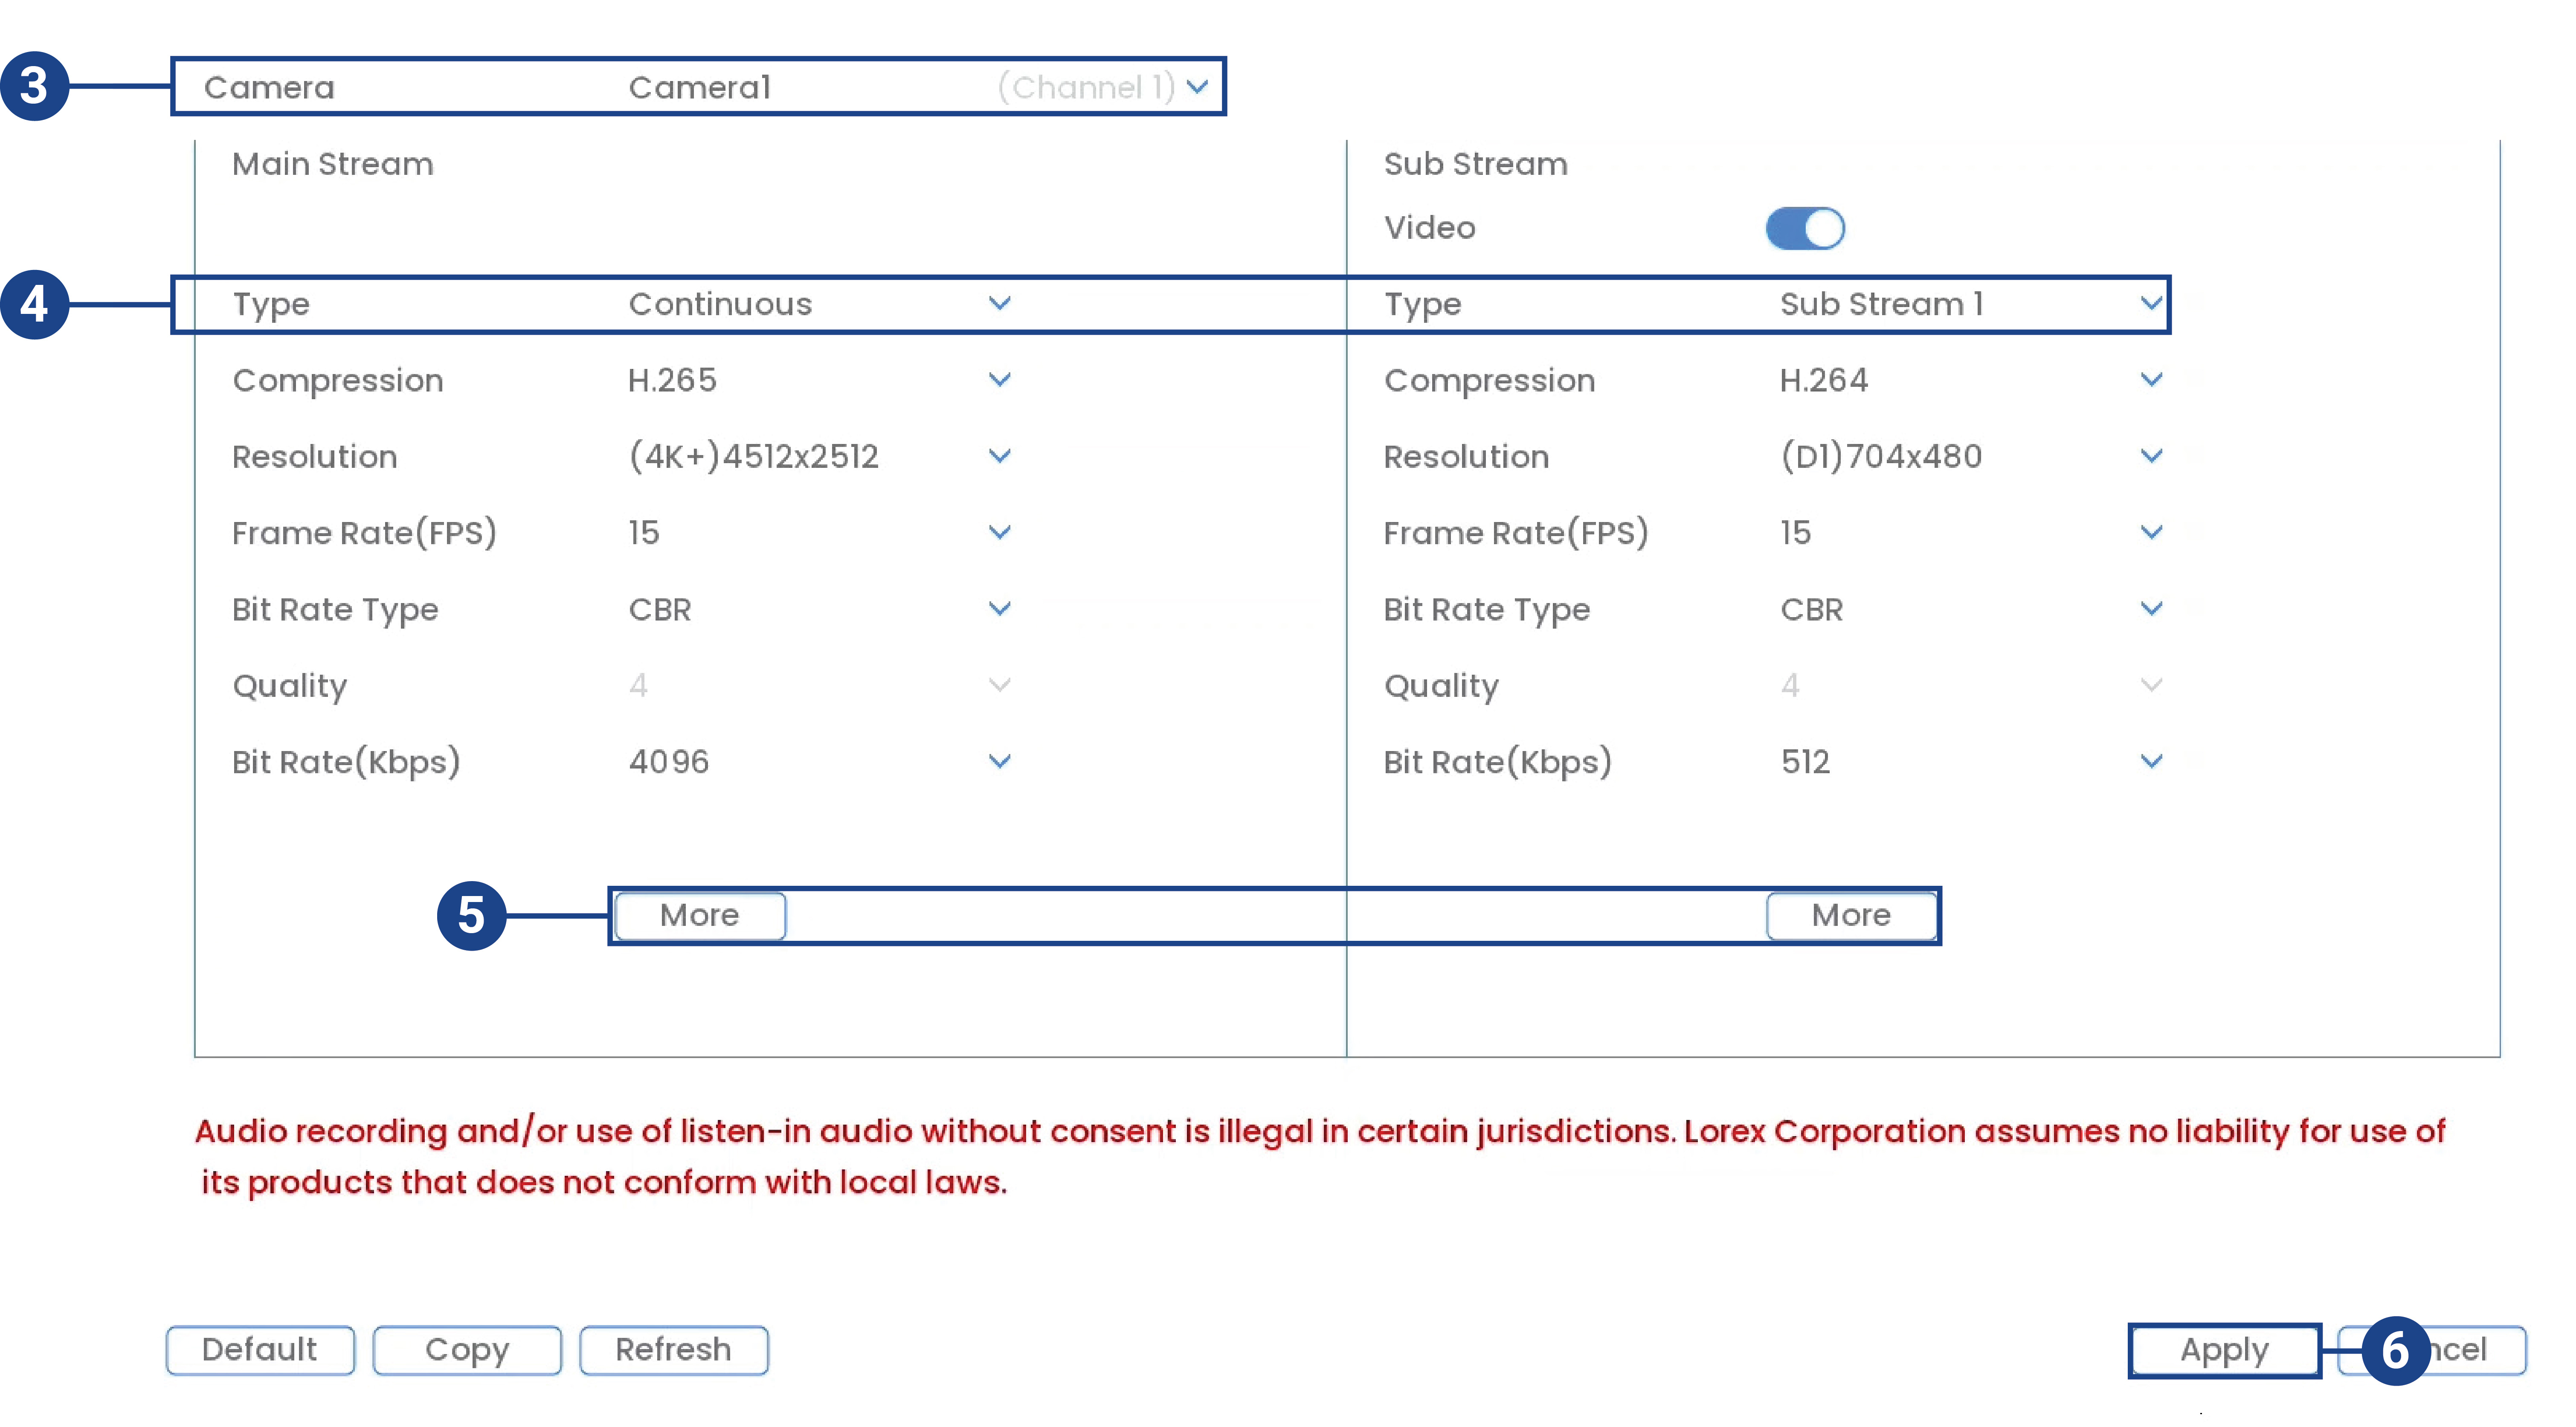
- Select the channel where the audio camera is connected.
- Select the type of recording to enable audio for. If you wish to record audio at all times, ensure you configure both Continuous and Motion recording.
- Click on More to configure the following:
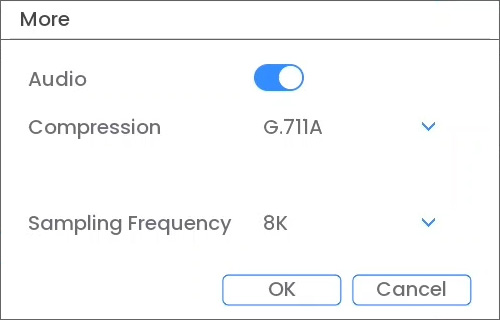
• Audio: Check box to enable/disable. • Compression: Select an audio codec (G711A recommended). • Sampling Frequency: Select an audio sampling rate (8K recommended). • Click OK to save.
- Click Apply to save all changes.
General:
What are the camera's general specifications?
- Video Transmission Technology: IP
- Image Sensor: 4MP CMOS
- Video Format: NTSC
- Imager Type: CMOS
- Video Compression: H.265/H264 (Main Stream & Sub Stream)
- Video Streams: 2 (Mainstream & Substream)
What is an IP Wired Turret Security Camera?
An IP Wired Turret Security Camera is a surveillance device with a spherical camera that can be positioned from the outside. It connects to a network using an Ethernet cable and operates on the IP protocol. These cameras often provide discreet and tamper-resistant surveillance and can be remotely accessed over the internet.
What is IP video transmission?
IP video transmission involves using the Internet Protocol (IP) to send digital video data over an Ethernet network. This enables remote access, maintains video quality, provides flexibility in camera placement, and supports advanced features and high resolutions. IP cameras have unique addresses, allowing them to communicate on a network, and the system is easily scalable for various surveillance setups.
What is the weight of my camera?
The weight of your camera is 1.06 lbs / 0.48 kg.
What is the size of the included Torx key?
The included Torx key is a T10 Torx key.
What is the operating temperature?
-40 °F (-40 °C) ~ +140 °F (+60 °C)
Which recorders work with this camera?
Check the Compatibility Chart to see which recorders work with your camera.
What is the camera's viewing angle?
- Diagonal: 114°
Does my camera have Color Night Vision, and how does it work?
Yes. Color Night Vision is a feature that allows your camera to capture and display color video footage in lower-light conditions than a traditional security camera. Traditional night vision on security cameras typically relies on infrared (IR) technology, which captures images in black and white. However, Color Night Vision goes a step further by incorporating additional technologies, such as low-light image sensors and improved algorithms, to maintain color in the video feed when ambient lighting is minimal. At extremely low-light levels, your camera will also switch to black and white video. But, in most low-light environments, this feature enhances the ability to identify and distinguish objects, people, or incidents, providing more detail compared to standard black and white night vision.
What is the IR Night Vision range?
98 ft (30 m) of total darkness.
Does my camera support person and vehicle detection?
Yes, called Smart Motion Detection.
What is Smart Motion Detection Plus?
Smart Motion Detection Plus utilizes advanced algorithms to intelligently recognize and differentiate between various types of motion. It reduces false alarms by distinguishing meaningful events, allows users to define specific monitoring zones, and includes person and vehicle detection.
What are my camera's video output specifications?
- Resolution/Frame rate: 4MP (2688 × 1520/2560 × 1440); 3MP (2304 × 1296); 1080p (1920 × 1080); 1.3M (1280 × 960); 720p (1280 × 720); D1 (704 × 576/704 × 480); VGA (640 × 480); CIF (352 × 288/352 × 240)
- Frame Rate (Maximum) Mainstream: 2688 × 1520@(1–20 fps) 2560 × 1440@(1–25/30 fps) Substream: 704 × 576@(1–25 fps) 704 × 480@(1–30 fps)
- WDR: Yes
- Termination: RJ45
- Aspect Ratio 16:9
Does my camera have a built-in microphone for audio recording?
Yes.
Does my camera support two-way audio?
No.
Are there different recording modes available, such as continuous recording, scheduled recording, or motion-triggered recording?
Yes, you can customize your camera's recording schedule using the recorder. To find instructions on accessing the recording schedule, refer to your recorder's series manual on the product support page.
How do I playback recordings?
Stored footage on the recorder can be accessed remotely using the compatible app or on the recorder itself. To access playback features on your recorder, refer to your recorder's series manual available on the product support page for guidance.
What storage does my camera offer?
-
Built-in Storage: A microSD card can be inserted for independent recording. Data can be accessed through your camera using a web browser but will not be uploaded to the NVR or to the cloud for mobile app viewing.
-
Recorder Storage: The primary storage solution is the Network Video Recorder (NVR). The NVR serves as a centralized hub for managing and storing video data from multiple cameras. NVRs typically offer varying storage capacities, ranging from terabytes to multiple terabytes, depending on the model.
What are the compatible SD cards?
Refer to the article "Compatible SD Cards and Storage Sizes" for more information.
What is the warranty period for my camera?
Check Lorex's B2B warranty page for information on the warranty period and any additional warranty details.
Can I integrate my camera with a smart home system?
Integration with a smart home system depends on your recorder. Check your recorder's Spec Sheet to see whether its compatible with platforms such as Google Home or Amazon Alexa.
--
How can I troubleshoot connectivity issues?
Refer to the troubleshooting article for guidance on resolving common connectivity issues. Check cable connections and network settings.
What is True WDR?
True Wide Dynamic Range (True WDR) is an advanced technology that optimizes image quality by intelligently handling varying light conditions. It ensures clear and balanced footage in scenes with both bright and dark areas, enhancing visibility and detail for effective surveillance.
What is the environmental rating?
An IP67 rating. This signifies excellent protection against dust and water, making it well-suited for outdoor use in various weather conditions.
How do I maintain the camera?
Periodically check and clean the camera lens to maintain image quality. Ensure that the camera remains securely mounted and hasn't been shifted due to weather or tampering.
How do I limit notifications and avoid false alerts?
Please read "Lorex App - Too Many Notifications."
Can I use third party software with my camera?
This camera is only compatible with its specified Lorex recorders.