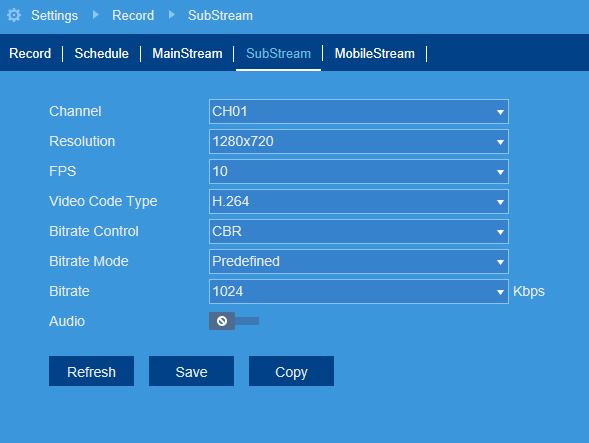
FLIR Client 12 Software: Configuring substream recording settings
Your DVR / NVR system uses two different recording streams:
- Mainstream: a high-quality stream used for live viewing and recording.
- Substream: a lower quality stream used for remote viewing and playback.
You can use these recording streams to record high-quality video locally and review video remotely with low bandwidth. These settings can be configured using the FLIR Client 12 software for PC / Mac.
Prerequisites:
- Ensure that you have downloaded and installed the FLIR Client 12 software on your PC / Mac. Click here for more information on locating software downloads.
- Ensure that you have logged in and added your DVR / NVR system to the FLIR Client 12 software. Click here for information on how to log in to the FLIR Client 12 software.
To configure a substream recording stream:
-
Launch the FLIR Client 12 software for PC / Mac.
-
Click Remote Setting in the top-right corner of the window.
-
Under Settings, click Record, then click on the Substream tab.

-
In the Channel drop-down menu, select a channel to configure the substream for.
-
In the Resolution drop-down menu, select the recording resolution.
-
In the FPS drop-down menu, select the number of frames per second.
-
In the Bitrate Control drop-down, select a control method:
- CBR (default): Constant Bit Rate.
- VBR: Variable Bit Rate. In the second drop-down, select a quality level for the video stream.
-
In the Bitrate Mode drop-down menu, select the bitrate mode:
- Predefined: select a preset value.
- User-defined: enter a custom bitrate value.
-
In the Bitrate drop-down menu, select the bitrate mode (predefined bitrate mode), or enter a custom bitrate between 1024-8192Kbps (user-defined bitrate mode).
-
Click the Audio switch to enable (
 ) or disable (
 ) audio on the selected channel (audio-enabled camera required).
 -
Click Save.
Click here for information on how to configure mainstream recording on your LHA / LNK Series DVR / NVR system.