E910AB, E910DD, H Series, H30 - 4K+ Smart Security Lighting IP Wired Bullet & Dome Cameras: Troubleshooting
The following article provides some troubleshooting tips for using your E910AB and E910DD Halo Series IP Wired Security Cameras.
Need to reset my camera
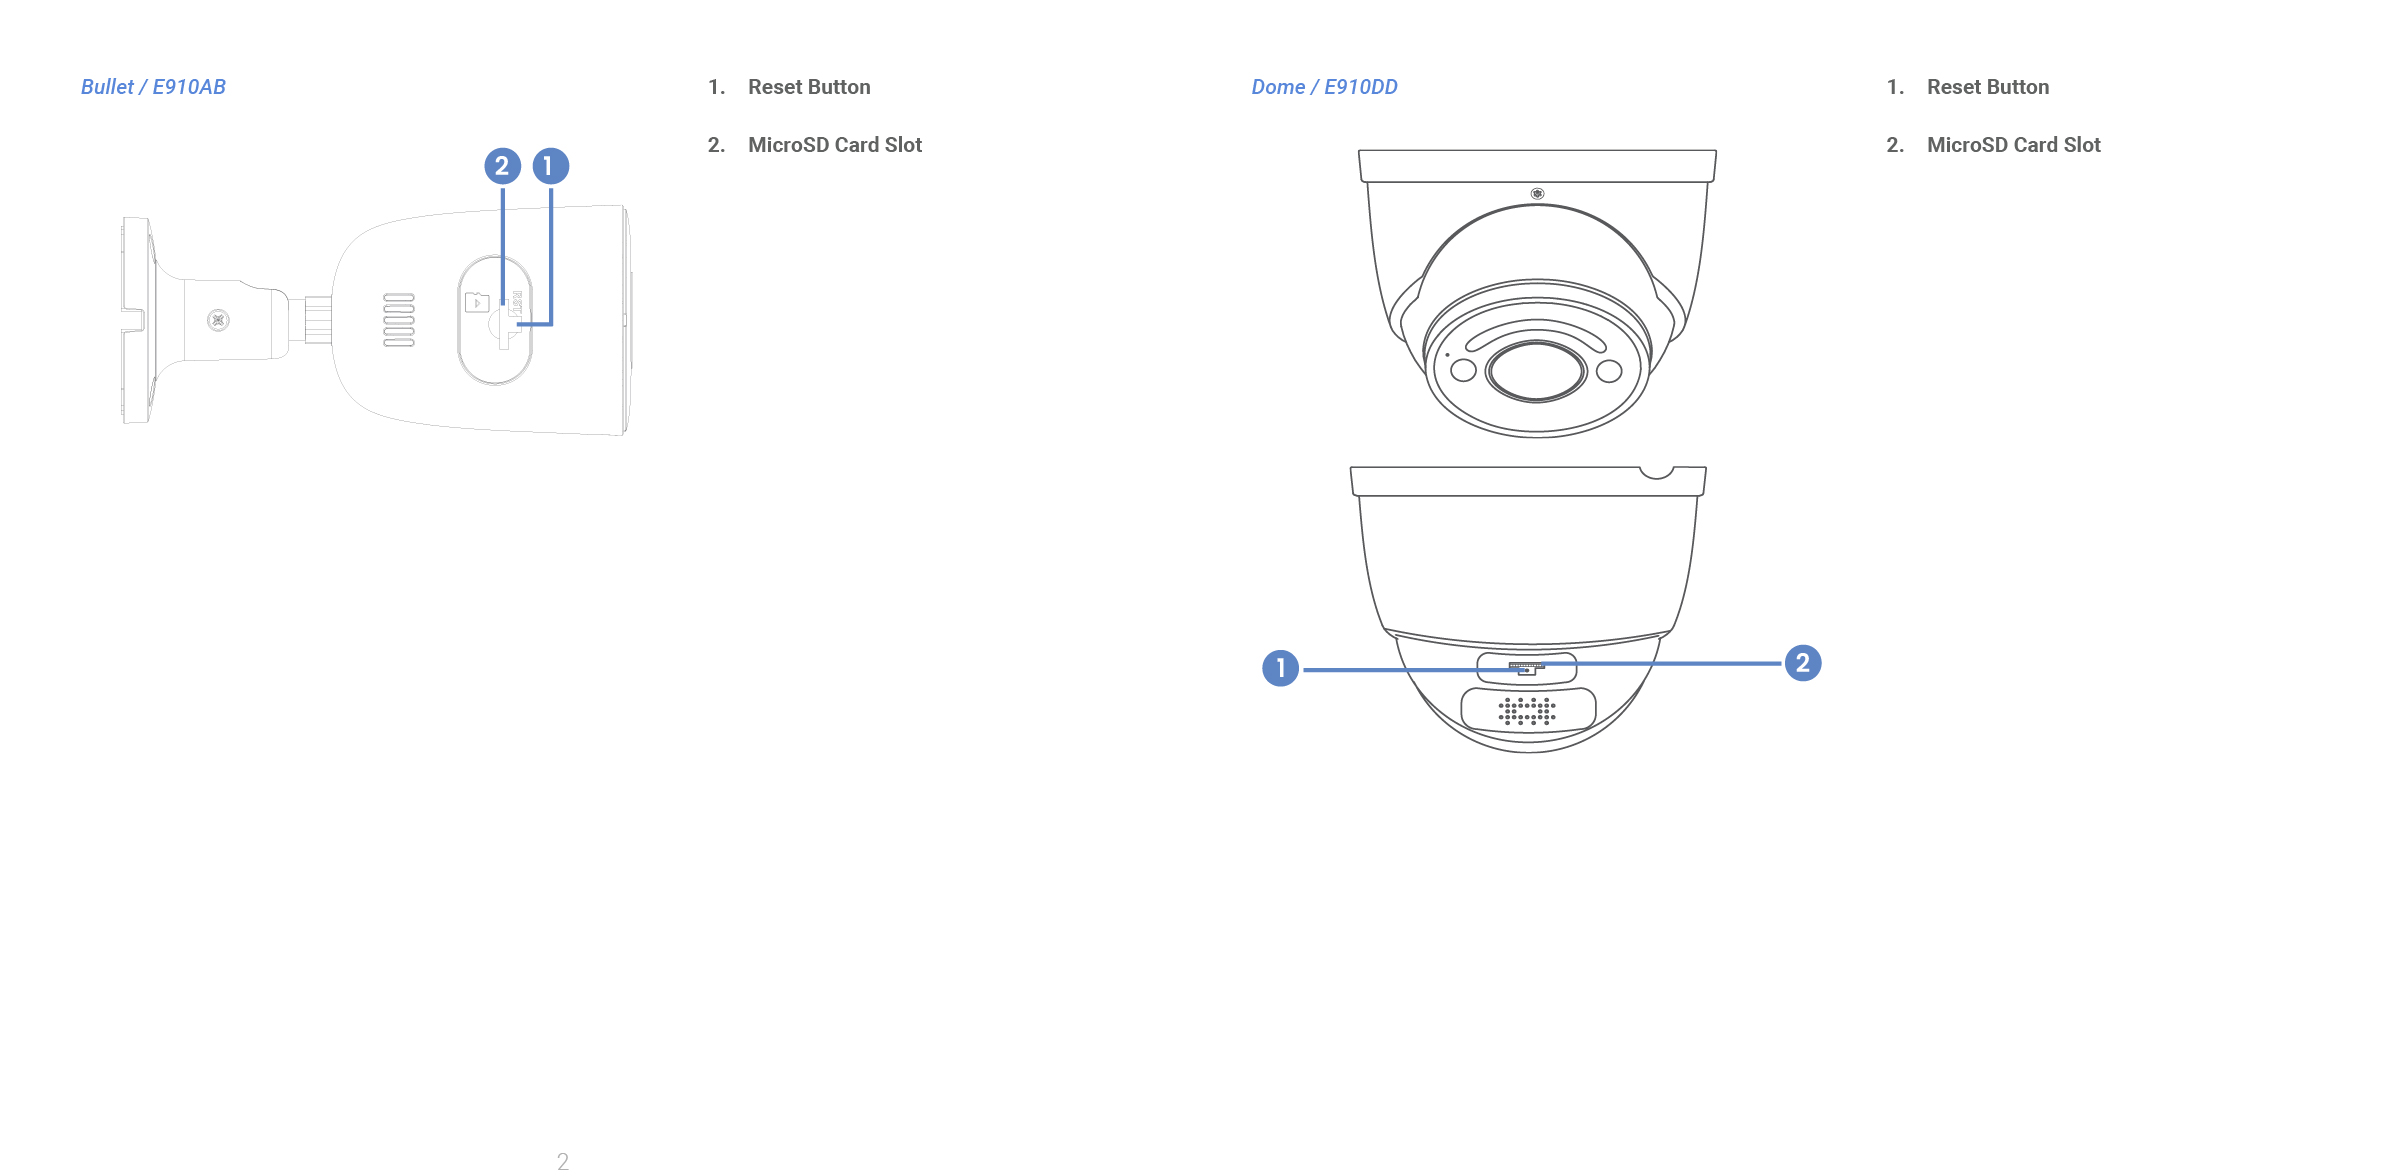
To reset your camera, press the Reset Button.
Need to locally record video on an SD card
Your camera has an SD card slot and can support SD cards with up to 256 Gb of storage. Refer to the article "Compatible SD Cards and Storage Sizes" for more information.
No picture / signal
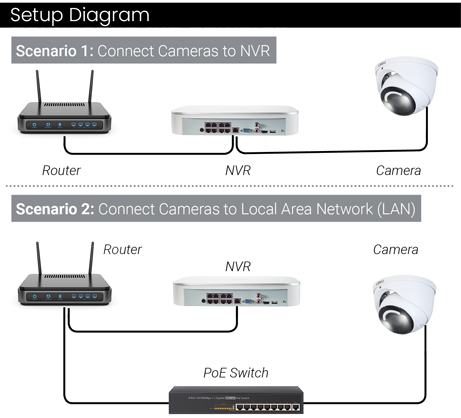
- Ensure your camera is connected to a compatible NVR supporting 4K camera input. For full camera compatibility, visit the relevant compatibility chart.
- Your camera may take up to 2 minutes to power up after being connected to the NVR.
- Ensure your camera is connected to your NVR or to your local network.
- If you are not using PoE, you must connect your camera to a 12V DC power adapter (not included).
- If your camera is connected to the LAN, you must search your network for cameras using the NVR. See the NVR’s instruction manual.
- Note: If you're connecting your camera to a LAN port that does not support PoE, you must connect your camera to a 12V DC poer adapter (not included).
- Ensure your NVR is properly connected to a TV/monitor.
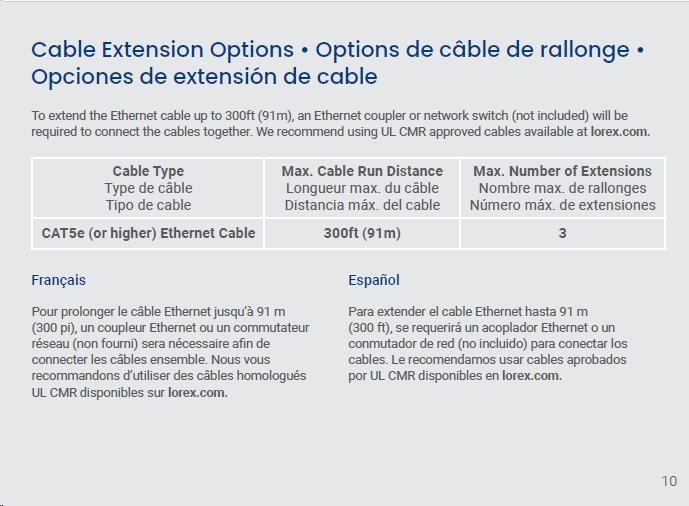
- There may be an issue with your extension cable run. Connect your camera to the NVR using a different Ethernet cable.
Picture does not appear to be 4K+
To ensure that you are viewing your camera video in full 4K+ resolution (4K+ monitor required), check the video output resolution of your NVR.
Please ensure that you are using the proper recorder, only the N910 Recorder supports 4K+ resolution.
Picture is too bright
- Ensure your camera isn’t pointed directly at a source of light (e.g., sun or spot light).
- Move your camera to a different location.
- Check the brightness and contrast settings on the NVR.
- Test out using the Wide Dynamin Range (WDR) setting on your NVR. To do this select Camera Settings, then under BLC Mode, Select WDR. WDR allows the camera to compensate for changes in brightness across the inhance the picture quality of both light and dark areas.

Picture is too dark
- Check the brightness and contrast settings on the NVR.
- Test out using the Wide Dynamin Range (WDR) setting on your NVR. To do this select Camera Settings, then under BLC Mode, Select WDR. WDR allows the camera to compensate for changes in brightness across the inhance the picture quality of both light and dark areas.
Night vision is not working
- The night vision activates when light levels drop. The area may have too much light.
Picture is not clear
- Check your camera lens for dirt, dust, spiderwebs. Clean the lens with a soft, clean cloth.
- Remove the vinyl film from your camera lens when your installation is complete.
- Make sure that the cable run is within the limitations specified below:
Bright spot in video when viewing my camera at night
- Night vision reflects when pointing a camera through a window. Move your camera to a different location.
Picture is in color in dark conditions
- Your camera's image sensor is extra sensitive to light, meaning that your camera stays in color mode at low-light conditions. For instructions on how to make your camera switch to night mode, visit lorex.com, and search for “How do I make my camera switch to night mode?”.
My camera warning light is not switching on automatically
- Ensure that you have enabled and configured white light deterrence using a compatible NVR. See your NVR’s documentation for full instructions.
- Ensure the active areas and schedule for white light deterrence are set properly.
For more information on your camera's warning light, please refer to "N910, E910 Series: Using Your Camera's Warning Lights"
Cannot turn off Smart Security Lighting
The following steps are applicable to compatible recorders that use the Lorex App.
- Tap
 above the recorder's thumbnail.
 - Select your camera.
- Tap the ellipses (...) in the top right corner of the app.
- Tap Light Settings.
- Tap Smart Security Lighting Modes.
- Tap Working Mode to uncheck it, and then tap Set.
Note: As long as all of the Smart Security Lighting modes are not selected, the Smart Security Lighting is turned off. This will not effect the Smart Security Lighting set to activate on smart detection. For instructions on how to enable and disable Smart Security Lighting through your recorder, please refer to "N910 Series: Smart Security Lighting".
My camera siren is not activating automatically
Your camera siren cannot switch on automatically. You can control your camera siren manually using a compatible Lorex NVR or app. Please read N910, E910 Series: Using Your Camera's Siren for more information on using your camera's siren.
No audio
- Audio is only supported on Lorex NVRs. For a list of compatible recorders, visit your camera's compatibility chart (E910AB Wired Bullet Camera, E910DD Wired Dome Camera).
- Ensure NVR volume is turned on / turned up.
- Ensure audio function on your camera is turned on.
- Ensure audio is turned up on viewing device.
For more information on connecting audio, please refer to "N910 Series: Connecting Audio".
Need to configure automatic alarms and camera pre-recorded messages
The following instructions refer to the N910 Recorder. You can only configure pre-recorded messages using a recorder.
- From the Live View display, right-click to open the Quick Menu, then click Main Menu.
- Click Events, then Event Settings. Click the Person & Vehicle tab from the side panel.
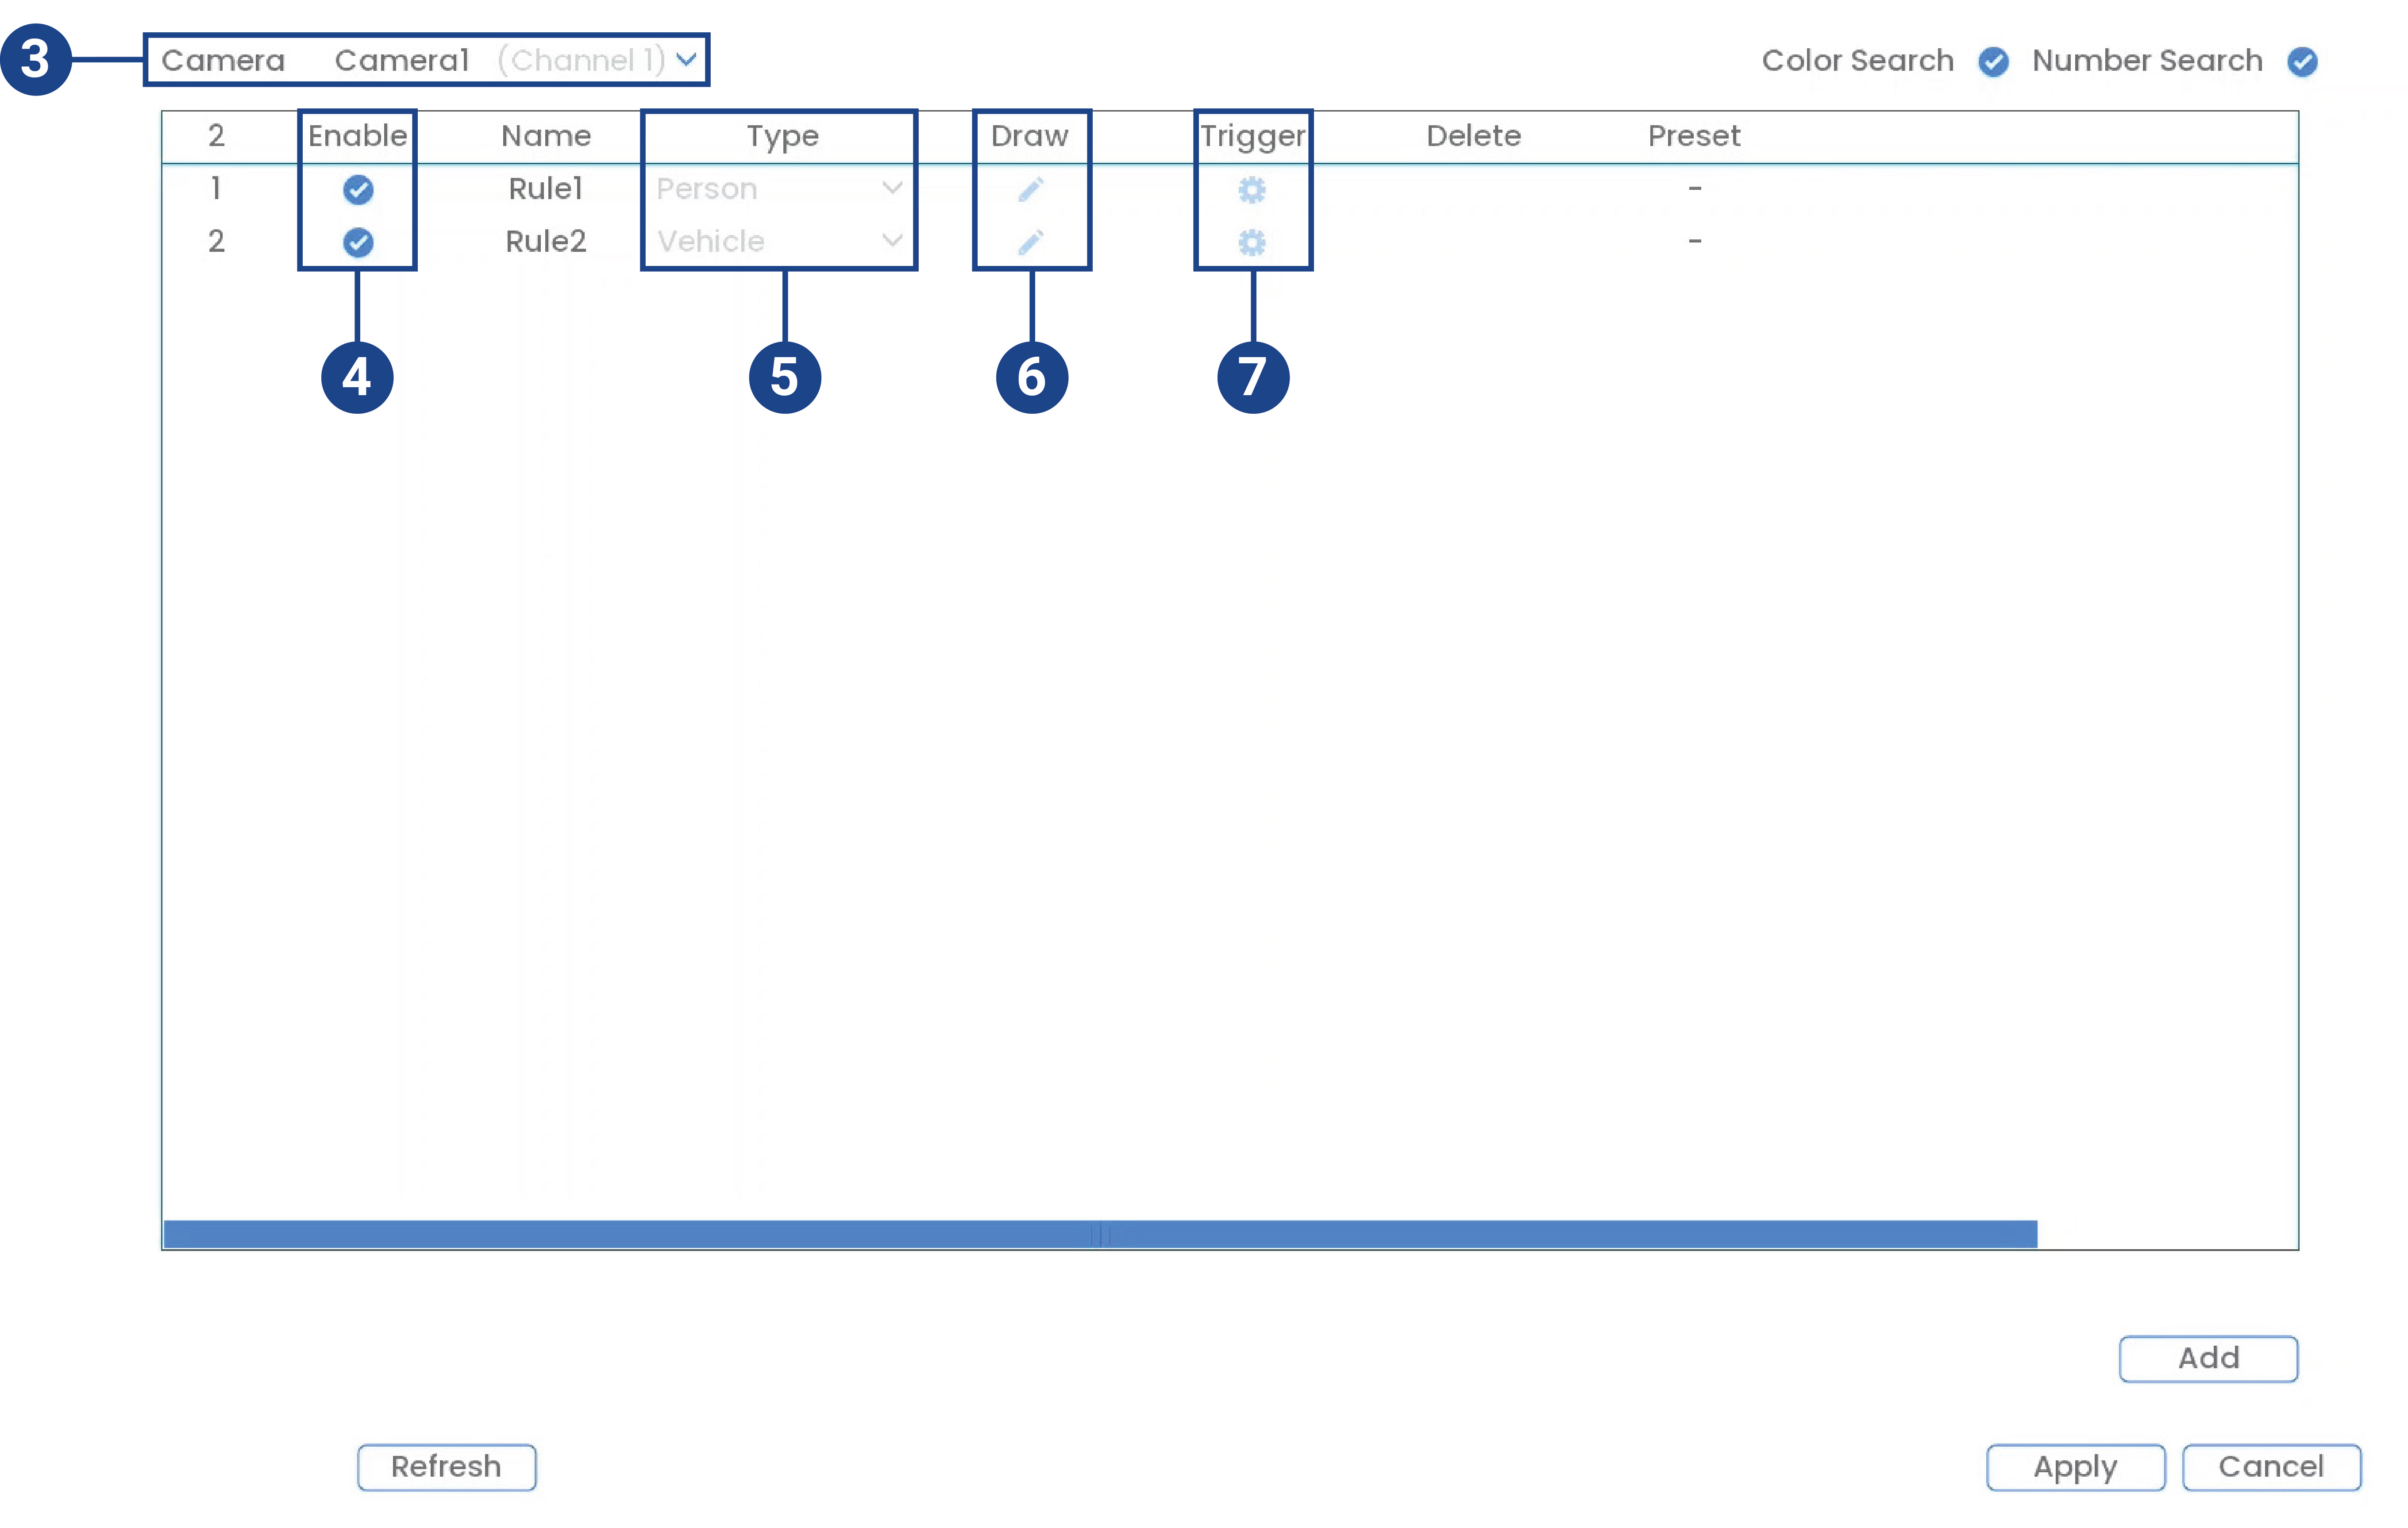
- Select a camera to configure.
- Check to enable the detection rule that you want to use.
- Select between Person or Vehicle detection types.
Note: The first two smart motion detection rules were added by default. The detection type for the two default rules cannot change and the areas can only be enabled or disabled. All details from rules added after can be changed or deleted.
- Click the Draw icon
 and customize the active area for automatic alarm & camera prerecord messages:
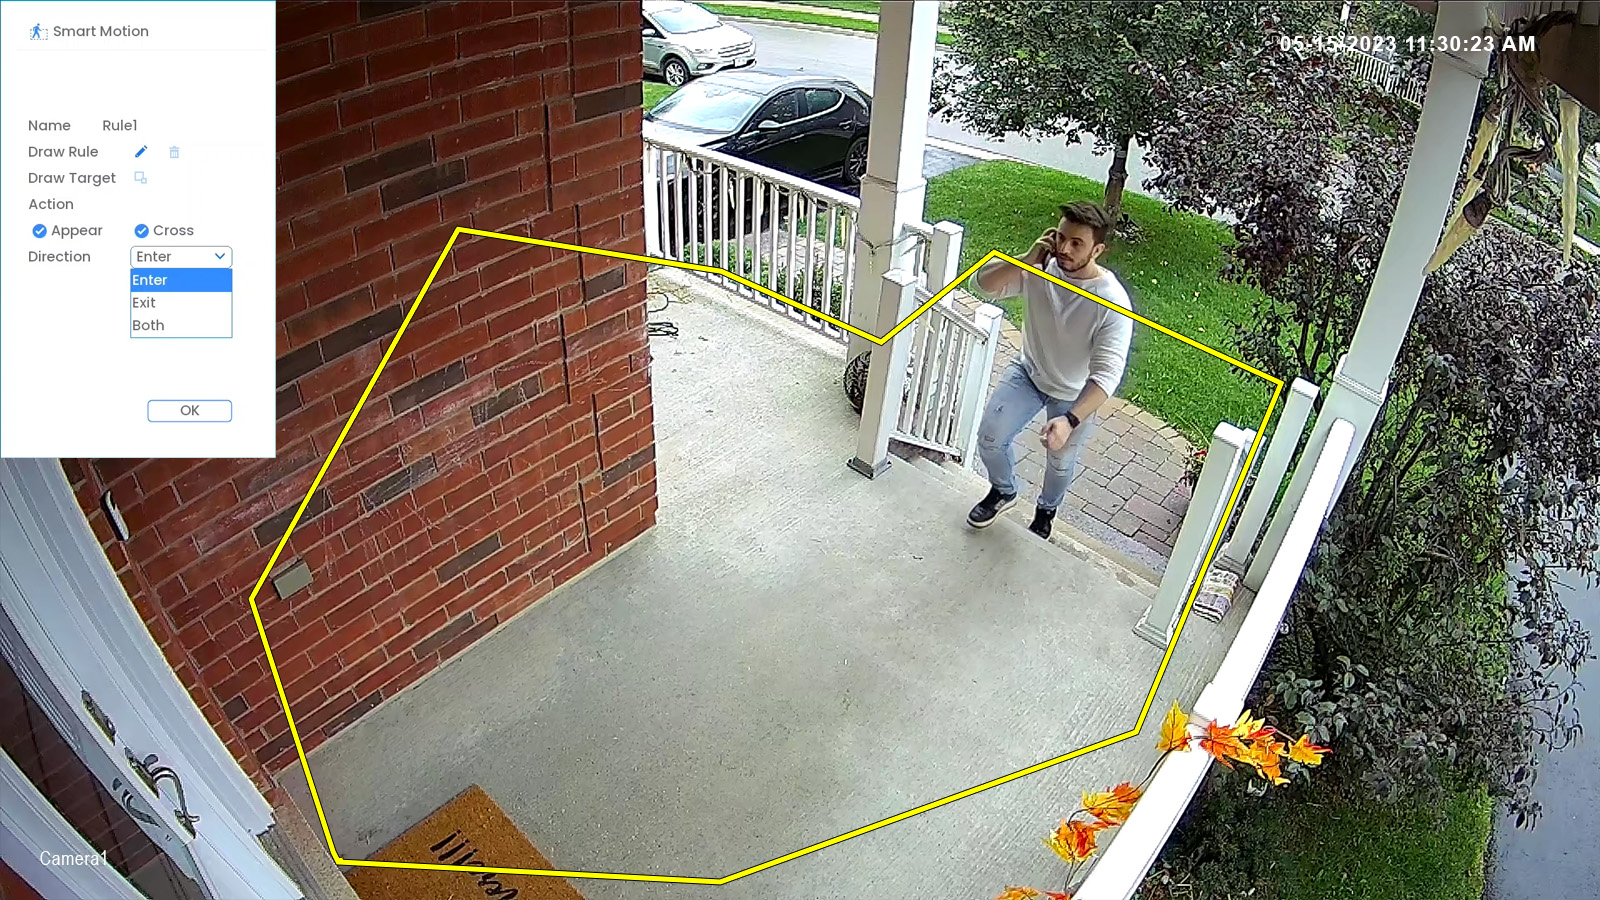
- Name: Click to enter a custom name for the detection area.
- Draw Rule: Click-and-drag the corners of the yellow box to resize the area. To create a
new bounding box, click the delete icon
 to remove the current one, then click on the
camera’s live view image and draw a line around the area that you want to monitor. Continue to click to change the direction and then right-click to close the area.
to remove the current one, then click on the
camera’s live view image and draw a line around the area that you want to monitor. Continue to click to change the direction and then right-click to close the area. - Action: Check Appear to detect if an object of interest appears in the defined area. Check Cross to detect if an object of interest enters or crosses through the defined area. Check both to enable each type of action.
- Direction: Determine which direction an object needs to travel in order to trigger automatic deterrence. You can select Enter for movement entering the defined area, or Exit for movement exiting the defined area, or Both for both types of directions.
- Click OK when finished.
- Click the Trigger icon.


- Check Alarm & Camera Pre-record messages, and then click Setting.
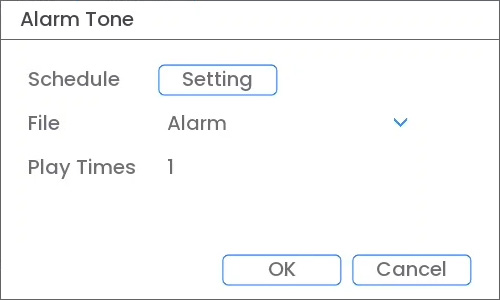
- Adjust voice prompt preferences:
- Schedule: Click Setting choose which days and times or the week to enable automatic warning lights. Click or click-and-drag along each of the red timelines to quickly add or remove time from each day’s schedule in 30–minute segments.
- File: Select Alarm or any other one of the camera pre-recorded messages.
- Play Times: Choose how many times the voice prompt will play following a smart motion detection event.
- Click OK.
- Click Add to create additional activate areas for automatic alarm & camera pre-record messages.
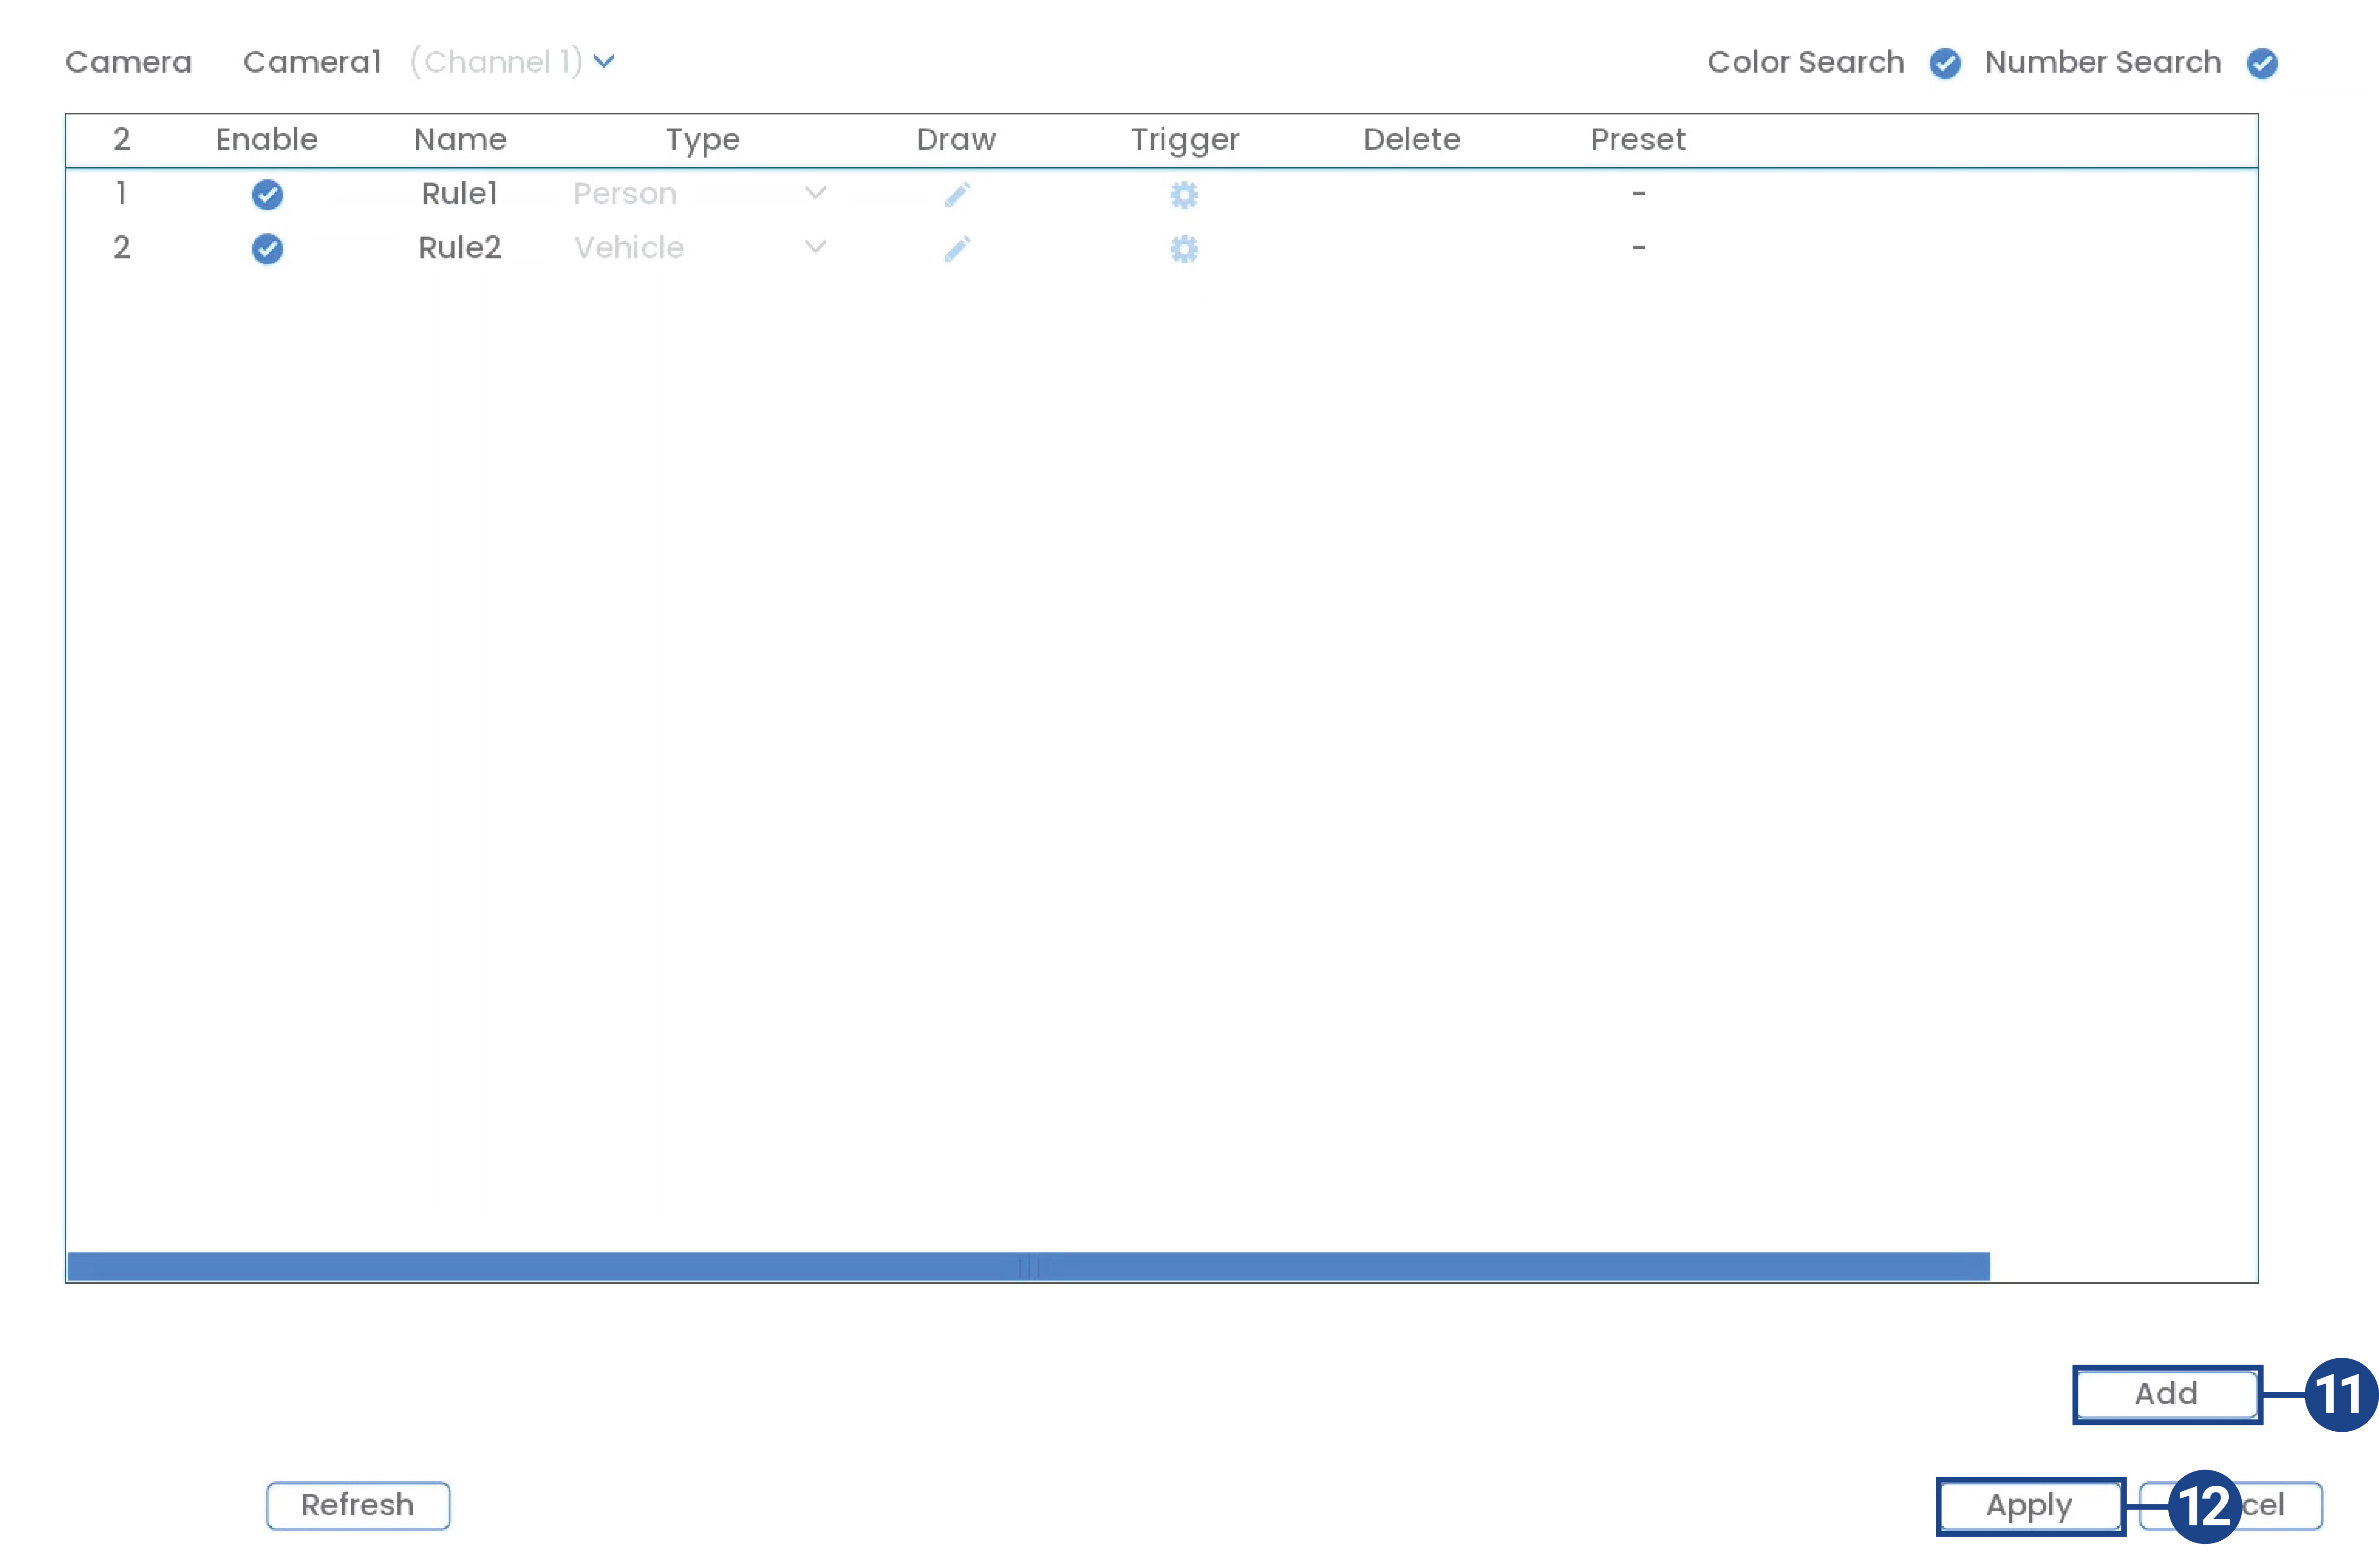
- Click Apply to save changes.
Two-way talk not working
- Use the Lorex app (specified in your NVR documentation) to activate two-way talk. Tap from your camera's Liveview, then speak into the microphone on your mobile device. Tap again when finished speaking.
Need to record at certain times
The following steps are applicable to compatible recorders that use the Lorex App. You can also adjust your recording schedule using your recorder. Please refer to your recorder's manual for instructions.
- Tap above the recorder's thumbnail.
- Select your camera.
- Tap the ellipses (...) in the top right corner of the app.
- Tap Local Storage.
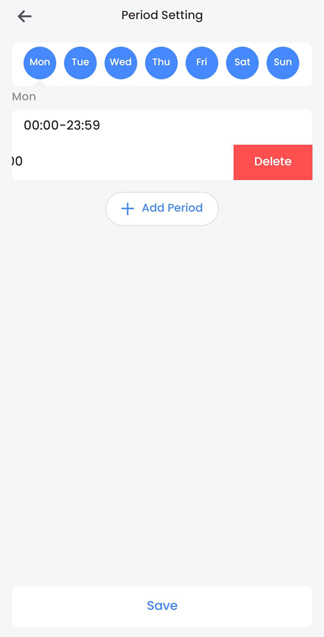
- Tap Recording Schedule. You will see your current recording schedule appear.
- Tap in the top right corner.
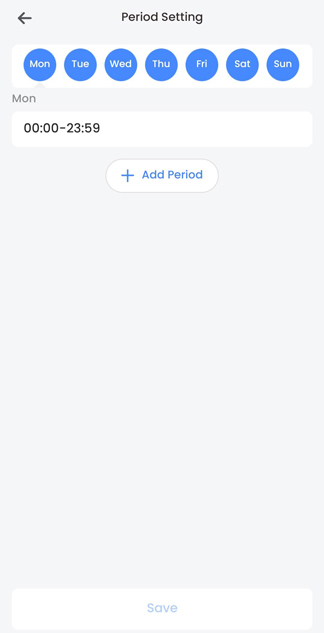
- Tap the day you would like to set a schedule for.
- Tap Add Period.
- Select a start and end time and tap Save.
- To create another schedule, return to step 7.
- To delete a period, swipe left on the period and tap Delete.
Need to replace MicroSD Card
- Locate the MicroSD Card slot pictured below:
- Press the MicroSD Card in, and it will partially eject.
- Carefully remove the old MicroSD Card.
- Insert the new MicroSD Card.
Need my camera to be recording at all times
The following steps are applicable to compatible recorders that use the Lorex App. You can also ensure that your camera is always recording using your recorder. Please refer to your recorder's manual for instructions.
- Tap above the recorder's thumbnail.
- Select your camera.
- Tap the ellipses (...) in the top right corner of the app.
- Tap Local Storage.
- Tap
 to enable Continuous Recording if it is not already enabled.