L4248, U424A Series - 2K NVR & Wire-Free Camera System: Frequently Asked Questions (FAQs)
The following FAQ article answers many of the general questions about the 2K NVR & Wire-Free Camera system (L4248 Series). Where applicable, the FAQ includes links to articles where you may find more information.
Why has the Alexa or Google feature stopped working?
If you have already paired your Lorex system to the Alexa or Google app, but it recently stopped working, please see the article Alexa/Google Compatibility Support to learn more about the recent service change.
Why is my video not clear, delayed, or lower in quality?
The camera is too far from the NVR. Place the NVR in a more central location or move the cameras closer. Note: Video quality is dependent on your Wi-Fi network strength, the number of devices on your networks etc.,
How do I extend the battery life?
Note: Battery life is dependent on placement, settings, frequency and length of events, and ambient temperature.
-
Select Person Detection
In the Lorex Cirrus app, select the camera channel > tap
 > tap Motion Detection Settings > select Person
 -
Reduce the Distance Setting to less than 50% distance.
In the Lorex Cirrus app, select the camera channel > tap
> tap Motion Detection Settings > tap Distance Setting > Slide the bar to the desired percentage -
Disable the deterrance light.
From the NVR, right-click > click > click Setup > click Alarm > click Deterrence > click and drag to deselect the schedule.
 -
Create an activity zone.
From the NVR, right-click > click
> click Setup > click Alarm > from the Area field click Setup.
What power pack is compatible with the wire-free cameras?
Dependent on your cameras they may require either the 2-cell or 3-cell powerpack. The L4248 system cameras come with a 2-cell rechargable battery pack.
To purchase additional power packs visit:
For camera compatibility with this system, click to see the Compatability Chart.
How many wire-free cameras can I connect to my recorder?
You can connect up to 8 wire-free cameras to your recorder.
Are the cameras solar panel compatible?
Yes. Click here to purchase.
Why is the Solar Panel not charging my cameras?
Make sure of the following:
- Fully charge the camera battery pack. Refer to the product documentation for charging instructions.
- Choose a location for the solar panel with plenty of direct sunlight exposure. Do not install in a covered or shaded area. Performance is dependent on temperature and light exposure.
- You must have the latest camera firmware. Upgrading the NVR firmware will not resolve compability issues.
To upgrade the camera firmware:
- Download or call tech support to request the latest camera firmware.
- Place the file on a USB drive (not included).
- Insert the USB drive into one of the USB ports.
- From the NVR Live View screen, click
 > Setup > System > Maintenance > Upgrade.
 - Click Select File
- The drive menu appears. Navigate to and select the .bin firmware file, then click OK.
- Click Upgrade to confirm when the pop-up appears.
- Allow 5-10 minutes for the camera and system to reboot. Do not power off the recorder or cameras during the firmware upgrade.
How do I add the recorder without a QR code?
Note: Connect your recorder with a monitor and the provided mouse.
-
Tap
 icon on the bottom-right corner of the taskbar.
 -
Scan the QR code from your Lorex Cirrus app to add your recorder.
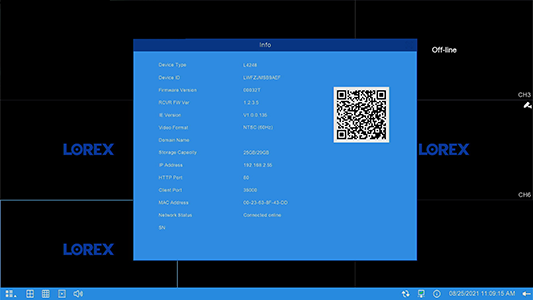
What does the recorder's status indicator mean?

How do I configure the date and time after initial setup?
To change the date and time of the recorder, connect your recorder with a monitor and the provided mouse.
![]() You cannot configure the date and time from the Lorex Cirrus app.
You cannot configure the date and time from the Lorex Cirrus app.
To configure the date and time after initial setup:
-
Right-click, and then click
on the bottom-right corner of the taskbar. -
Enter your device password.
-
Click System, then Setup.
-
Tap Date and Time.
-
Update the Date, Date Format, and Time Format as needed.
How to enable Motion Detection setting?
-
Launch the Lorex Cirrus app.
-
Tap
icon to open Settings. -
Tap Motion Detection Settings.
For full instructions on how to set Motion Detection settings, see Configuring Motion Detection.
How to activate Motion Detection setting only on a particular area?
Motion Zones allows you to customize your device’s motion detection region.
Motion detection will be disabled for areas without the blue overlay. Only motion which occurs in the blue overlay will trigger motion detection. Disabling motion detection in certain areas of the image is an effective way to eliminate unwanted recordings and notifications, such as those caused by trees blowing in the wind or street traffic seen through a window.
To set Motion Zones
-
Launch the Lorex Cirrus app.
-
Tap
icon to open Settings. -
Tap Motion Detection Settings.
-
Tap Motion Zone.
For full instructions on how to set Motion Detection settings, see Customizing Motion Zones.
Can I enable Continous Recording?
Yes.
How do I enable Continous Recording?
- The camera must be connected to continous power. To purchase the cable and adater (ACPWF1), click here.
- From the NVR, right-click > click
 > click Camera > from the Recording Time drop-down menu, click and select Continous.
For more NVR configurations, download the Manual here.
How to enable/disable push notifications?
For full instructions on how to set customized push notification settings, see Configuring Push Notifications.
How to play back a recording?
- Launch the Lorex Cirrus app.
- From the live view, choose a channel in the display view.
- Tap
 to access the channel's playback screen.
For full instructions on how to play back a recording, see Playback Settings.
How to take a picture from the camera?
-
Launch the Lorex Cirrus app.
-
Tap
 icon on the Home screen.
For full instructions on viewing saved Snapshots and Recordings, see View saved snapshots or videos.
How to format device?
-
Launch the Lorex Cirrus app.
-
Tap
icon to open Settings. -
Tap Device Settings.
-
Tap Format.
-
Tap Format, then enter your User Name and Password.
-
Tap OK.
Note: Formatting your storage device will erase all recordings and snapshots. This step cannot be undone.
What is my username and password?
Follow these steps to view your username and password:
-
Launch the Lorex Cirrus app.
-
Tap
 to open the menu, then tap Devices.
 -
Tap
 icon to view user information.
 -
Tap
 icon to view your Password.
How to change my username and password?
-
Launch the Lorex Cirrus app.
-
Tap
to open the menu, then tap Devices. -
Tap
icon to view user information. -
Tap Change Password.
-
Enter your current Original Password.
-
Enter the New Password that you wish to change to, then reenter the new password.
-
Tap Save.
How to remove a device?
-
Launch the Lorex Cirrus app.
-
Tap
to open the menu, then tap Devices. -
Tap
 icon to remove device.
 -
Tap Ok.
How to check if my device firmware is up-to-date or not?
-
Launch the Lorex Cirrus app.
-
Tap
icon to open Settings. -
Tap Device Settings.
-
Tap Firmware Upgrade.
Note: You can upgrade the device's firmware whenever new firmware may become available by tapping Upgrade. The Upgrade button will be greyed out when a firmware update is not available.
How to extend length of the recording?
-
Launch the Lorex Cirrus app.
-
Tap
icon to open Settings. -
Tap Recording Length.
-
Tap from the dropdown list to choose the recording length.
Note: The maximum recording length is 30 seconds.
How to enable audio in recording?
-
Launch the Lorex Cirrus app.
-
Tap
icon to open Settings. -
Tap
 icon beside Audio to enable audio. Tap again to disable.
How to set a recording schedule?
-
Launch the Lorex Cirrus app.
-
Tap
icon to open Settings. -
Tap Recording Schedule.
To navigate the recording schedule:
- Use one finger to add / remove hours from a recording schedule.
- Use two fingers to slide up and down.
- Tap Save to apply any changes.
For more information on setting recording schedule, refer to the Recording Schedule section in Configuring Settings.
Why is my camera not detecting motion?
- Your camera may be too far away from the area of interest. Try to keep the camera within 20ft (6.1m) of the area you want to monitor.
- Ensure your camera is installed in an optimal location and motion detection is properly configured. For full instructions on how to set Motion Detection settings, see Configuring Motion Detection.
Why is the Live View too bright?
- Ensure your camera isn’t pointed directly at a source of light (e.g., sun or spot light).
- Move your camera to a different location.
Why is Night vision not working?
The night vision activates when light levels drop. The area may have too much light.
Why is there a bright spot in the video when viewing at night?
Night vision reflects when pointing a camera through a window. Move the camera to a different location.
System is not receiving power, or is not powering up
- Confirm that all cables are firmly connected to the recorder.
- Confirm that the power adapter is securely connected to the back of the unit.
- Confirm that the system is powered on (LED indicators on the front should be ON).
- If the unit is connected through a power bar or surge protector, try bypassing the bar and connecting the power directly to the wall outlet.
- Confirm that there is power at the outlet:
- Connect the power cable to another outlet.
- Test the outlet with another device (such as a lamp or phone charger).
There is no picture on monitor/TV after connecting it to the recorder
- Power off the monitor/TV and the recorder. Power on the monitor/TV, and then power on the recorder.
- Ensure that the monitor/TV is set to the input channel that the recorder is connected to.
- Check the video cable connection to the recorder and the monitor/TV.
Mouse not detected by system
- Remove then firmly reconnect the mouse cable to one of the USB ports marked Mouse / Backup.
- Power off the system (disconnect power cable). Firmly connect a USB mouse to one of the USB ports. Reconnect the power cable to the 12V DC port on the rear panel.
The edges of the recorder’s on-screen display are cut off
If you are using an older Cathode Ray Tube (CRT) monitor, you may need to enable overscan.
The image on one or more of my cameras is distorted or discolored
- The system uses the region entered in the setup wizard to intelligently determine the video format for your region.
- To change the region, enter the main menu. Under System, click General, then click the Date and Time tab. Use the dropdown next to Time Zone to select the correct region, then click Save. The system takes some time to refresh and reboot.
The camera beeps during motion detection
-
Click
icon on the bottom-right corner of the taskbar. -
Click Setup, then click System.
-
Click Alarm tab.
-
Use the dropdown next to Buzzer to select Disable for any channels you want to disable the buzzer for, then click Save.
I am not receiving email notifications
- Ensure you have configured email notification.
- If you want to use your own SMTP server, you must enter your SMTP server address, SMTP port, username, and password in the appropriate fields.
What products are compatible with the 2K NVR & Wire-Free Camera system?
Refer to Product Compatibility Chart for more information.