W881AA Series - 4K Spotlight Wi-Fi Camera: Frequently Asked Questions (FAQs)
The following FAQ article answers many of the general questions about the 4K Spotlight Wi-Fi Camera with Smart Deterrence (W881AA). Where applicable, the FAQ includes links to articles where you may find more information.
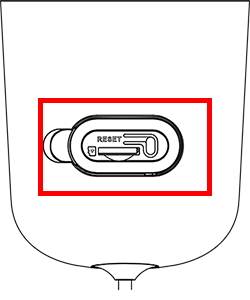
How do I reset my 4K Spotlight Wi-Fi Camera?
Ensure your camera is plugged in and powered ON throughout the reset process.
- Locate the reset button located at the side of the camera.
-
Gently press and hold the reset button for 10 seconds until you hear the audio prompt.
-
Look for the flashing green Smart Security LED light to indicate that the camera has been fully reset.
 A solid or steady green light indicates that the camera has not been fully reset. You may have to redo the process again.
Why is my 4K Spotlight Wi-Fi camera not connecting to the Lorex App?
The 4K Spotlight Wi-Fi camera can be onboarded on a 2.4GHz or 5GHz Wi-Fi network.
*5GHz networks may have limitations in Canada.
- Due to Industry Canada (IC) regulations; 3 of the 4 bands need to be disabled, as a result you may experience connectivity issues on the 5GHz frequency.
Where do I place my 4K Spotlight Wi-Fi camera?
- Place the camera close to your Wi-Fi router as possible.
- Reduce the number of obstructive materials between the camera and the router or access point.
- Other electronic devices such as microwaves, TVs, cordless phones, and baby monitors can cause signal interference. It is recommended to install the camera as far away from these devices as possible.
How should I position my 4K Spotlight Wi-Fi camera?
When mounting the 4K Spotlight Wi-Fi camera on a wall, make sure of the following:
- Distance: Optimal accuracy for objects within 5ft to 50ft (1.5-15m).
- Angle: Angle the camera around 30°-60° down from the level position.
- Height: Install the camera between 8-16ft (2.5-5m) off of the ground.
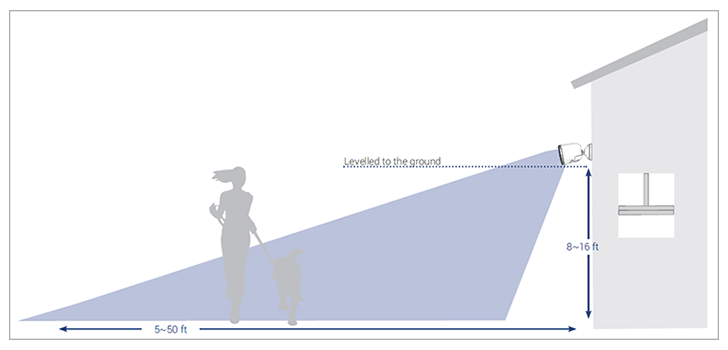
Accuracy of person detection will be influenced by multiple factors, such as the person’s distance from the camera, the height of the person, and the height and angle of the camera. Night vision will also impact the accuracy and distance of detection.
How do I enable motion detection and person detection?
-
Launch the Lorex App.
-
From the Home screen, tap your device.
-
Tap
 above the camera's thumbnail.
 -
Tap Motion Detection Settings.
-
Tap
 icon to enable Motion Detection.
 -
Tap Smart Detection Settings.
-
Tap
icon to enable Person Detection.
Note: If motion detection is disabled, general/person/vehicle detection will automatically disable and you will not receive any motion detection notifications in the Lorex App.
How do I customize Motion Zones™?
Motion Zones™ allows you to customize your device’s motion detection region. Motion Zones™ screen consists of the following settings:
- General Motion Zone
- Person Motion Zone
- Vehicle Motion Zone
- Animal Motion Zone
- Package Motion Zone
- Package Removed Motion Zone
To set Motion Zones™
- Launch the Lorex App.
- From the Home screen, tap your device.
- Tap above the camera's thumbnail.
- Tap Motion Detection Settings.
- Tap Motion Zones™.
For full instructions on how to set customized Motion Zones™, see Configuring Motion Zones™.
Why am I receiving so many notifications?
There are a few ways you can lower the number of notifications you are getting.
- Adjust Motion Detection Settings: You can enable/disable motion detection and person detection, as well as customize Motion Zones™ and Motion Sensitivity. Refer to Configuring Motion Zones™ for more information.
- Manage Notifications: You can manage notifications in Device Settings>Notifications and set a schedule to receive alerts at set periods in the day. Refer to Configuring Notification Settings for more information.
How do I enable Color Night Vision?
-
Lauch the Lorex App.
-
From the Home screen, tap your device.
-
Tap
above the camera's thumbnail. -
Tap
 icon to disable Auto Night Vision.
Note: Disabling Auto Night Vision will force the camera into Color Night Vision mode. Some ambient lighting required.
How do I activate the LED deterrence light when motion is detected?
-
Launch Lorex App.
-
From the Home screen, tap your device.
-
Tap
above the camera's thumbnail. -
Swipe to the bottom and tap on Light Settings.
-
Tap Activate Light on Smart Motion.
-
Tap
 on your desired motion detection type.
 -
Tap
icon to enable the camera's deterrence light whenever desired motion type is detected. -
(Optional) customize your motion detection.

How do I customize the Smart Security Lighting™?
To enable, disable, and customize Smart Security Lighting™ settings, visit W881AA Series: Using Smart Security Lighting™ for more information.
How to activate Two-Step Verification?
-
Launch the Lorex App.
-
Tap Settings.
-
Tap Account Settings.
-
Tap Two-Step Verification.
-
Tap
icon to enable Two-Step Verification.
For detailed setup instructions, see Two-Step Verification Setup.
How to optimize video quality?
By default, the video quality is set to High (2K).
- Launch the Lorex App.
- From the Home screen, tap your device.
- Tap above the camera's thumbnail.
- Tap Video Settings.
- Tap icon to enable HDR (High Dynamic Range).
Note: Enabling HDR optimizes video picture in high-contrast conditions such as under-lit and over-lit areas.
How do I customise notifications?
- Launch Lorex App.
- From the Home screen, tap your device.
- Tap above the camera's thumbnail.
- Tap Notifications.
- Tap icon to enable Alert Notifications, Alert and Event Thumbnails, or Offline Notifications.
- Tap Notification Schedule, to customise when you would like to recieve notifications.
How do I adjust the volume of my camera's Siren?
- Launch Lorex App.
- From the Home screen, tap your device.
- Tap above the camera's thumbnail.
- Tap Sound Settings.
- Tap Siren Volume to set the volume of your camera's siren.
How do I adjust the volume of my camera's Two-Way Talk?
- Launch Lorex App.
- From the Home screen, tap your device.
- Tap above the camera's thumbnail.
- Tap Sound Settings.
- Tap Two-Way Talk Volume to set the volume of your camera's siren.
How do I enable the Auto-Framing feature?
The Auto-Framing feature detects a moving object, then uses one lens to automatically zoom-in and follow across the 180° view.
- Launch Lorex App.
- From the Home screen, tap your device.
- Tap above the camera's thumbnail.
- Tap icon to enable Auto-Framing.
How do I activate the siren when motion is detected?
- Launch Lorex App.
- From the Home screen, tap your device.
- Tap above the camera's thumbnail.
- Tap Siren Settings.
- Tap icon to enable Activate Siren on Motion.
How do I play Quick Responses?
From your camera's Liveview: Tap the Response button, and then tap a response from the list to hear it play from your camera.
How do I create custom Quick Responses?
- Launch Lorex App.
- From the Home screen, tap your device.
- Tap above the camera's thumbnail.
- Tap Quick Responses.
- Tap +.
- Press and hold the record button to create your own custom Quick Response.
- Tap Next, and then enter a name for your Quick Response.
- Tap Save.
- From the list, tap your newly created Quick Response to hear it play from your camera.
How do I enable Privacy Mode?
Privacy mode turns off live viewing, recording, and notifications on your device.
- Launch Lorex App.
- From the Home screen, tap your device.
- Tap above the camera's thumbnail.
- Tap icon to enable Privacy Mode.
How do I add Shared Users?
You can share your cameras with friends or family to give them access to Liveview, recordings, and more.
Note: The shared user must already have a Lorex app account.
- Launch Lorex App.
- From the Home screen, tap your device.
- Tap above the camera's thumbnail.
- Tap Shared Users.
- Tap Add Shared User.
- Enter the user's email address, select their permissions, and then tap Confirm.
How do I enable Audio Recording
Caution: Audio recording and/ or use of listen-in audio without consent is illegal in certain jurisdictions. Lorex Corporation assumes no liability for use of its products that does not conform with local laws.
- Launch Lorex App.
- From the Home screen, tap your device.
- Tap above the camera's thumbnail.
- Tap icon to enable Audio Recording.
What is Home & Away™?
Lorex App can automatically use your location to manage your notifications when you are at home or away. The app will notify you when you are inside/outside of your set home perimeter.
To start using this feature, navigate to your mobile device settings and enable Location services for Lorex App.
For detailed setup instructions, visit Configuring Home & Away™.
How do I remove the Spotlight Camera from my account?
-
Launch the Lorex App.
-
From the Home screen, tap your device.
-
Tap
above the camera's thumbnail. -
Tap Remove Device.
How to permanently delete data of my camera?
Visit Formatting Device Storage, for more information.
Does my device support WPA2 or WPA3?
Your device supports Wi-Fi Protected Access 2 (WPA2) which is the industry standard security protocol for Wi-Fi networks. WPA2 offers security against unauthorized access and data interception and is supported by most Wi-Fi routers including those that support both WPA2 and WPA3. It employs Advanced Encryption Standard (AES), an encryption mechanism, which secures communication between your camera and Wi-Fi network to keep transmitted data confidential. For information on which devices support WPA2 and which devices support WPA3, please refer to “WPA2 and WPA3 Supportive Devices.”
What are the compatible SD cards?
Visit Compatible SD Cards and Storage Sizes for more information.
What devices are compatible with the camera?
Visit Product Compatibility Chart for more information.