FLIR Client 12 Software: Date and time on the DVR / NVR
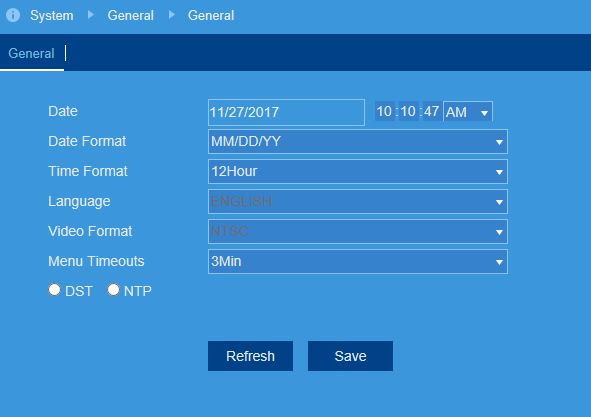
If you would like to correct or adjust your DVR / NVR system time, you can configure time settings by enabling / disabling the Network Time Protocol (NTP), adjust Daylight Savings Time (DST), or manually enter the time using the FLIR Client 12 software for PC / Mac.
Prerequisites:
- Ensure that you have downloaded and installed the FLIR Client 12 software on your PC / Mac. Click here for more information on locating software downloads.
- Ensure that you have logged in and added your DVR / NVR system to the FLIR Client 12 software. Click here for information on how to log in to the FLIR Client 12 software.
- Ensure your DVR / NVR is connected to a Router or switch on your network using the included Ethernet cable. A constant connection to the Internet is required to use NTP.
To enable / disable NTP:
-
Launch FLIR Client 12 software for PC / Mac.
-
Click Remote Setting in the top-right corner of the window.
-
Under System, click General to open the General tab.

-
Click the NTP checkbox to show NTP options.
-
Click the NTP switch to enable (
 ) or disable (
 ) NTP on the system.
 -
In the Server Address drop-down menu, select the desired NTP server.
RECOMMENDED: Use the default Lorex server: ntp.lorexddns.net.
-
In the Time Zone drop-down menu, select the correct region.
REMINDER: In most cases, the region should already be correct as it was configured during the DVR setup wizard. The selected region is also used by the system to intelligently determine the correct video format for that region, which may change automatically when changing the region. For example, changing the region from New York to London will also switch the video format of the system from NTSC to PAL.
-
Click Save to sync with the NTP server.
You can also enable / disable DST if required.
To enable / disable DST:
- Launch FLIR Client 12 software for PC / Mac.
- Under System, click General, then click the DST tab.
- In the DST drop-down, select Enable.
- In the Time Offset drop-down menu, select the time difference to use for DST.
- In the Daylight Saving Time drop-down menu, select a mode of entry for effective dates:
- Select Week to choose DST time changes that are relative to the day of the week (for example, on the second Sunday of March).
- Select Date to choose a specific date and time for each DST time change (for example, on March 13th at 2:00AM).
- Enter the desired Start Time and End Time for Daylight Savings Time. System time will move forward an hour at the start time, and back an hour at the end time.
- Click Save.
You can also manually enter a time in your DVR / NVR system using the FLIR Client 12 software for PC / Mac.
To manually configure the date and time:
- Launch FLIR Client 12 software for PC / Mac.
- Under System, click General to open the General tab.
- Click the field next to Date to select the correct date from the calendar.
- Enter the correct time and use the Time drop-down menu to select AM or PM if using 12-hour time format.
- In the Date Format drop-down menu, select how you want the date to appear.
- In the Time Format drop-down menu, select how you want the time to appear.
- Click Save.
Set up date and time using your LHA / LNK Series DVR / NVR.
Set up NTP on your LHB Series DVR.
Set up DST on your LHB Series DVR.
Set up the date and time on your LHB Series DVR